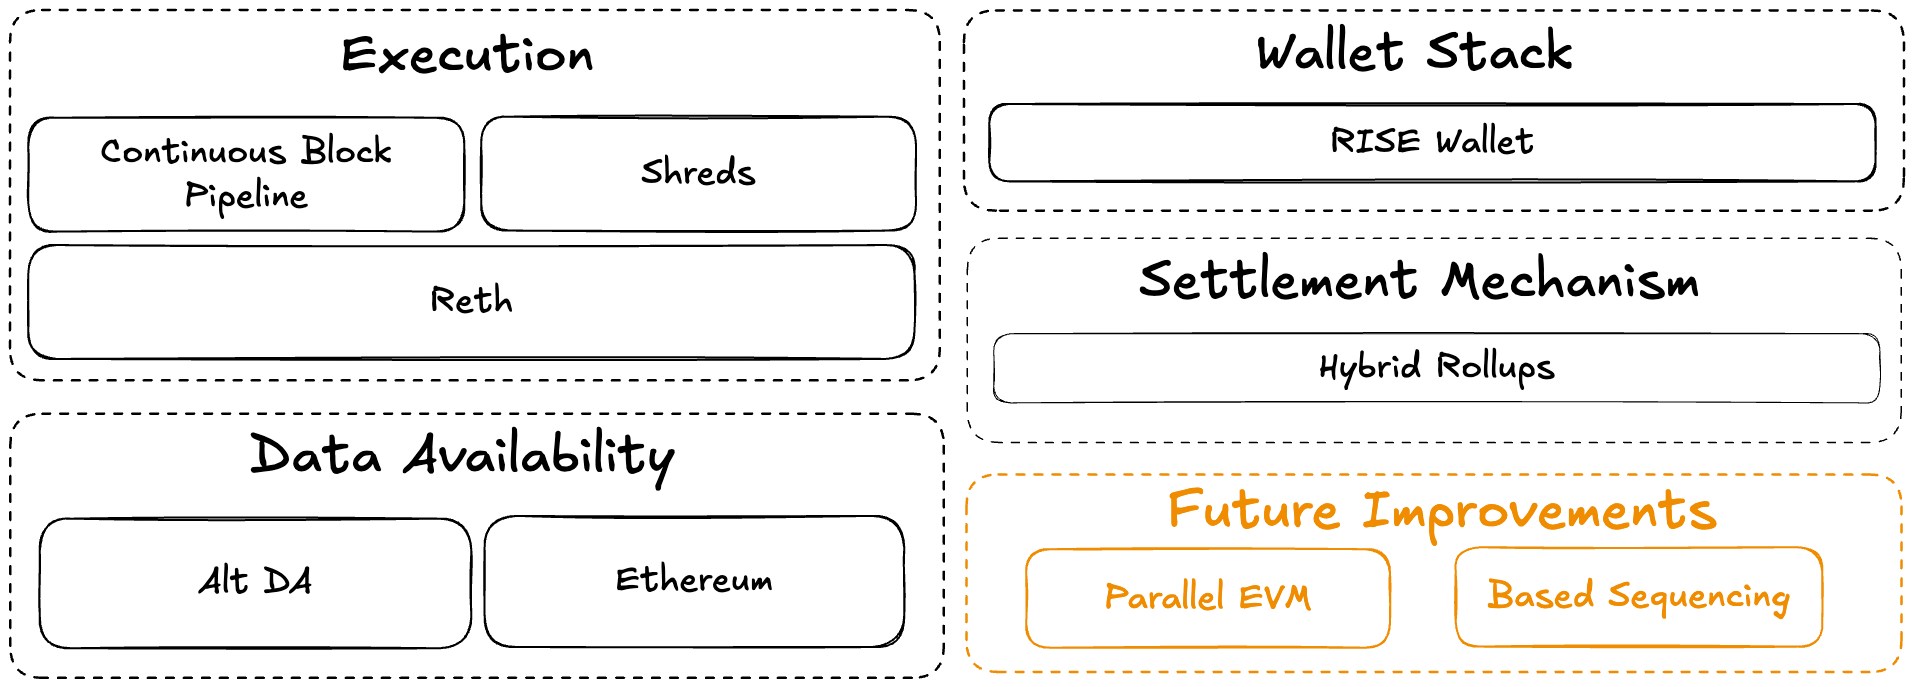
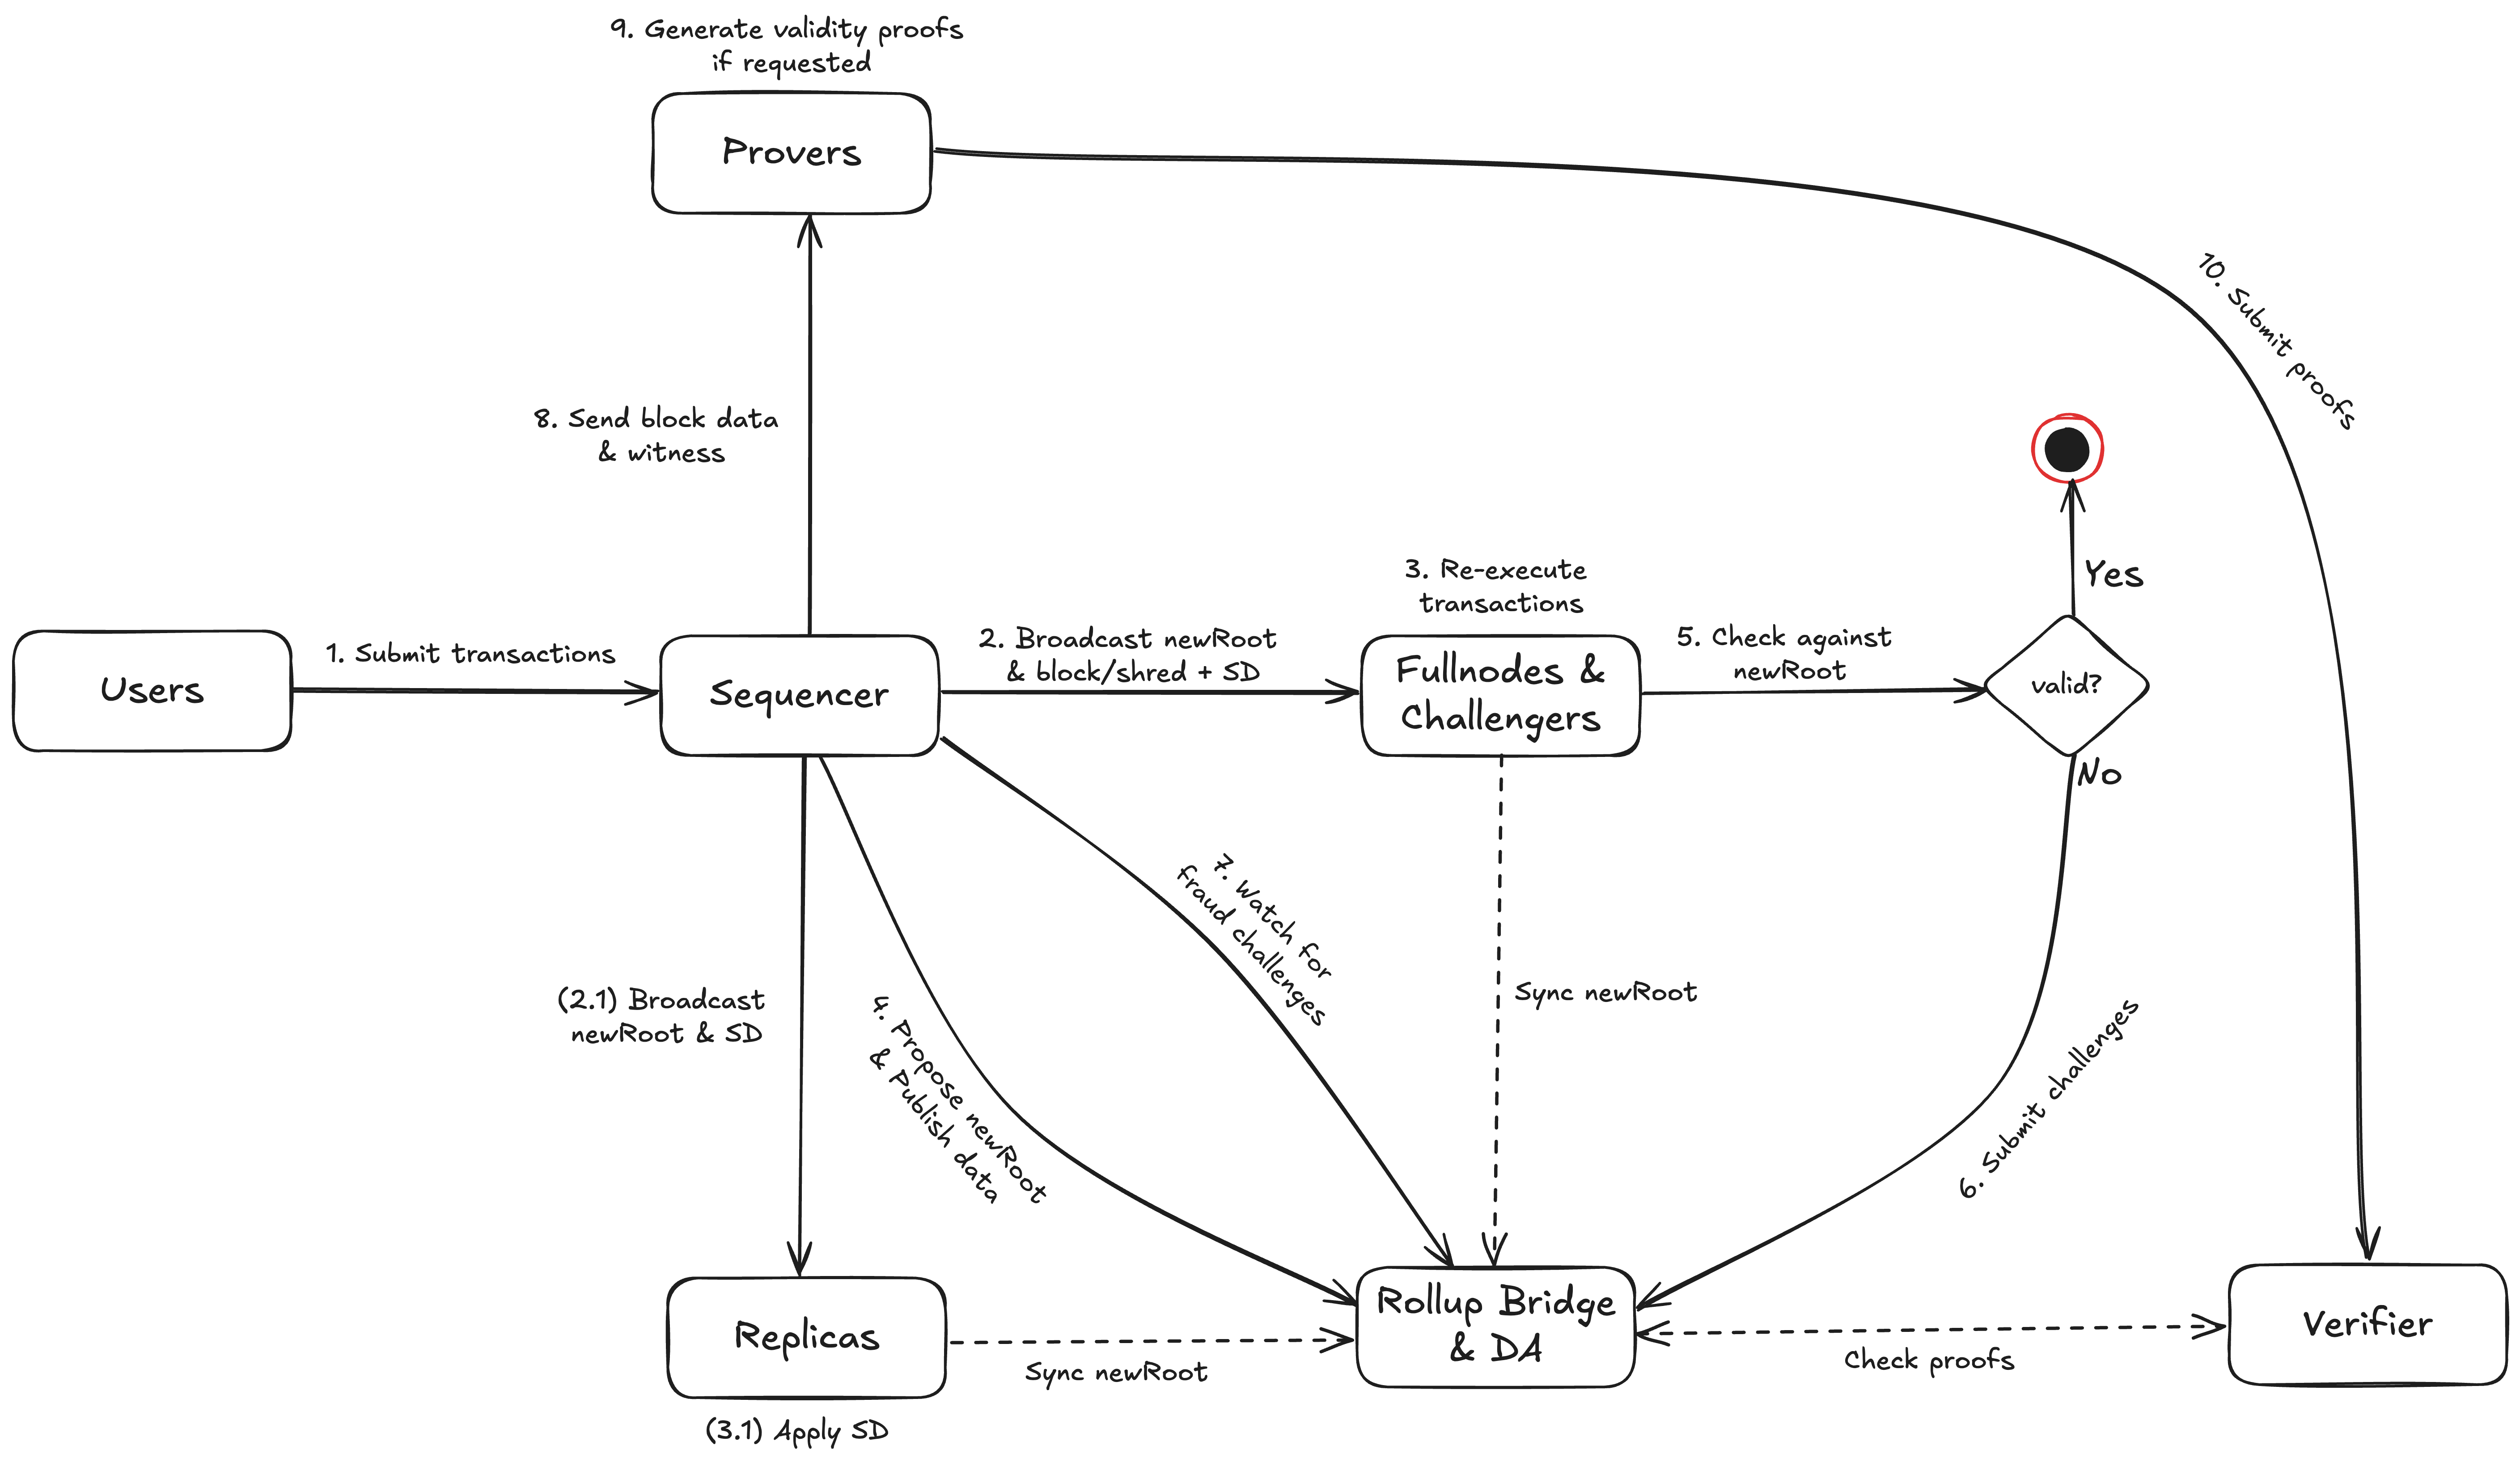
# RISE Documentation (/docs) import { Rocket, Globe, Wallet, ArrowLeftRight, Layers, Dices, Clock, GitFork } from 'lucide-react'; RISE is an Ethereum Layer 2 blockchain delivering near-instant transactions at unprecedented scale with sub-3ms latency and 100,000+ TPS capacity, all secured by Ethereum. Built for CEX-grade performance and full EVM composability, RISE enables builders, traders, and institutions to create and connect to global orderbooks alongside a thriving DeFi ecosystem with ease. ## Explore } title="Testnet Details" href="/docs/builders/testnet-details" description="RPC, Chain ID, and explorer info" /> } title="Builder Quickstart" href="/docs/builders/quick-start" description="Start building on RISE" /> } title="Parallel EVM" href="/docs/rise-evm/pevm" description="The ultimate parallel EVM execution engine" /> } title="RISE Wallet" href="/docs/rise-wallet" description="Gas sponsored, passkey compatible wallet integration" /> } title="RISEx" href="/docs/risex" description="RISE's native decentralized exchange" /> } title="Shreds" href="/docs/builders/shreds" description="RISE's mini-block like structures" /> } title="VRF" href="/docs/builders/vrf" description="Verifiable randomness on RISE" /> ## AI & LLM Access These docs are optimized for AI consumption. You can access the content in machine-readable formats: * **Full documentation**: [/llms-full.txt](/llms-full.txt) - All docs in a single text file * **Individual pages**: Append `.mdx` to any page URL (e.g., `/docs/get-started/rise.mdx`) to get the raw markdown This makes it easy to feed RISE documentation into AI assistants like ChatGPT, Claude, or other LLMs. ## Community Join our growing community to stay updated and engage with the RISE ecosystem: * [Discord](https://discord.gg/risechain) * [Twitter](https://x.com/risechain) * [GitHub](https://github.com/risechain) # Mermaid Test (/docs/test-mermaid) # Mermaid Diagram Test This page demonstrates Mermaid diagram rendering. ## State Diagram Here's your state diagram from the image: ## Flow Chart ## Sequence Diagram ## Gantt Chart # Components (/docs/test) ## Code Block ```js console.log('Hello World'); ``` ## Cards # Build on RISE (/docs/builders) import { Card, Cards } from 'fumadocs-ui/components/card'; import { Zap, Globe, Wallet, Layers, Dices } from 'lucide-react'; ## Why Build on RISE? RISE is built for builders who demand speed, precision, and zero compromise. RISE offers the fastest execution and lowest latency available today. It empowers developers to create high-performance applications, from CLOBs and actively managed strategies to DePIN and fully onchain gaming. If your users can't wait, build on RISE. * **Blazing Performance**: Over 100,000 transactions per second unlocks massive scalability for next-gen dApps * **Instant Confirmations**: 10ms end-to-end confirmations ensure your applications respond in realtime, even under heavy load * **Ultra-Low Fees**: Optimized for minimal gas costs, making high-frequency and high-volume activity sustainable * **Seamless Development**: Complete EVM compatibility means you can build fast, deploy instantly, and scale without friction ## Getting Started } title="Quick Start" href="/docs/builders/quick-start" description="Deploy your first contract" /> } title="Testnet Details" href="/docs/builders/testnet-details" description="Connect to RISE and configure your dev environment" /> ### Tools } title="RISE Wallet" href="/docs/rise-wallet" description="Gasless transactions with passkey authentication" /> } title="Shreds" href="/docs/builders/shreds" description="Realtime 3ms transaction confirmations" /> } title="Fast VRF" href="/docs/builders/vrf" description="Verifiable randomness for gaming and more" /> ## Connect with Builders Join the RISE Developer Community. Connect with other builders, share ideas, get technical support, and collaborate on projects. } title="Builder Discord" href="https://discord.com/invite/qhKnePXdSM" description="Connect with other builders and get support" /> # Internal Oracles (/docs/builders/internal-oracles) Internal price oracles deployed on RISE Testnet. ## Oracle Addresses | Ticker | Address | | ------ | -------------------------------------------------------------------------------------------------------------------------------------------------------------------------------------------------------------------------------------------------------------- | | ETH | [`0x7114E2537851e727678DE5a96C8eE5d0Ca14f03D`](https://explorer.testnet.riselabs.xyz/address/0x7114E2537851e727678DE5a96C8eE5d0Ca14f03D) | | USDC | [`0x50524C5bDa18aE25C600a8b81449B9CeAeB50471`](https://explorer.testnet.riselabs.xyz/address/0x50524C5bDa18aE25C600a8b81449B9CeAeB50471) | | USDT | [`0x9190159b1bb78482Dca6EBaDf03ab744de0c0197`](https://explorer.testnet.riselabs.xyz/address/0x9190159b1bb78482Dca6EBaDf03ab744de0c0197) | | BTC | [`0xadDAEd879D549E5DBfaf3e35470C20D8C50fDed0`](https://explorer.testnet.riselabs.xyz/address/0xadDAEd879D549E5DBfaf3e35470C20D8C50fDed0) | ## Usage The oracle price for each asset can be fetched by calling the `latestAnswer` function on the respective oracle address. ```solidity interface IPriceOracle { function latestAnswer() external view returns (int256); } // Example: Get ETH price IPriceOracle ethOracle = IPriceOracle(0x7114E2537851e727678DE5a96C8eE5d0Ca14f03D); int256 ethPrice = ethOracle.latestAnswer(); ``` # Contract Addresses (/docs/builders/mainnet-contract-addresses) This page provides a reference for all contract addresses on RISE Mainnet. ## Sepolia Superchain Contracts These contracts are deployed on Sepolia and are shared across the Superchain. | Contract Name | Description | Address | | ---------------- | ------------------------ | ----------------------------------------------------------------------------------------------------------------------------------------------------------------------------------------------------------------------------------------------------- | | ProtocolVersions | Tracks protocol versions | [`0xacedd47c946c435154c0c4826e89f7a84412f6e3`](https://sepolia.etherscan.io/address/0xacedd47c946c435154c0c4826e89f7a84412f6e3) | | SuperchainConfig | Superchain configuration | [`0xb786207a1edfc724c1d507335f403f53fd9e79d6`](https://sepolia.etherscan.io/address/0xb786207a1edfc724c1d507335f403f53fd9e79d6) | ## L1 (Ethereum) System Contracts These contracts are deployed on Ethereum mainnet and handle the communication between L1 and RISE Mainnet. | Contract Name | Description | Address | | ------------------------------------- | --------------------------------------------------- | --------------------------------------------------------------------------------------------------------------------------------------------------------------------------------------------------------------------------------------------- | | AnchorStateRegistryProxy | Stores state roots of the L2 chain | [`0x551A672d703966D83C3EC3ea0e844f43c3373c91`](https://etherscan.io/address/0x551A672d703966D83C3EC3ea0e844f43c3373c91) | | Access Manager (OP Succinct) | Access control for OP Succinct | [`0xF90a72FC295DBEf2fD27629Fda4B98Fd3E842d17`](https://etherscan.io/address/0xF90a72FC295DBEf2fD27629Fda4B98Fd3E842d17) | | BatchSubmitter | Submits batches of transactions | [`0x499a15427F46685A362Dab7886A491FEfDf68A41`](https://etherscan.io/address/0x499a15427F46685A362Dab7886A491FEfDf68A41) | | Challenger | Handles challenges to invalid state transitions | [`0xaC20430db63b066560FC41d383102B4F2e3bDbcF`](https://etherscan.io/address/0xaC20430db63b066560FC41d383102B4F2e3bDbcF) | | DisputeGameFactoryProxy | Creates dispute games for challenging invalid state | [`0x6A4139810986CF13408330e14C4ac9Daf0511aA3`](https://etherscan.io/address/0x6A4139810986CF13408330e14C4ac9Daf0511aA3) | | Guardian | Guardian multisig | [`0x03B85FAa108C10F6EFfec1d91954DE99dA32FB46`](https://etherscan.io/address/0x03B85FAa108C10F6EFfec1d91954DE99dA32FB46) | | L1CrossDomainMessengerProxy | Handles message passing from L1 to L2 | [`0xC0de1d9B1cD2Caf782355C66a6A8e5948e63c9c6`](https://etherscan.io/address/0xC0de1d9B1cD2Caf782355C66a6A8e5948e63c9c6) | | L1ERC721BridgeProxy | Bridge for NFTs between L1 and L2 | [`0x01A6274B9607ac024e8c191E491d0b25ad14c217`](https://etherscan.io/address/0x01A6274B9607ac024e8c191E491d0b25ad14c217) | | L1StandardBridgeProxy | Bridge for ETH and ERC20 tokens | [`0x553257678Dd11a6668a92934AAB005e420c6535A`](https://etherscan.io/address/0x553257678Dd11a6668a92934AAB005e420c6535A) | | OptimismMintableERC20FactoryProxy | Factory for creating bridged tokens on L2 | [`0xE2B9526277DcD2B27222Df760D6427213AC9dbb8`](https://etherscan.io/address/0xE2B9526277DcD2B27222Df760D6427213AC9dbb8) | | OptimismPortalProxy | Main entry point for L1 to L2 transactions | [`0xad92Fa18EB74E46Db844240623124BF46589db4C`](https://etherscan.io/address/0xad92Fa18EB74E46Db844240623124BF46589db4C) | | Proposer | Proposes new L2 state roots | [`0xec112bf7aCf4782E1555e3680F5ca955C9156B82`](https://etherscan.io/address/0xec112bf7aCf4782E1555e3680F5ca955C9156B82) | | ProxyAdmin | Admin for proxy contracts | [`0xCf32d8c4Be30cA330c1150916A71A651bADd70d5`](https://etherscan.io/address/0xCf32d8c4Be30cA330c1150916A71A651bADd70d5) | | ProxyAdminOwner | Owner of ProxyAdmin | [`0x9196464e3F828A50233C20732fa6898F4317002c`](https://etherscan.io/address/0x9196464e3F828A50233C20732fa6898F4317002c) | | PermissionedDisputeGame (OP Succinct) | Permissioned dispute game | [`0xA9aF0d2efC17ce247c6821D94910cF8f27cC2587`](https://etherscan.io/address/0xA9aF0d2efC17ce247c6821D94910cF8f27cC2587) | | SystemConfigOwner | Owner of SystemConfig | [`0x03B85FAa108C10F6EFfec1d91954DE99dA32FB46`](https://etherscan.io/address/0x03B85FAa108C10F6EFfec1d91954DE99dA32FB46) | | SystemConfigProxy | Configuration for the RISE system | [`0xd3caf2a473dbb5bc2e8fb7f328e01ab9b726a24f`](https://etherscan.io/address/0xd3caf2a473dbb5bc2e8fb7f328e01ab9b726a24f) | | SuperchainProxyAdmin | Proxy admin for Superchain | [`0xB786207A1EdfC724c1d507335f403F53fd9E79d6`](https://etherscan.io/address/0xB786207A1EdfC724c1d507335f403F53fd9E79d6) | | UnsafeBlockSigner | Signs blocks in development mode | [`0x19B485cbe0B8c1AeB6C0C459611C7A8bCf7b137a`](https://etherscan.io/address/0x19B485cbe0B8c1AeB6C0C459611C7A8bCf7b137a) | ## L2 (RISE Mainnet) System Contracts These are the predeploy contracts on RISE Mainnet. | Contract Name | Description | Address | | ----------------------------- | ------------------------------------- | ------------------------------------------------------------------------------------------------------------------------------------------------------------------------------------------------------------------------------------------------------- | | L2ToL1MessagePasser | Initiates withdrawals to L1 | [`0x4200000000000000000000000000000000000016`](https://explorer.risechain.com/address/0x4200000000000000000000000000000000000016) | | L2CrossDomainMessenger | Handles message passing from L2 to L1 | [`0x4200000000000000000000000000000000000007`](https://explorer.risechain.com/address/0x4200000000000000000000000000000000000007) | | L2StandardBridge | L2 side of the token bridge | [`0x4200000000000000000000000000000000000010`](https://explorer.risechain.com/address/0x4200000000000000000000000000000000000010) | | L2ERC721Bridge | L2 side of the NFT bridge | [`0x4200000000000000000000000000000000000014`](https://explorer.risechain.com/address/0x4200000000000000000000000000000000000014) | | SequencerFeeVault | Collects sequencer fees | [`0x4200000000000000000000000000000000000011`](https://explorer.risechain.com/address/0x4200000000000000000000000000000000000011) | | OptimismMintableERC20Factory | Creates standard bridged tokens | [`0x4200000000000000000000000000000000000012`](https://explorer.risechain.com/address/0x4200000000000000000000000000000000000012) | | OptimismMintableERC721Factory | Creates bridged NFTs | [`0x4200000000000000000000000000000000000017`](https://explorer.risechain.com/address/0x4200000000000000000000000000000000000017) | | L1Block | Provides L1 block information | [`0x4200000000000000000000000000000000000015`](https://explorer.risechain.com/address/0x4200000000000000000000000000000000000015) | | GasPriceOracle | Provides gas price information | [`0x420000000000000000000000000000000000000F`](https://explorer.risechain.com/address/0x420000000000000000000000000000000000000F) | | ProxyAdmin | Admin for proxy contracts | [`0x4200000000000000000000000000000000000018`](https://explorer.risechain.com/address/0x4200000000000000000000000000000000000018) | | BaseFeeVault | Collects base fee | [`0x4200000000000000000000000000000000000019`](https://explorer.risechain.com/address/0x4200000000000000000000000000000000000019) | | L1FeeVault | Collects L1 data fees | [`0x420000000000000000000000000000000000001A`](https://explorer.risechain.com/address/0x420000000000000000000000000000000000001A) | | GovernanceToken | RISE governance token | [`0x4200000000000000000000000000000000000042`](https://explorer.risechain.com/address/0x4200000000000000000000000000000000000042) | | SchemaRegistry | EAS schema registry | [`0x4200000000000000000000000000000000000020`](https://explorer.risechain.com/address/0x4200000000000000000000000000000000000020) | | EAS | Ethereum Attestation Service | [`0x4200000000000000000000000000000000000021`](https://explorer.risechain.com/address/0x4200000000000000000000000000000000000021) | ## Pre-installed Contracts These contracts are pre-deployed and available from genesis. | Contract Name | Description | Address | | ---------------------------- | ----------------------------------------------------- | ------------------------------------------------------------------------------------------------------------------------------------------------------------------------------------------------------------------------------------------------------- | | MultiCall3 | Allows bundling multiple transactions | [`0xcA11bde05977b3631167028862bE2a173976CA11`](https://explorer.risechain.com/address/0xcA11bde05977b3631167028862bE2a173976CA11) | | Create2Deployer | Helper for CREATE2 opcode usage | [`0x13b0D85CcB8bf860b6b79AF3029fCA081AE9beF2`](https://explorer.risechain.com/address/0x13b0D85CcB8bf860b6b79AF3029fCA081AE9beF2) | | GnosisSafe (v1.3.0) | Multisignature wallet | [`0x69f4D1788e39c87893C980c06EdF4b7f686e2938`](https://explorer.risechain.com/address/0x69f4D1788e39c87893C980c06EdF4b7f686e2938) | | GnosisSafeL2 (v1.3.0) | Events-based implementation of GnosisSafe | [`0xfb1bffC9d739B8D520DaF37dF666da4C687191EA`](https://explorer.risechain.com/address/0xfb1bffC9d739B8D520DaF37dF666da4C687191EA) | | MultiSendCallOnly (v1.3.0) | Batches multiple transactions (calls only) | [`0xA1dabEF33b3B82c7814B6D82A79e50F4AC44102B`](https://explorer.risechain.com/address/0xA1dabEF33b3B82c7814B6D82A79e50F4AC44102B) | | SafeSingletonFactory | Factory for Safe wallets | [`0x914d7Fec6aaC8cd542e72Bca78B30650d45643d7`](https://explorer.risechain.com/address/0x914d7Fec6aaC8cd542e72Bca78B30650d45643d7) | | DeterministicDeploymentProxy | Integrated with Foundry for deterministic deployments | [`0x4e59b44847b379578588920cA78FbF26c0B4956C`](https://explorer.risechain.com/address/0x4e59b44847b379578588920cA78FbF26c0B4956C) | | MultiSend (v1.3.0) | Batches multiple transactions | [`0x998739BFdAAdde7C933B942a68053933098f9EDa`](https://explorer.risechain.com/address/0x998739BFdAAdde7C933B942a68053933098f9EDa) | | Permit2 | Next-generation token approval system | [`0x000000000022D473030F116dDEE9F6B43aC78BA3`](https://explorer.risechain.com/address/0x000000000022D473030F116dDEE9F6B43aC78BA3) | | SenderCreator (v0.6.0) | Helper for EntryPoint | [`0x7fc98430eAEdbb6070B35B39D798725049088348`](https://explorer.risechain.com/address/0x7fc98430eAEdbb6070B35B39D798725049088348) | | EntryPoint (v0.6.0) | ERC-4337 entry point for account abstraction | [`0x5FF137D4b0FDCD49DcA30c7CF57E578a026d2789`](https://explorer.risechain.com/address/0x5FF137D4b0FDCD49DcA30c7CF57E578a026d2789) | | CreateX | Universal deployer | [`0xba5Ed099633D3B313e4D5F7bdc1305d3c28ba5Ed`](https://explorer.risechain.com/address/0xba5Ed099633D3B313e4D5F7bdc1305d3c28ba5Ed) | | BeaconBlockRoots | Beacon block roots precompile | [`0x000F3df6D732807Ef1319fB7B8bB8522d0Beac02`](https://explorer.risechain.com/address/0x000F3df6D732807Ef1319fB7B8bB8522d0Beac02) | | BeaconBlockRootsSender | Sends beacon block roots | [`0x0B799C86a49DEeb90402691F1041aa3AF2d3C875`](https://explorer.risechain.com/address/0x0B799C86a49DEeb90402691F1041aa3AF2d3C875) | | HistoryStorage | Stores historical data | [`0x0000F90827F1C53a10cb7A02335B175320002935`](https://explorer.risechain.com/address/0x0000F90827F1C53a10cb7A02335B175320002935) | | HistoryStorageSender | Sends historical data | [`0x3462413Af4609098e1E27A490f554f260213D685`](https://explorer.risechain.com/address/0x3462413Af4609098e1E27A490f554f260213D685) | | GnosisSafeProxyFactory | Factory for creating Safe proxies | [`0xa6B71E26C5e0845f74c812102Ca7114b6a896AB2`](https://explorer.risechain.com/address/0xa6B71E26C5e0845f74c812102Ca7114b6a896AB2) | | FallbackHandler | Fallback handler for Safe wallets | [`0xf48f2B2d2a534e402487b3ee7C18c33Aec0Fe5e4`](https://explorer.risechain.com/address/0xf48f2B2d2a534e402487b3ee7C18c33Aec0Fe5e4) | | WETH | Wrapped ETH | [`0x4200000000000000000000000000000000000006`](https://explorer.risechain.com/address/0x4200000000000000000000000000000000000006) | ## RISEx Exchange Contracts These are the core contracts that power the RISEx exchange on RISE Mainnet. | Contract Name | Description | Address | | -------------------- | --------------------------------------------------- | ------------------------------------------------------------------------------------------------------------------------------------------------------------------------------------------------------------------------------------------------------- | | AccessManager | Role and permission management for the exchange | [`0x1BEe39C01907E3018b7ec2021Cf73F70541b36cC`](https://explorer.risechain.com/address/0x1BEe39C01907E3018b7ec2021Cf73F70541b36cC) | | AccountRegistry | Registry of trading accounts and authorized signers | [`0x1238991Cac4E65902C08213e79909A9c813Eebc3`](https://explorer.risechain.com/address/0x1238991Cac4E65902C08213e79909A9c813Eebc3) | | RISExAuthorization | Authorization checks for protected actions | [`0x0D919DAA3f12AE715744Eb648c00066c5DBd66f0`](https://explorer.risechain.com/address/0x0D919DAA3f12AE715744Eb648c00066c5DBd66f0) | | RISExUniversalRouter | Entry point for routing exchange actions | [`0xaaDDE0CeA454F2bcB26F46ED54C5709B7Bb34a7E`](https://explorer.risechain.com/address/0xaaDDE0CeA454F2bcB26F46ED54C5709B7Bb34a7E) | | OrdersManager | Manages on-chain orders and lifecycle | [`0xE03C1D5081eb2d0E6bFd62A949C5b12eFa44F2cD`](https://explorer.risechain.com/address/0xE03C1D5081eb2d0E6bFd62A949C5b12eFa44F2cD) | | PerpsManager | Manages perpetual futures positions | [`0x53f10fAcFC8965750494E6965F5d6dA39B41d852`](https://explorer.risechain.com/address/0x53f10fAcFC8965750494E6965F5d6dA39B41d852) | | SpotManager | Manages spot markets | [`0x1F92be734731e28F52C20AB0BAA73Db7cBf521F8`](https://explorer.risechain.com/address/0x1F92be734731e28F52C20AB0BAA73Db7cBf521F8) | | CollateralManager | Tracks collateral balances and margin | [`0x2C03C7d7e2974C6599b6B108879109281ef3F818`](https://explorer.risechain.com/address/0x2C03C7d7e2974C6599b6B108879109281ef3F818) | | TokenManager | Manages supported tokens and listings | [`0x07DCE641354bBbc93C785f86971ad9f78f676Bd5`](https://explorer.risechain.com/address/0x07DCE641354bBbc93C785f86971ad9f78f676Bd5) | | FeeManager | Trading fee configuration and accounting | [`0x11541dc387b9C307043ea732127DF92b80bab52b`](https://explorer.risechain.com/address/0x11541dc387b9C307043ea732127DF92b80bab52b) | | FundingRate | Funding rate computation for perps | [`0x069eDF2C2A3c93b54640Ae142B9f5375fe4A207a`](https://explorer.risechain.com/address/0x069eDF2C2A3c93b54640Ae142B9f5375fe4A207a) | | RISExOracle | Aggregated price oracle for the exchange | [`0x8fC4D0Cf74cdF595254cB763d4C05D38Df0e9503`](https://explorer.risechain.com/address/0x8fC4D0Cf74cdF595254cB763d4C05D38Df0e9503) | | RISExStork | Stork price feed adapter | [`0x76A559C716c5B93b9d743e08D9E9f23f96a4f975`](https://explorer.risechain.com/address/0x76A559C716c5B93b9d743e08D9E9f23f96a4f975) | | OperatorHub | Hub for operator/keeper actions | [`0xf665AbA90b6ac7515D50b12FCB4f350136726734`](https://explorer.risechain.com/address/0xf665AbA90b6ac7515D50b12FCB4f350136726734) | ## Usage Examples ### Bridging ETH from L1 to L2 ```solidity // On Ethereum (L1) IL1StandardBridge bridge = IL1StandardBridge(0x553257678Dd11a6668a92934AAB005e420c6535A); // Deposit ETH to L2 bridge.depositETH{value: amount}( minGasLimit, emptyBytes // No additional data ); ``` ### Sending a Message from L2 to L1 ```solidity // On RISE Mainnet (L2) IL2CrossDomainMessenger messenger = IL2CrossDomainMessenger(0x4200000000000000000000000000000000000007); // Send message to L1 messenger.sendMessage( targetL1Address, abi.encodeWithSignature("someFunction(uint256)", value), minGasLimit ); ``` # Network Details (/docs/builders/mainnet-details) Use the information below to connect and submit transactions to RISE. | Property | Mainnet | | --------------- | ------------------------------------------------------------------ | | Network Name | RISE Mainnet | | Chain ID | `4153` | | RPC URL | `https://rpc.risechain.com/` | | WSS URL | `wss://rpc.risechain.com/ws` | | Explorer | [https://explorer.risechain.com/](https://explorer.risechain.com/) | | Currency Symbol | ETH | ## Using with Development Tools ### Hardhat Configuration ```javascript // hardhat.config.js module.exports = { networks: { riseMainnet: { url: "https://rpc.risechain.com/", chainId: 4153, accounts: process.env.PRIVATE_KEY !== undefined ? [process.env.PRIVATE_KEY] : [] } } }; ``` ### Foundry Configuration ```toml # foundry.toml [profile.default] src = "src" out = "out" libs = ["lib"] [rpc_endpoints] rise_mainnet = "https://rpc.risechain.com/" [blockscout] rise_mainnet = { key = "", url = "https://explorer.risechain.com/api" } ``` ## Gas & Transaction Details | Property | Value | | ----------------------------- | ------------------ | | Max Gas Limit per Transaction | 16M | | Nonce Order | Enforced on-chain | | Data Storage Fees | Same as L1 | | Blocks to Finality | 259,200 (\~3 days) | # Internal Oracles (/docs/builders/mainnet-internal-oracles) ## Coming Soon Internal oracle addresses for RISE Mainnet will be available soon. Oracle information for RISE Mainnet is currently being finalized and will be published here once the network launches. For testing purposes, please refer to the [Testnet Internal Oracles](/docs/builders/internal-oracles) page. # LayerZero Integration (/docs/builders/mainnet-layerzero) ## Overview RISE Mainnet is integrated with LayerZero V1 and V2 for cross-chain messaging. This page provides the deployment addresses and configuration details for both versions. ## Chain Details | Parameter | Value | | -------------------------- | ----------------- | | Chain ID | `4153` | | LayerZero Endpoint ID (V1) | `401` | | LayerZero Endpoint ID (V2) | `30401` | | Chain Key | `rise-mainnet` | | Native Currency | ETH | | Block Time | 900ms (0.9s) | | Chain Type | EVM (OP Stack L2) | | Status | ACTIVE | ## LayerZero V1 Deployments ### Core Contracts | Contract | Address | | ------------------- | -------------------------------------------- | | Endpoint | `0xb6319cC6c8c27A8F5dAF0dD3DF91EA35C4720dd7` | | Ultra Light Node V2 | `0x38dE71124f7a447a01D67945a51eDcE9FF491251` | | Treasury V2 | `0x980205D352F198748B626f6f7C38A8a5663Ec981` | | Relayer V2 | `0xA658742d33ebd2ce2F0bdFf73515Aa797Fd161D9` | ### Validators | Contract | Address | | ---------------- | -------------------------------------------- | | FP Validator | `0xC1b15d3B262bEeC0e3565C11C9e0F6134BdaCB36` | | MPT Validator 01 | `0x2D61DCDD36F10b22176E0433B86F74567d529aAa` | ### ULN Contracts | Contract | Address | | --------------- | -------------------------------------------- | | Send ULN 301 | `0x37aaaf95887624a363effB7762D489E3C05c2a02` | | Receive ULN 301 | `0x15e51701F245F6D5bd0FEE87bCAf55B0841451B3` | | Nonce Contract | `0x66A71Dcef29A0fFBDBE3c6a460a3B5BC225Cd675` | ## LayerZero V2 Deployments ### Core Contracts | Contract | Address | | ---------------- | -------------------------------------------- | | Endpoint V2 | `0x6F475642a6e85809B1c36Fa62763669b1b48DD5B` | | Endpoint V2 View | `0xAaB5A48CFC03Efa9cC34A2C1aAcCCB84b4b770e4` | | Executor | `0x4208D6E27538189bB48E603D6123A94b8Abe0A0b` | | LZ Executor | `0x41Bdb4aa4A63a5b2Efc531858d3118392B1A1C3d` | ### ULN Contracts | Contract | Address | | --------------- | -------------------------------------------- | | Send ULN 302 | `0xC39161c743D0307EB9BCc9FEF03eeb9Dc4802de7` | | Receive ULN 302 | `0xe1844c5D63a9543023008D332Bd3d2e6f1FE1043` | ### Other Contracts | Contract | Address | | --------------------- | -------------------------------------------- | | Blocked Message Lib | `0xc1ce56b2099ca68720592583c7984cab4b6d7e7a` | | Dead DVN (Deprecated) | `0x6788f52439ACA6BFF597d3eeC2DC9a44B8FEE842` | ## Decentralized Verification Networks (DVNs) ### Active DVNs | DVN | Address | Version | | -------------- | -------------------------------------------- | ------- | | LayerZero Labs | `0x282b3386571f7f794450d5789911a9804fa346b4` | V2 | | Nethermind | `0x8d77d35604a9f37f488e41d1d916b2a0088f82dd` | V2 | | Horizen | `0x276e6b1138d2d49c0cda86658765d12ef84550c1` | V2 | ### Deprecated DVNs | DVN | Address | Version | Status | | --------- | -------------------------------------------- | ------- | ---------- | | LZDeadDVN | `0x6788f52439aca6bff597d3eec2dc9a44b8fee842` | V2 | Deprecated | ## Usage ### LayerZero V1 ```solidity interface ILayerZeroEndpoint { function send( uint16 _dstChainId, bytes calldata _destination, bytes calldata _payload, address payable _refundAddress, address _zroPaymentAddress, bytes calldata _adapterParams ) external payable; } // Example ILayerZeroEndpoint endpoint = ILayerZeroEndpoint(0xb6319cC6c8c27A8F5dAF0dD3DF91EA35C4720dd7); ``` ### LayerZero V2 ```solidity interface ILayerZeroEndpointV2 { function send( MessagingParams calldata _params, address _refundAddress ) external payable returns (MessagingReceipt memory); } // Example ILayerZeroEndpointV2 endpoint = ILayerZeroEndpointV2(0x6F475642a6e85809B1c36Fa62763669b1b48DD5B); ``` ## Resources * [LayerZero Documentation](https://docs.layerzero.network/) * [LayerZero V2 Docs](https://docs.layerzero.network/v2) * [LayerZero Scan](https://layerzeroscan.com/) # Token Addresses (/docs/builders/mainnet-tokens) Native and wrapped token addresses on RISE Mainnet (Chain ID: 4153). ## Token Addresses | Name | Symbol | Decimals | Address | | ----------- | ------ | -------- | ------------------------------------------------------------------------------------------------------------------------------------------------------------------------------------------------------------------------------------------------------- | | Wrapped ETH | WETH | 18 | [`0x4200000000000000000000000000000000000006`](https://explorer.risechain.com/address/0x4200000000000000000000000000000000000006) | ## WETH Features The WETH token at `0x4200000000000000000000000000000000000006` is a predeploy contract with the following functionality: * Wrap ETH by sending ETH to the contract or calling `deposit()` * Unwrap WETH by calling `withdraw(uint)` * Standard ERC20 interface for wrapped ETH ## Example Commands ```bash # Check WETH balance cast call 0x4200000000000000000000000000000000000006 "balanceOf(address)(uint256)" --rpc-url https://rpc.risechain.com/ # Transfer WETH cast send 0x4200000000000000000000000000000000000006 "transfer(address,uint256)(bool)" --private-key $PRIVATE_KEY --rpc-url https://rpc.risechain.com/ # Wrap ETH cast send 0x4200000000000000000000000000000000000006 "deposit()" --value --private-key $PRIVATE_KEY --rpc-url https://rpc.risechain.com/ # Unwrap WETH cast send 0x4200000000000000000000000000000000000006 "withdraw(uint256)" --private-key $PRIVATE_KEY --rpc-url https://rpc.risechain.com/ ``` # Quick Start (/docs/builders/quick-start) RISE is fully EVM compatible. You can use your existing Ethereum development tools and workflows with minimal configuration changes. ## Smart Contracts Learn how to create a new smart contract project, compile your contracts, and deploy them to RISE. } title="Remix IDE" href="/docs/builders/smart-contracts/remix" description="Deploy contracts on RISE using Remix IDE" /> } title="Hardhat" href="/docs/builders/smart-contracts/hardhat" description="Set up Hardhat for smart contract development on RISE" /> } title="Foundry" href="/docs/builders/smart-contracts/foundry" description="Set up Foundry for smart contract development on RISE" /> ## Applications Learn how to build frontend applications to interact with smart contracts on RISE. } title="Viem" href="/docs/builders/frontend/viem" description="Build apps using Viem" /> } title="Ethers.js" href="/docs/builders/frontend/ethers" description="Build apps using Ethers.js" /> # RISE Wallet Stack (/docs/builders/rise-wallet) import { Card, Cards } from 'fumadocs-ui/components/card'; import { Tab, Tabs } from 'fumadocs-ui/components/tabs'; import { Zap, Key, Code, BookOpen } from 'lucide-react'; RISE Wallet is a chain-native wallet layer that provides gasless transactions, passkey authentication, and session keys for your dApp. Built on audited smart accounts from Porto and integrated directly into RISE's infrastructure. ## Key Features * **Gasless by Default**: Users don't need ETH to start using your app * **Passkey Authentication**: No seed phrases - just biometrics (FaceID, TouchID) * **Session Keys**: Enable high-frequency interactions without popups * **3ms Confirmations**: Leverages RISE's shred architecture for instant feedback ## Quick Integration ```bash npm i rise-wallet wagmi viem ``` ```bash pnpm add rise-wallet wagmi viem ``` ```bash yarn add rise-wallet wagmi viem ``` ```bash bun add rise-wallet wagmi viem ``` ```tsx import { Chains, RiseWallet } from "rise-wallet"; import { riseWallet } from "rise-wallet/wagmi"; export const rwConnector = riseWallet(RiseWallet.defaultConfig); ``` ## Learn More } title="Overview" href="/docs/rise-wallet" description="Introduction to RISE Wallet features and benefits" /> } title="Getting Started" href="/docs/rise-wallet/minting" description="Interactive tutorials for common use cases" /> } title="Session Keys" href="/docs/rise-wallet/session-keys" description="Build popup-free experiences" /> } title="Integration Guides" href="/docs/rise-wallet/wagmi" description="Framework-specific documentation" /> # Contract Addresses (/docs/builders/testnet-contract-addresses) This page provides a reference for all contract addresses on RISE Testnet. ## Pre-deployed Contracts These contracts are pre-deployed and available from genesis. | Contract Name | Description | Address | | ---------------------------- | ----------------------------------------------------- | -------------------------------------------------------------------------------------------------------------------------------------------------------------------------------------------------------------------------------------------------------------- | | Create2Deployer | Helper for CREATE2 opcode usage | [`0x13b0D85CcB8bf860b6b79AF3029fCA081AE9beF2`](https://explorer.testnet.riselabs.xyz/address/0x13b0D85CcB8bf860b6b79AF3029fCA081AE9beF2) | | DeterministicDeploymentProxy | Integrated with Foundry for deterministic deployments | [`0x4e59b44847b379578588920ca78fbf26c0b4956c`](https://explorer.testnet.riselabs.xyz/address/0x4e59b44847b379578588920ca78fbf26c0b4956c) | | MultiCall3 | Allows bundling multiple transactions | [`0xcA11bde05977b3631167028862bE2a173976CA11`](https://explorer.testnet.riselabs.xyz/address/0xcA11bde05977b3631167028862bE2a173976CA11) | | GnosisSafe (v1.3.0) | Multisignature wallet | [`0x69f4D1788e39c87893C980c06EdF4b7f686e2938`](https://explorer.testnet.riselabs.xyz/address/0x69f4D1788e39c87893C980c06EdF4b7f686e2938) | | GnosisSafeL2 (v1.3.0) | Events-based implementation of GnosisSafe | [`0xfb1bffC9d739B8D520DaF37dF666da4C687191EA`](https://explorer.testnet.riselabs.xyz/address/0xfb1bffC9d739B8D520DaF37dF666da4C687191EA) | | MultiSendCallOnly (v1.3.0) | Batches multiple transactions (calls only) | [`0xA1dabEF33b3B82c7814B6D82A79e50F4AC44102B`](https://explorer.testnet.riselabs.xyz/address/0xA1dabEF33b3B82c7814B6D82A79e50F4AC44102B) | | MultiSend (v1.3.0) | Batches multiple transactions | [`0x998739BFdAAdde7C933B942a68053933098f9EDa`](https://explorer.testnet.riselabs.xyz/address/0x998739BFdAAdde7C933B942a68053933098f9EDa) | | Permit2 | Next-generation token approval system | [`0x000000000022D473030F116dDEE9F6B43aC78BA3`](https://explorer.testnet.riselabs.xyz/address/0x000000000022D473030F116dDEE9F6B43aC78BA3) | | EntryPoint (v0.7.0) | ERC-4337 entry point for account abstraction | [`0x0000000071727De22E5E9d8BAf0edAc6f37da032`](https://explorer.testnet.riselabs.xyz/address/0x0000000071727De22E5E9d8BAf0edAc6f37da032) | | SenderCreator (v0.7.0) | Helper for EntryPoint | [`0xEFC2c1444eBCC4Db75e7613d20C6a62fF67A167C`](https://explorer.testnet.riselabs.xyz/address/0xEFC2c1444eBCC4Db75e7613d20C6a62fF67A167C) | | WETH | Wrapped ETH | [`0x4200000000000000000000000000000000000006`](https://explorer.testnet.riselabs.xyz/address/0x4200000000000000000000000000000000000006) | ## L1 (Sepolia) System Contracts These contracts are deployed on the Sepolia Ethereum testnet and handle the communication between L1 and RISE Testnet. | Contract Name | Description | Address | | --------------------------------- | --------------------------------------------------- | ----------------------------------------------------------------------------------------------------------------------------------------------------------------------------------------------------------------------------------------------------- | | AnchorStateRegistryProxy | Stores state roots of the L2 chain | [`0x5ca4bfe196aa3a1ed9f8522f224ec5a7a7277d5a`](https://sepolia.etherscan.io/address/0x5ca4bfe196aa3a1ed9f8522f224ec5a7a7277d5a) | | BatchSubmitter | Submits batches of transactions | [`0x45Bd8Bc15FfC21315F8a1e3cdF67c73b487768e8`](https://sepolia.etherscan.io/address/0x45Bd8Bc15FfC21315F8a1e3cdF67c73b487768e8) | | Challenger | Handles challenges to invalid state transitions | [`0xb49077bAd82968A1119B9e717DBCFb9303E91f0F`](https://sepolia.etherscan.io/address/0xb49077bAd82968A1119B9e717DBCFb9303E91f0F) | | DelayedWETHProxy | Wrapped ETH with withdrawal delay | [`0x3547e7b4af6f0a2d626c72fd7066b939e8489450`](https://sepolia.etherscan.io/address/0x3547e7b4af6f0a2d626c72fd7066b939e8489450) | | DisputeGameFactoryProxy | Creates dispute games for challenging invalid state | [`0x790e18c477bfb49c784ca0aed244648166a5022b`](https://sepolia.etherscan.io/address/0x790e18c477bfb49c784ca0aed244648166a5022b) | | L1CrossDomainMessengerProxy | Handles message passing from L1 to L2 | [`0xcc1c4f905d0199419719f3c3210f43bb990953fc`](https://sepolia.etherscan.io/address/0xcc1c4f905d0199419719f3c3210f43bb990953fc) | | L1ERC721BridgeProxy | Bridge for NFTs between L1 and L2 | [`0xfc197687ac16218bad8589420978f40097c42a44`](https://sepolia.etherscan.io/address/0xfc197687ac16218bad8589420978f40097c42a44) | | L1StandardBridgeProxy | Bridge for ETH and ERC20 tokens | [`0xe9a531a5d7253c9823c74af155d22fe14568b610`](https://sepolia.etherscan.io/address/0xe9a531a5d7253c9823c74af155d22fe14568b610) | | MIPS | MIPS verification for fault proofs | [`0xaa33f21ada0dc6c40a33d94935de11a0b754fec4`](https://sepolia.etherscan.io/address/0xaa33f21ada0dc6c40a33d94935de11a0b754fec4) | | OptimismMintableERC20FactoryProxy | Factory for creating bridged tokens on L2 | [`0xb9b92645886135838abd71a1bbf55e34260dabf6`](https://sepolia.etherscan.io/address/0xb9b92645886135838abd71a1bbf55e34260dabf6) | | OptimismPortalProxy | Main entry point for L1 to L2 transactions | [`0x77cce5cd26c75140c35c38104d0c655c7a786acb`](https://sepolia.etherscan.io/address/0x77cce5cd26c75140c35c38104d0c655c7a786acb) | | PreimageOracle | Stores preimages for fault proofs | [`0xca8f0068cd4894e1c972701ce8da7f934444717d`](https://sepolia.etherscan.io/address/0xca8f0068cd4894e1c972701ce8da7f934444717d) | | Proposer | Proposes new L2 state roots | [`0x407379B3eBd88B4E92F8fF8930D244B592D65c06`](https://sepolia.etherscan.io/address/0x407379B3eBd88B4E92F8fF8930D244B592D65c06) | | SystemConfigProxy | Configuration for the RISE system | [`0x5088a091bd20343787c5afc95aa002d13d9f3535`](https://sepolia.etherscan.io/address/0x5088a091bd20343787c5afc95aa002d13d9f3535) | | UnsafeBlockSigner | Signs blocks in development mode | [`0x8d451372bAdE8723F45BF5134550017F639dFb11`](https://sepolia.etherscan.io/address/0x8d451372bAdE8723F45BF5134550017F639dFb11) | ## L2 (RISE Testnet) System Contracts These are the predeploy contracts on RISE Testnet. | Contract Name | Description | Address | | ----------------------------- | ------------------------------------- | -------------------------------------------------------------------------------------------------------------------------------------------------------------------------------------------------------------------------------------------------------------- | | L2ToL1MessagePasser | Initiates withdrawals to L1 | [`0x4200000000000000000000000000000000000016`](https://explorer.testnet.riselabs.xyz/address/0x4200000000000000000000000000000000000016) | | L2CrossDomainMessenger | Handles message passing from L2 to L1 | [`0x4200000000000000000000000000000000000007`](https://explorer.testnet.riselabs.xyz/address/0x4200000000000000000000000000000000000007) | | L2StandardBridge | L2 side of the token bridge | [`0x4200000000000000000000000000000000000010`](https://explorer.testnet.riselabs.xyz/address/0x4200000000000000000000000000000000000010) | | L2ERC721Bridge | L2 side of the NFT bridge | [`0x4200000000000000000000000000000000000014`](https://explorer.testnet.riselabs.xyz/address/0x4200000000000000000000000000000000000014) | | SequencerFeeVault | Collects sequencer fees | [`0x4200000000000000000000000000000000000011`](https://explorer.testnet.riselabs.xyz/address/0x4200000000000000000000000000000000000011) | | OptimismMintableERC20Factory | Creates standard bridged tokens | [`0x4200000000000000000000000000000000000012`](https://explorer.testnet.riselabs.xyz/address/0x4200000000000000000000000000000000000012) | | OptimismMintableERC721Factory | Creates bridged NFTs | [`0x4200000000000000000000000000000000000017`](https://explorer.testnet.riselabs.xyz/address/0x4200000000000000000000000000000000000017) | | L1Block | Provides L1 block information | [`0x4200000000000000000000000000000000000015`](https://explorer.testnet.riselabs.xyz/address/0x4200000000000000000000000000000000000015) | | GasPriceOracle | Provides gas price information | [`0x420000000000000000000000000000000000000F`](https://explorer.testnet.riselabs.xyz/address/0x420000000000000000000000000000000000000F) | | ProxyAdmin | Admin for proxy contracts | [`0x4200000000000000000000000000000000000018`](https://explorer.testnet.riselabs.xyz/address/0x4200000000000000000000000000000000000018) | | BaseFeeVault | Collects base fee | [`0x4200000000000000000000000000000000000019`](https://explorer.testnet.riselabs.xyz/address/0x4200000000000000000000000000000000000019) | | L1FeeVault | Collects L1 data fees | [`0x420000000000000000000000000000000000001A`](https://explorer.testnet.riselabs.xyz/address/0x420000000000000000000000000000000000001A) | | GovernanceToken | RISE governance token | [`0x4200000000000000000000000000000000000042`](https://explorer.testnet.riselabs.xyz/address/0x4200000000000000000000000000000000000042) | | SchemaRegistry | EAS schema registry | [`0x4200000000000000000000000000000000000020`](https://explorer.testnet.riselabs.xyz/address/0x4200000000000000000000000000000000000020) | | EAS | Ethereum Attestation Service | [`0x4200000000000000000000000000000000000021`](https://explorer.testnet.riselabs.xyz/address/0x4200000000000000000000000000000000000021) | ## Usage Examples ### Bridging ETH from L1 to L2 ```solidity // On Sepolia (L1) IL1StandardBridge bridge = IL1StandardBridge(0xe9a531a5d7253c9823c74af155d22fe14568b610); // Deposit ETH to L2 bridge.depositETH{value: amount}( minGasLimit, emptyBytes // No additional data ); ``` ### Sending a Message from L2 to L1 ```solidity // On RISE Testnet (L2) IL2CrossDomainMessenger messenger = IL2CrossDomainMessenger(0x4200000000000000000000000000000000000007); // Send message to L1 messenger.sendMessage( targetL1Address, abi.encodeWithSignature("someFunction(uint256)", value), minGasLimit ); ``` # Network Details (/docs/builders/testnet-details) Use the information below to connect and submit transactions to RISE. | Property | Testnet | | --------------- | ------------------------------------------------------------------------------ | | Network Name | RISE Testnet | | Chain ID | `11155931` | | RPC URL | `https://testnet.riselabs.xyz` | | Explorer | [https://explorer.testnet.riselabs.xyz](https://explorer.testnet.riselabs.xyz) | | Currency Symbol | ETH | ## Using with Development Tools ### Hardhat Configuration ```javascript // hardhat.config.js module.exports = { networks: { riseTestnet: { url: "https://testnet.riselabs.xyz", chainId: 11155931, accounts: process.env.PRIVATE_KEY !== undefined ? [process.env.PRIVATE_KEY] : [] } } }; ``` ### Foundry Configuration ```toml # foundry.toml [profile.default] src = "src" out = "out" libs = ["lib"] [rpc_endpoints] rise_testnet = "https://testnet.riselabs.xyz" [blockscout] rise_testnet = { key = "", url = "https://explorer.testnet.riselabs.xyz/api" } ``` ## Gas & Transaction Details | Property | Value | | ----------------------------- | ------------------ | | Max Gas Limit per Transaction | 16M | | Nonce Order | Enforced on-chain | | Data Storage Fees | Same as L1 | | Blocks to Finality | 259,200 (\~3 days) | ## Getting Testnet ETH } title="RISE Faucet" href="https://faucet.testnet.riselabs.xyz" description="Get free testnet ETH and other tokens for testing" /> # Token Addresses (/docs/builders/testnet-tokens) ERC20 tokens deployed on RISE Testnet (Chain ID: 11155931). These tokens have been minted purely for testing purposes. They hold no value. You can acquire tokens via the faucet on the [Testnet Portal](https://portal.risechain.com). ## Token Addresses | Name | Symbol | Decimals | Address | | --------------- | ------ | -------- | -------------------------------------------------------------------------------------------------------------------------------------------------------------------------------------------------------------------------------------------------------------- | | Wrapped ETH | WETH | 18 | [`0x4200000000000000000000000000000000000006`](https://explorer.testnet.riselabs.xyz/address/0x4200000000000000000000000000000000000006) | | USD Coin | USDC | 6 | [`0x8a93d247134d91e0de6f96547cb0204e5be8e5d8`](https://explorer.testnet.riselabs.xyz/address/0x8a93d247134d91e0de6f96547cb0204e5be8e5d8) | | Tether USD | USDT | 8 | [`0x40918ba7f132e0acba2ce4de4c4baf9bd2d7d849`](https://explorer.testnet.riselabs.xyz/address/0x40918ba7f132e0acba2ce4de4c4baf9bd2d7d849) | | Wrapped Bitcoin | WBTC | 18 | [`0xf32d39ff9f6aa7a7a64d7a4f00a54826ef791a55`](https://explorer.testnet.riselabs.xyz/address/0xf32d39ff9f6aa7a7a64d7a4f00a54826ef791a55) | | RISE | RISE | 18 | [`0xd6e1afe5ca8d00a2efc01b89997abe2de47fdfaf`](https://explorer.testnet.riselabs.xyz/address/0xd6e1afe5ca8d00a2efc01b89997abe2de47fdfaf) | | Mog Coin | MOG | 18 | [`0x99dbe4aea58e518c50a1c04ae9b48c9f6354612f`](https://explorer.testnet.riselabs.xyz/address/0x99dbe4aea58e518c50a1c04ae9b48c9f6354612f) | | Pepe | PEPE | 18 | [`0x6f6f570f45833e249e27022648a26f4076f48f78`](https://explorer.testnet.riselabs.xyz/address/0x6f6f570f45833e249e27022648a26f4076f48f78) | ## Contract Features All tokens implement: * ERC20 standard functionality (transfer, approve, transferFrom) * Custom decimals support (6 to 18) * Minting capability (restricted to owner) * Burning capability (anyone can burn their own tokens) ### WETH The WETH token at `0x4200000000000000000000000000000000000006` is a predeploy contract with additional functionality: * Wrap ETH by sending ETH to the contract or calling `deposit()` * Unwrap WETH by calling `withdraw(uint)` * Standard ERC20 interface for wrapped ETH ## Example Commands ```bash # Check token balance cast call "balanceOf(address)(uint256)" --rpc-url https://testnet.riselabs.xyz # Transfer tokens cast send "transfer(address,uint256)(bool)" --private-key $PRIVATE_KEY --rpc-url https://testnet.riselabs.xyz # Wrap ETH cast send 0x4200000000000000000000000000000000000006 "deposit()" --value --private-key $PRIVATE_KEY --rpc-url https://testnet.riselabs.xyz # Unwrap WETH cast send 0x4200000000000000000000000000000000000006 "withdraw(uint256)" --private-key $PRIVATE_KEY --rpc-url https://testnet.riselabs.xyz ``` # Deploy an ERC20 Token (/docs/cookbook/deploy-erc20-token) import { Step, Steps } from 'fumadocs-ui/components/steps'; import { Tab, Tabs } from 'fumadocs-ui/components/tabs'; Learn how to create and deploy your own ERC20 token on RISE using OpenZeppelin's battle-tested contracts. ## What You'll Build A standard ERC20 token with: * Custom name and symbol * Initial token supply * Standard transfer, approve, and allowance functions * Built on OpenZeppelin's secure implementation ## The Contract We'll use OpenZeppelin's ERC20 implementation: ```solidity title="MyToken.sol" // SPDX-License-Identifier: MIT pragma solidity ^0.8.0; import "@openzeppelin/contracts/token/ERC20/ERC20.sol"; contract MyToken is ERC20 { constructor(uint256 initialSupply) ERC20("MyToken", "MTK") { _mint(msg.sender, initialSupply * 10 ** decimals()); } } ``` This creates a token called "MyToken" with symbol "MTK" and mints the initial supply to the deployer. ## Choose Your Tool ## Deploy with Remix The easiest way - no installation required! ### Prerequisites * A Web3 wallet (MetaMask or Rabby) with RISE Testnet configured * Testnet ETH from the [RISE Faucet](https://faucet.testnet.riselabs.xyz/) ### Open Remix IDE Go to [remix.ethereum.org](https://remix.ethereum.org) in your browser. ### Create the Contract 1. In the File Explorer, create a new file: `MyToken.sol` 2. Copy and paste this code: ```solidity title="MyToken.sol" // SPDX-License-Identifier: MIT pragma solidity ^0.8.0; import "@openzeppelin/contracts/token/ERC20/ERC20.sol"; contract MyToken is ERC20 { constructor(uint256 initialSupply) ERC20("MyToken", "MTK") { _mint(msg.sender, initialSupply * 10 ** decimals()); } } ``` Customize the token name ("MyToken") and symbol ("MTK") to your preference. ### Compile 1. Click the **Solidity Compiler** tab 2. Select compiler version `0.8.20` or higher 3. Click **Compile MyToken.sol** Remix will automatically fetch the OpenZeppelin contracts from GitHub. ### Deploy to RISE 1. Click the **Deploy & Run Transactions** tab 2. Select **Injected Provider - MetaMask** in Environment 3. Connect your wallet when prompted 4. Verify you're on RISE Testnet (Chain ID: 11155931) 5. In the **Contract** dropdown, select `MyToken` 6. Enter initial supply (e.g., `1000000` for 1 million tokens) 7. Click **Deploy** 8. Confirm the transaction in your wallet ### Interact with Your Token Under **Deployed Contracts**, you can: * Click `name` → Returns "MyToken" * Click `symbol` → Returns "MTK" * Click `decimals` → Returns 18 * Click `totalSupply` → Returns total supply in wei (1000000 \* 10^18) * Click `balanceOf` with your address → Shows your token balance To transfer tokens: 1. Expand the `transfer` function 2. Enter recipient address and amount 3. Click **transact** and confirm ### View on Explorer Visit [RISE Testnet Explorer](https://explorer.testnet.riselabs.xyz) and search for your contract address to see all token transfers and holders. ## Deploy with Foundry Fast, Rust-based toolkit with OpenZeppelin integration. ### Prerequisites * Foundry installed ([installation guide](https://book.getfoundry.sh/getting-started/installation)) * Testnet ETH from the [RISE Faucet](https://faucet.testnet.riselabs.xyz/) ### Create Project Initialize a new Foundry project: ```bash forge init erc20-token cd erc20-token ``` ### Install OpenZeppelin Contracts Install the OpenZeppelin contracts library: ```bash forge install OpenZeppelin/openzeppelin-contracts ``` Configure remappings to make imports work: ```bash forge remappings > remappings.txt ``` This creates a `remappings.txt` file that tells Foundry where to find OpenZeppelin contracts. ### Create the Token Contract Create `src/MyToken.sol`: ```solidity title="src/MyToken.sol" // SPDX-License-Identifier: MIT pragma solidity ^0.8.0; import "@openzeppelin/contracts/token/ERC20/ERC20.sol"; contract MyToken is ERC20 { constructor(uint256 initialSupply) ERC20("MyToken", "MTK") { _mint(msg.sender, initialSupply * 10 ** decimals()); } } ``` ### Configure RISE Network Update `foundry.toml`: ```toml title="foundry.toml" [profile.default] src = "src" out = "out" libs = ["lib"] solc = "0.8.30" [rpc_endpoints] rise = "https://testnet.riselabs.xyz" ``` ### Compile Build your contract: ```bash forge build ``` ### Deploy Deploy to RISE Testnet with 1 million token initial supply using your private key: ```bash forge create \ --rpc-url rise \ --private-key 0xYOUR_PRIVATE_KEY_HERE \ src/MyToken.sol:MyToken \ --constructor-args 1000000 ``` Alternatively, use a keystore for better security: ```bash forge create \ --rpc-url rise \ --account \ src/MyToken.sol:MyToken \ --constructor-args 1000000 ``` Learn how to create a keystore: [Foundry Keystore Guide](https://book.getfoundry.sh/reference/cast/cast-wallet-import) Save the contract address from the output! ### Interact with Your Token Check token name: ```bash cast call "name()" --rpc-url rise ``` Check your balance: ```bash cast call "balanceOf(address)(uint256)" --rpc-url rise ``` Transfer tokens to another address: ```bash cast send \ "transfer(address,uint256)" \ \ 1000000000000000000 \ --rpc-url rise \ --private-key 0xYOUR_PRIVATE_KEY_HERE ``` Note: The amount is in wei (18 decimals), so `1000000000000000000` = 1 token. ### View on Explorer Visit [RISE Testnet Explorer](https://explorer.testnet.riselabs.xyz) and search for your contract address. ## Deploy with Hardhat Flexible development environment with OpenZeppelin support. ### Prerequisites * Node.js v22 or later * Testnet ETH from the [RISE Faucet](https://faucet.testnet.riselabs.xyz/) ### Create Project Initialize a new Hardhat project: ```bash mkdir erc20-token cd erc20-token npm init -y npm install --save-dev hardhat npx hardhat --init ``` Select: * "Hardhat 3 Beta" * Current directory * "A minimal Hardhat project" * Install dependencies: yes ### Install OpenZeppelin Contracts Install the OpenZeppelin contracts package: ```bash npm install @openzeppelin/contracts ``` ### Create the Token Contract Create `contracts/MyToken.sol`: ```bash mkdir contracts ``` ```solidity title="contracts/MyToken.sol" // SPDX-License-Identifier: MIT pragma solidity ^0.8.0; import "@openzeppelin/contracts/token/ERC20/ERC20.sol"; contract MyToken is ERC20 { constructor(uint256 initialSupply) ERC20("MyToken", "MTK") { _mint(msg.sender, initialSupply * 10 ** decimals()); } } ``` ### Configure RISE Network Update `hardhat.config.ts`: ```typescript title="hardhat.config.ts" {2,11-16} import hardhatToolboxViemPlugin from "@nomicfoundation/hardhat-toolbox-viem"; import { configVariable, defineConfig } from "hardhat/config"; export default defineConfig({ plugins: [hardhatToolboxViemPlugin], solidity: { version: "0.8.30", }, networks: { riseTestnet: { type: "http", url: "https://testnet.riselabs.xyz", accounts: [configVariable("RISE_PRIVATE_KEY")], chainId: 11155931 } } }); ``` ### Set Your Private Key Store your private key securely: ```bash npx hardhat keystore set RISE_PRIVATE_KEY ``` Enter your private key when prompted. ### Compile Compile your contract: ```bash npx hardhat compile ``` ### Create Deployment Module Create the deployment script: ```bash mkdir -p ignition/modules ``` ```typescript title="ignition/modules/MyToken.ts" import { buildModule } from "@nomicfoundation/hardhat-ignition/modules"; export default buildModule("MyTokenModule", (m) => { const initialSupply = m.getParameter("initialSupply", 1000000n); const myToken = m.contract("MyToken", [initialSupply]); return { myToken }; }); ``` ### Deploy Deploy to RISE Testnet: ```bash npx hardhat ignition deploy ignition/modules/MyToken.ts --network riseTestnet ``` To deploy with a custom initial supply: ```bash npx hardhat ignition deploy ignition/modules/MyToken.ts --network riseTestnet --parameters '{"MyTokenModule":{"initialSupply":"5000000"}}' ``` Save the contract address from the output! ### Interact with Your Token Use Hardhat console: ```bash npx hardhat console --network riseTestnet ``` Then in the console: ```javascript const MyToken = await ethers.getContractFactory("MyToken"); const token = await MyToken.attach("YOUR_CONTRACT_ADDRESS"); // Check name and symbol await token.name(); // "MyToken" await token.symbol(); // "MTK" // Check total supply await token.totalSupply(); // Check your balance await token.balanceOf("YOUR_ADDRESS"); // Transfer tokens await token.transfer("RECIPIENT_ADDRESS", ethers.parseUnits("100", 18)); ``` ### View on Explorer Visit [RISE Testnet Explorer](https://explorer.testnet.riselabs.xyz) and search for your contract address. ## Customizing Your Token ### Change Token Details Modify the constructor in your contract: ```solidity constructor(uint256 initialSupply) ERC20("YourTokenName", "YTN") { _mint(msg.sender, initialSupply * 10 ** decimals()); } ``` ### Add Minting Capability Want to mint more tokens later? Add Ownable: ```solidity // SPDX-License-Identifier: MIT pragma solidity ^0.8.0; import "@openzeppelin/contracts/token/ERC20/ERC20.sol"; import "@openzeppelin/contracts/access/Ownable.sol"; contract MyToken is ERC20, Ownable { constructor(uint256 initialSupply) ERC20("MyToken", "MTK") Ownable(msg.sender) { _mint(msg.sender, initialSupply * 10 ** decimals()); } function mint(address to, uint256 amount) public onlyOwner { _mint(to, amount); } } ``` ### Add Burning Capability Allow token holders to burn their tokens: ```solidity // SPDX-License-Identifier: MIT pragma solidity ^0.8.0; import "@openzeppelin/contracts/token/ERC20/ERC20.sol"; import "@openzeppelin/contracts/token/ERC20/extensions/ERC20Burnable.sol"; contract MyToken is ERC20, ERC20Burnable { constructor(uint256 initialSupply) ERC20("MyToken", "MTK") { _mint(msg.sender, initialSupply * 10 ** decimals()); } } ``` ## Next Steps # Deploy Your First Contract (/docs/cookbook/deploy-first-contract) import { Step, Steps } from 'fumadocs-ui/components/steps'; import { Tab, Tabs } from 'fumadocs-ui/components/tabs'; A hands-on guide to deploying your first smart contract on RISE. You'll create a simple Counter contract that stores and increments a number. ## What You'll Build A basic Counter contract with two functions: * `count` - A public variable to read the current count * `increment()` - Increments the count by 1 ## The Contract This is the contract you'll deploy: ```solidity title="Counter.sol" // SPDX-License-Identifier: MIT pragma solidity ^0.8.30; contract Counter { uint256 public count; function increment() external { count++; } } ``` Simple, right? Now let's deploy it using your preferred tool. ## Choose Your Tool ## Deploy with Remix The easiest way to get started - no installation required! ### Prerequisites * A crypto wallet (MetaMask or Rabby) with RISE Testnet configured * Testnet ETH from the [RISE Faucet](https://faucet.testnet.riselabs.xyz/) ### Open Remix IDE Go to [remix.ethereum.org](https://remix.ethereum.org) in your browser. ### Create the Contract 1. In the File Explorer (left sidebar), create a new file called `Counter.sol` 2. Copy and paste the Counter contract code shown above 3. Save the file (Ctrl+S or Cmd+S) ### Compile 1. Click the **Solidity Compiler** tab in the left sidebar 2. Select compiler version `0.8.0` or higher 3. Click **Compile Counter.sol** You should see a green checkmark when compilation succeeds. Enable **Auto compile** to automatically compile as you make changes. ### Deploy to RISE 1. Click the **Deploy & Run Transactions** tab 2. In **Environment**, select **Injected Provider - MetaMask** 3. Your wallet will prompt you to connect - click **Connect** 4. **Important**: Verify your wallet is on RISE Testnet (Chain ID: 11155931) 5. Select `Counter` in the **Contract** dropdown 6. Click **Deploy** 7. Confirm the transaction in your wallet ### Interact with Your Contract After deployment, expand your contract under **Deployed Contracts**: * Click the blue `count` button to read the current value (starts at 0) * Click the orange `increment` button to increase the count * Click `count` again to see the updated value Each `increment` call requires a transaction confirmation. ### View on Explorer Copy the contract address from Remix and view it on the [RISE Testnet Explorer](https://explorer.testnet.riselabs.xyz). ## Deploy with Foundry Fast, Rust-based toolkit for smart contract development. ### Prerequisites * Foundry installed ([installation guide](https://book.getfoundry.sh/getting-started/installation)) * Testnet ETH from the [RISE Faucet](https://faucet.testnet.riselabs.xyz/) ### Create Project Initialize a new Foundry project: ```bash forge init counter-project cd counter-project ``` ### Add the Contract Replace `src/Counter.sol` with our Counter contract: ```solidity title="src/Counter.sol" // SPDX-License-Identifier: MIT pragma solidity ^0.8.0; contract Counter { uint256 public count; function increment() external { count++; } } ``` ### Configure RISE Network Update `foundry.toml`: ```toml title="foundry.toml" [profile.default] src = "src" out = "out" libs = ["lib"] solc = "0.8.30" [rpc_endpoints] rise_testnet = "https://testnet.riselabs.xyz" ``` ### Compile Build your contract: ```bash forge build ``` ### Deploy Deploy to RISE Testnet using your private key: ```bash forge create \ --rpc-url rise_testnet \ --private-key 0xYOUR_PRIVATE_KEY_HERE \ src/Counter.sol:Counter ``` Alternatively, use a keystore for better security: ```bash forge create \ --rpc-url rise_testnet \ --account \ src/Counter.sol:Counter ``` Learn how to create a keystore: [Foundry Keystore Guide](https://book.getfoundry.sh/reference/cast/cast-wallet-import) Save the contract address from the output! ### Interact with Your Contract Read the count: ```bash cast call "count()" --rpc-url rise_testnet ``` Increment the count: ```bash cast send \ "increment()" \ --rpc-url rise_testnet \ --private-key 0xYOUR_PRIVATE_KEY_HERE ``` Read again to see the updated value. ### View on Explorer Visit [RISE Testnet Explorer](https://explorer.testnet.riselabs.xyz) and search for your contract address. ## Deploy with Hardhat Flexible development environment with great tooling support. ### Prerequisites * Node.js v22 or later * Testnet ETH from the [RISE Faucet](https://faucet.testnet.riselabs.xyz/) ### Create Project Initialize a new Hardhat project: ```bash mkdir counter-project cd counter-project npx hardhat --init ``` When prompted: * Select "Hardhat 3 Beta" * Choose current directory * Select "A minimal Hardhat project" * Install dependencies: yes ### Add the Contract Create `contracts/Counter.sol`: ```bash mkdir contracts ``` ```solidity title="contracts/Counter.sol" // SPDX-License-Identifier: MIT pragma solidity ^0.8.0; contract Counter { uint256 public count; function increment() external { count++; } } ``` ### Configure RISE Network Update `hardhat.config.ts`: ```typescript title="hardhat.config.ts" {2,11-16} import hardhatToolboxViemPlugin from "@nomicfoundation/hardhat-toolbox-viem"; import { configVariable, defineConfig } from "hardhat/config"; export default defineConfig({ plugins: [hardhatToolboxViemPlugin], solidity: { version: "0.8.30", }, networks: { riseTestnet: { type: "http", url: "https://testnet.riselabs.xyz", accounts: [configVariable("RISE_PRIVATE_KEY")], chainId: 11155931 } } }); ``` ### Set Your Private Key Store your private key securely: ```bash npx hardhat keystore set RISE_PRIVATE_KEY ``` Enter your private key when prompted. ### Compile Compile your contract: ```bash npx hardhat compile ``` ### Create Deployment Module Create the deployment script: ```bash mkdir -p ignition/modules ``` ```typescript title="ignition/modules/Counter.ts" import { buildModule } from "@nomicfoundation/hardhat-ignition/modules"; export default buildModule("CounterModule", (m) => { const counter = m.contract("Counter"); return { counter }; }); ``` ### Deploy Deploy to RISE Testnet: ```bash npx hardhat ignition deploy ignition/modules/Counter.ts --network riseTestnet ``` Save the contract address from the output! ### Interact with Your Contract You can interact with your contract using Hardhat console: ```bash npx hardhat console --network riseTestnet ``` Then in the console: ```javascript const Counter = await ethers.getContractFactory("Counter"); const counter = await Counter.attach("YOUR_CONTRACT_ADDRESS"); // Read count await counter.count(); // Increment await counter.increment(); // Read again await counter.count(); ``` ### View on Explorer Visit [RISE Testnet Explorer](https://explorer.testnet.riselabs.xyz) and search for your contract address. ## Next Steps Congratulations! You've deployed your first contract on RISE. Here's what you can explore next: # Introduction (/docs/cookbook) import { Cards, Card } from 'fumadocs-ui/components/card'; Practical guides and code recipes for building on RISE. Learn by doing with step-by-step tutorials. ## Smart Contracts ## RISE Wallet ## Shreds ## VRF ## RISEx ## Complete # Based Sequencing (/docs/rise-evm/based-sequencing) # Based Sequencing ## The Sequencer Problem At the core of every rollup is the sequencer, a critical entity that manages transaction flow on the rollup, ensuring efficient and secure interaction with L1.
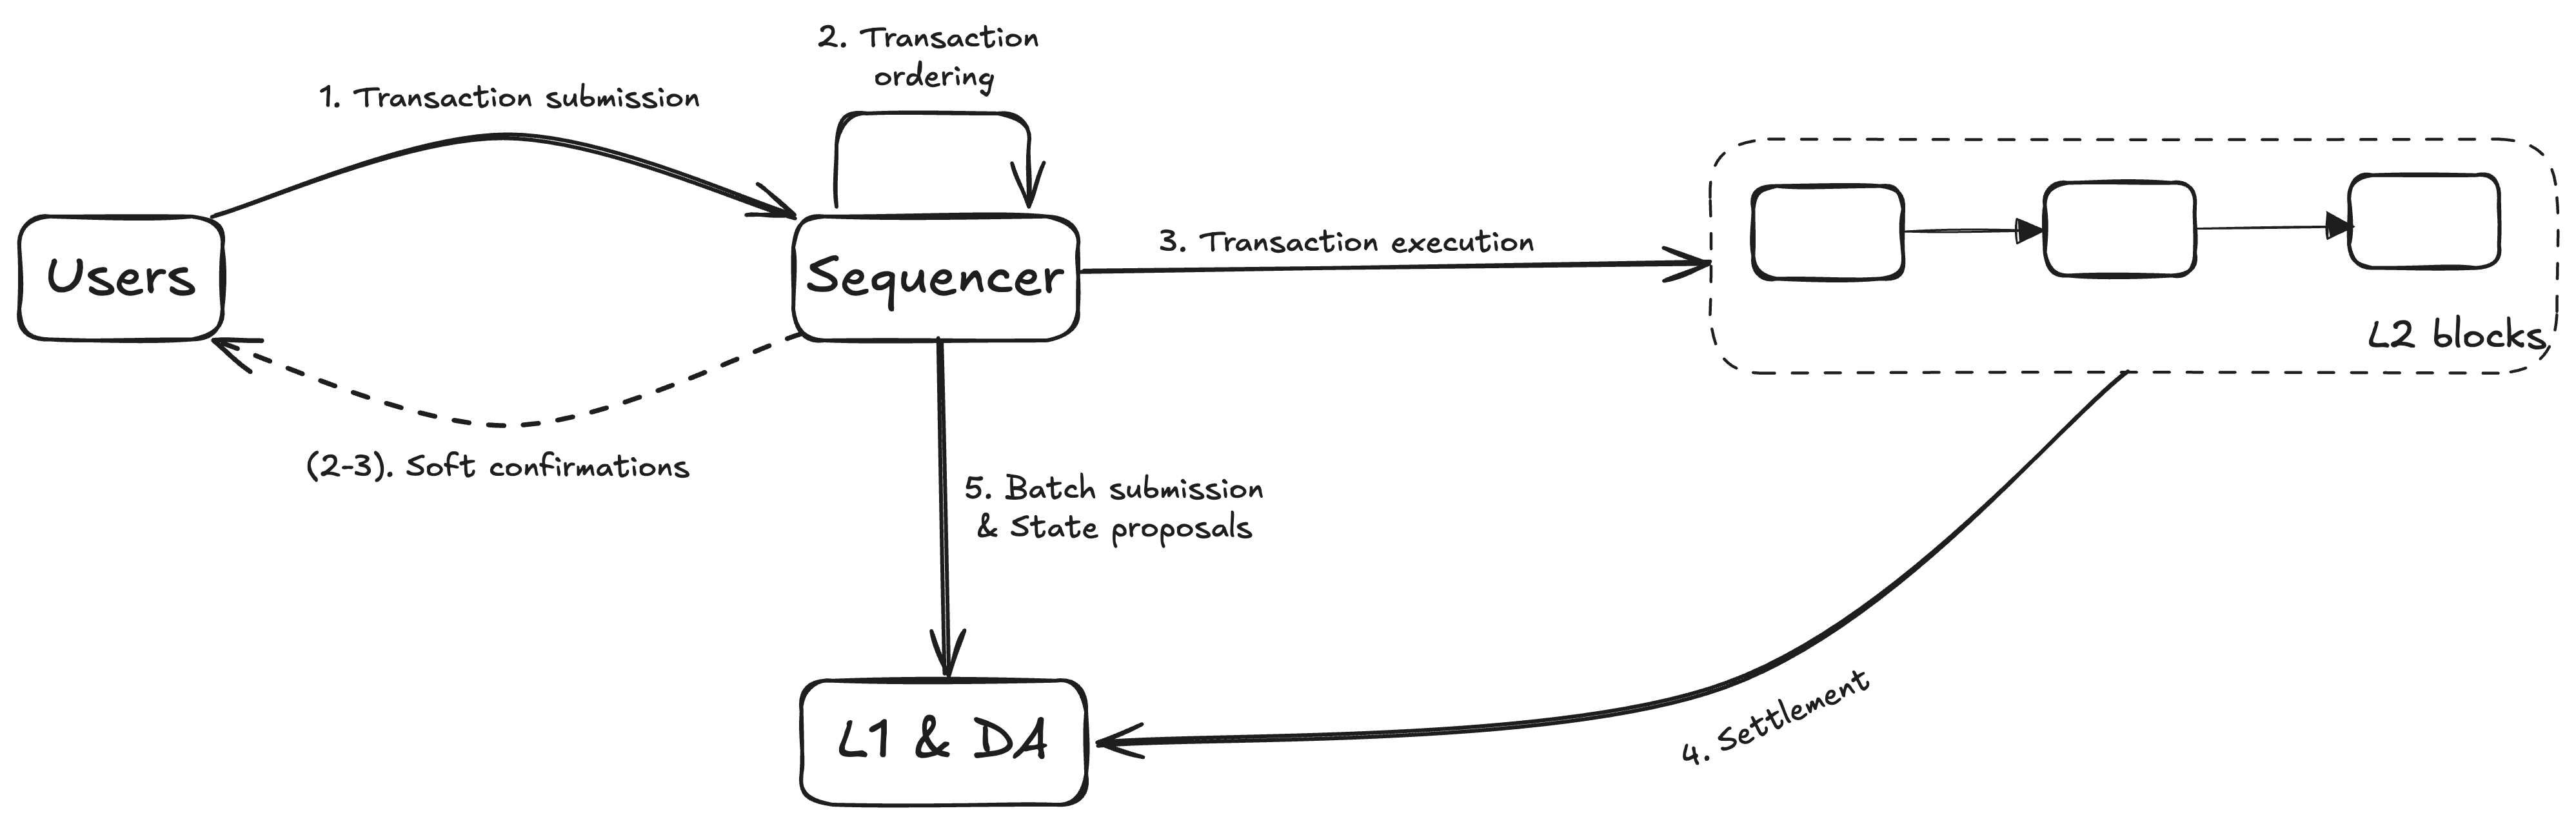
Centralized Sequencers Centralized Sequencers
The sequencer fetches and orders incoming transactions from the mempool into blocks (similar to block proposers in regular blockchains). It also creates L2 checkpoints by posting the latest state commitment to L1. It acts as an intermediary between the L2 and L1, performing the following functions. * **Ordering.** The sequencer receives transactions from users on the L2, orders them, and includes them in blocks. * **Execution.** The sequencer executes the transactions and updates the state of the rollup. * **Batching.** The sequencer groups transactions into batches, compresses the data, and submits these batches to Ethereum. * **Preconfirmation**. The sequencer advertises an RPC endpoint for users to submit transactions to. As a response, the sequencer issues soft confirmations on user transactions. ### Centralization Risks Traditional rollups favor centralized sequencers because they offer high performance on dedicated hardware, low latency for better user experience. Low latency is crucial for applications that require quick transaction confirmations, such as perpetual exchanges or lending platforms. Last but not least, a rollup with centralized sequencers is simple to implement, mainly because no consensus is required. However, a centralized sequencer becomes a **single point of failure**, making the entire rollup vulnerable to technical failures, attacks, or manipulations. A centralized sequencer has the absolute power to censor transactions, reorder transactions to favor their own interests, go offline and halt the rollup entirely, or extract bad MEV from users. This raises concerns about censorship resistance. If they refuse to process certain types of transactions, perhaps due to regulatory pressure or self-interest, users may find themselves unable to execute essential operations within the ecosystem. The impact of censorship undermines the fundamental principles of a permissionless network. *** ## Based Sequencing: Leveraging Ethereum's Security [Based sequencing](https://ethresear.ch/t/based-rollups-superpowers-from-l1-sequencing/15016) removes the centralized sequencer entirely. Instead, L1 block proposers, the same entities responsible for building Ethereum blocks, serve as sequencers for the rollup. ### The Philosophy Rather than building a separate L2 consensus mechanism, RISE leverages Ethereum's existing, battle-tested block building pipeline. RISE inherits Ethereum proven liveness and censorship resistance properties backed by around 1M+ validators with no additional consensus layer. ### How It Works
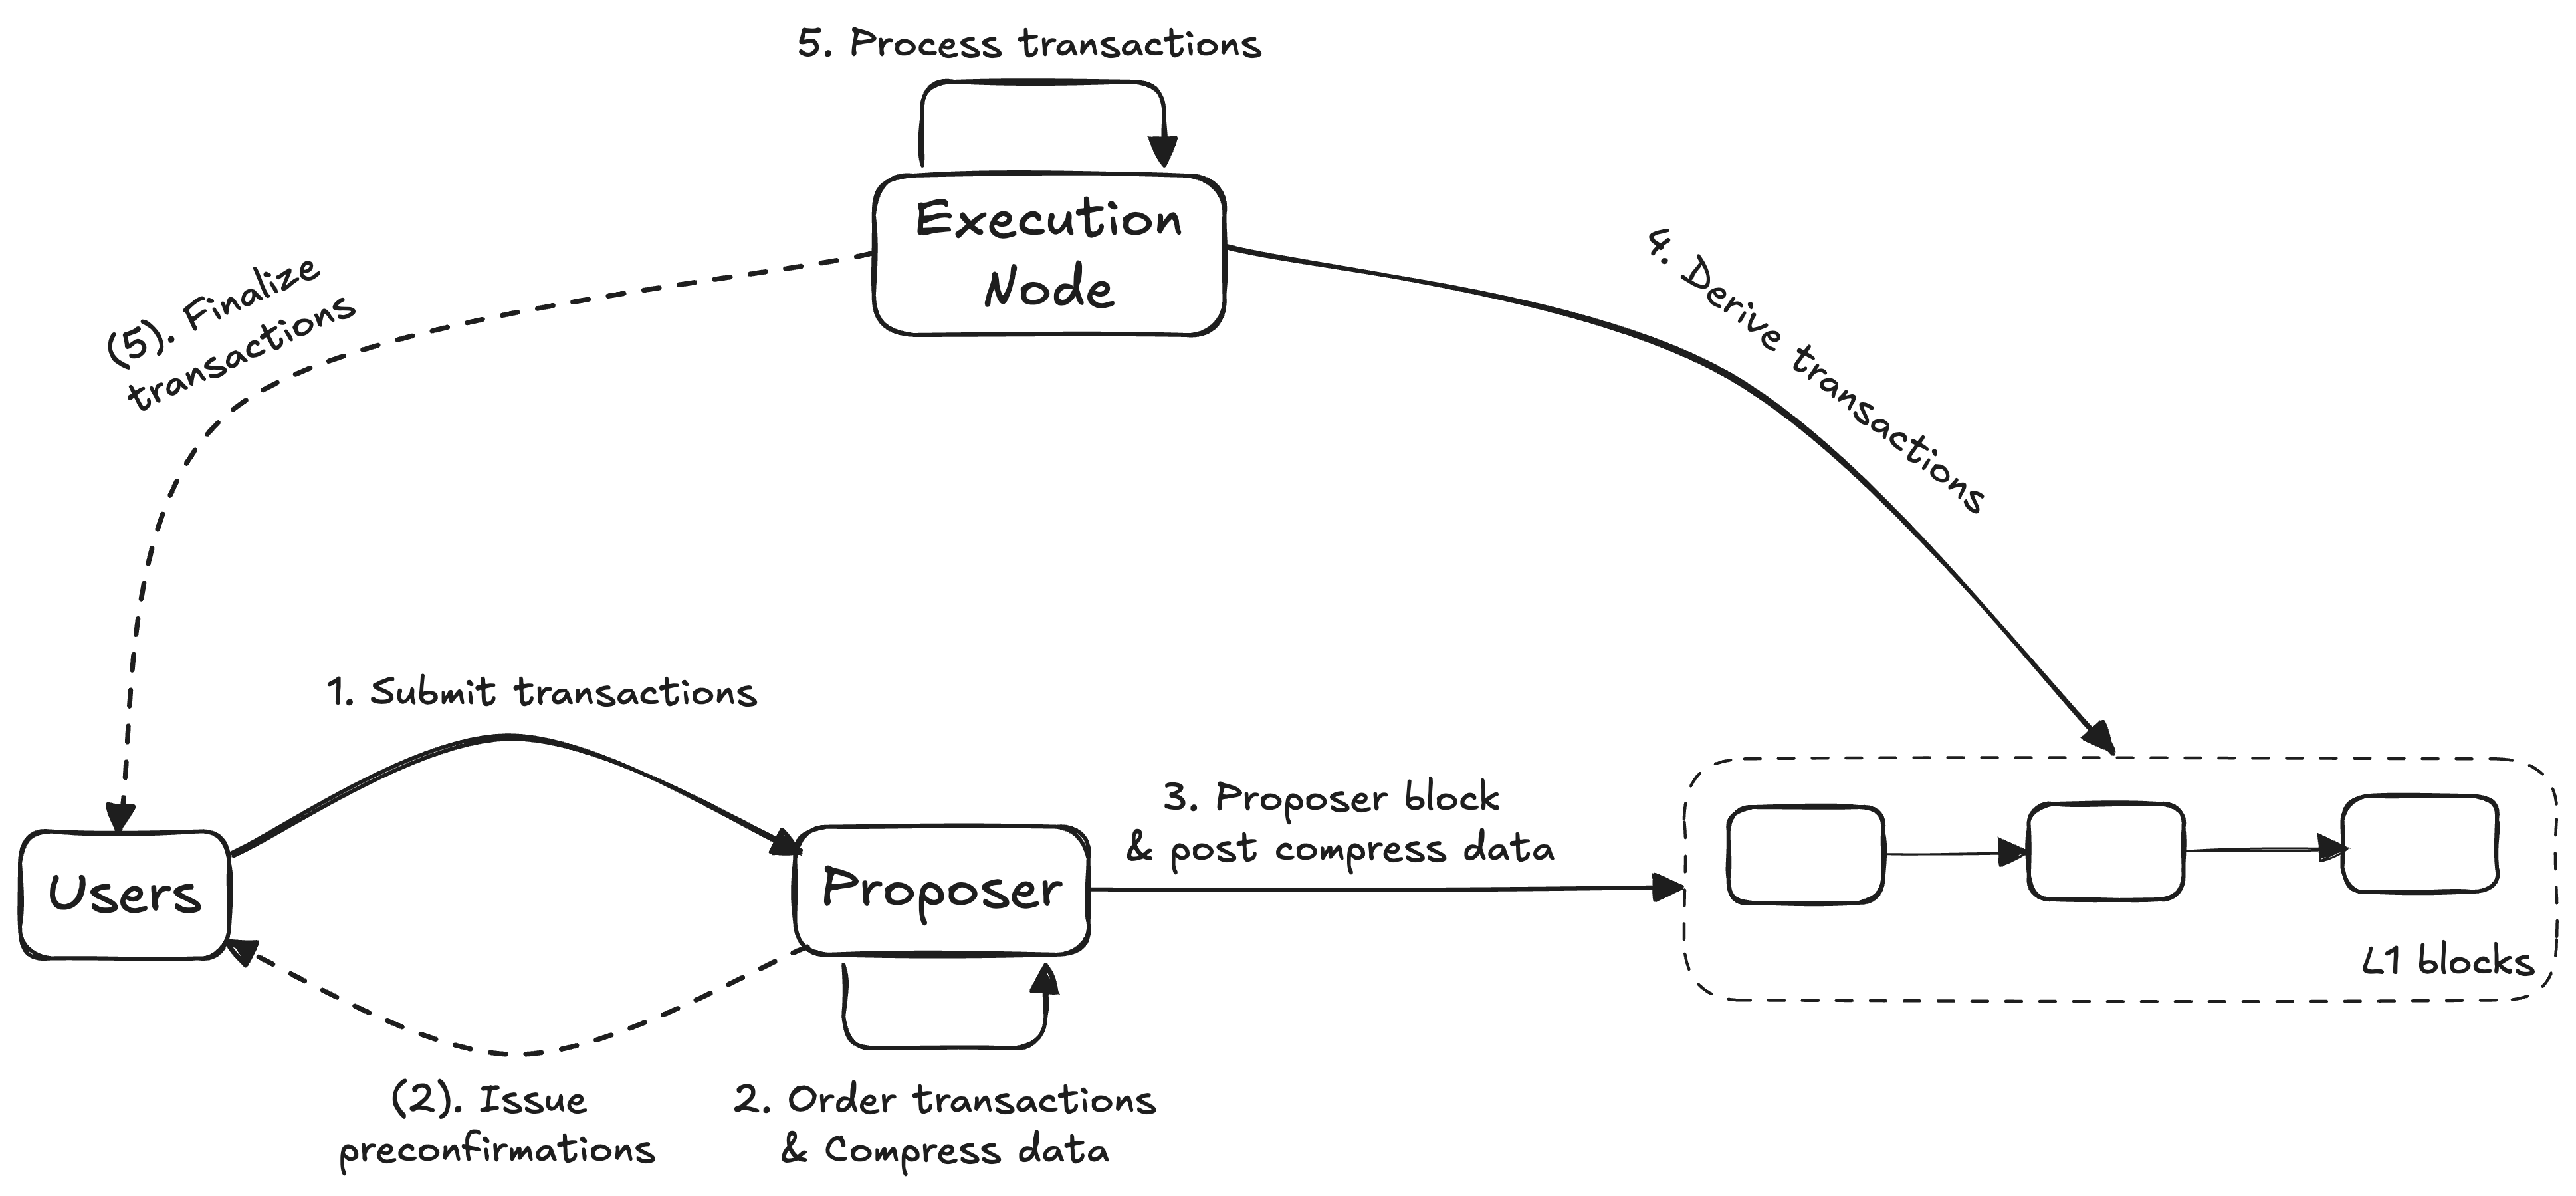
General paradigm of based sequencing General paradigm of based sequencing
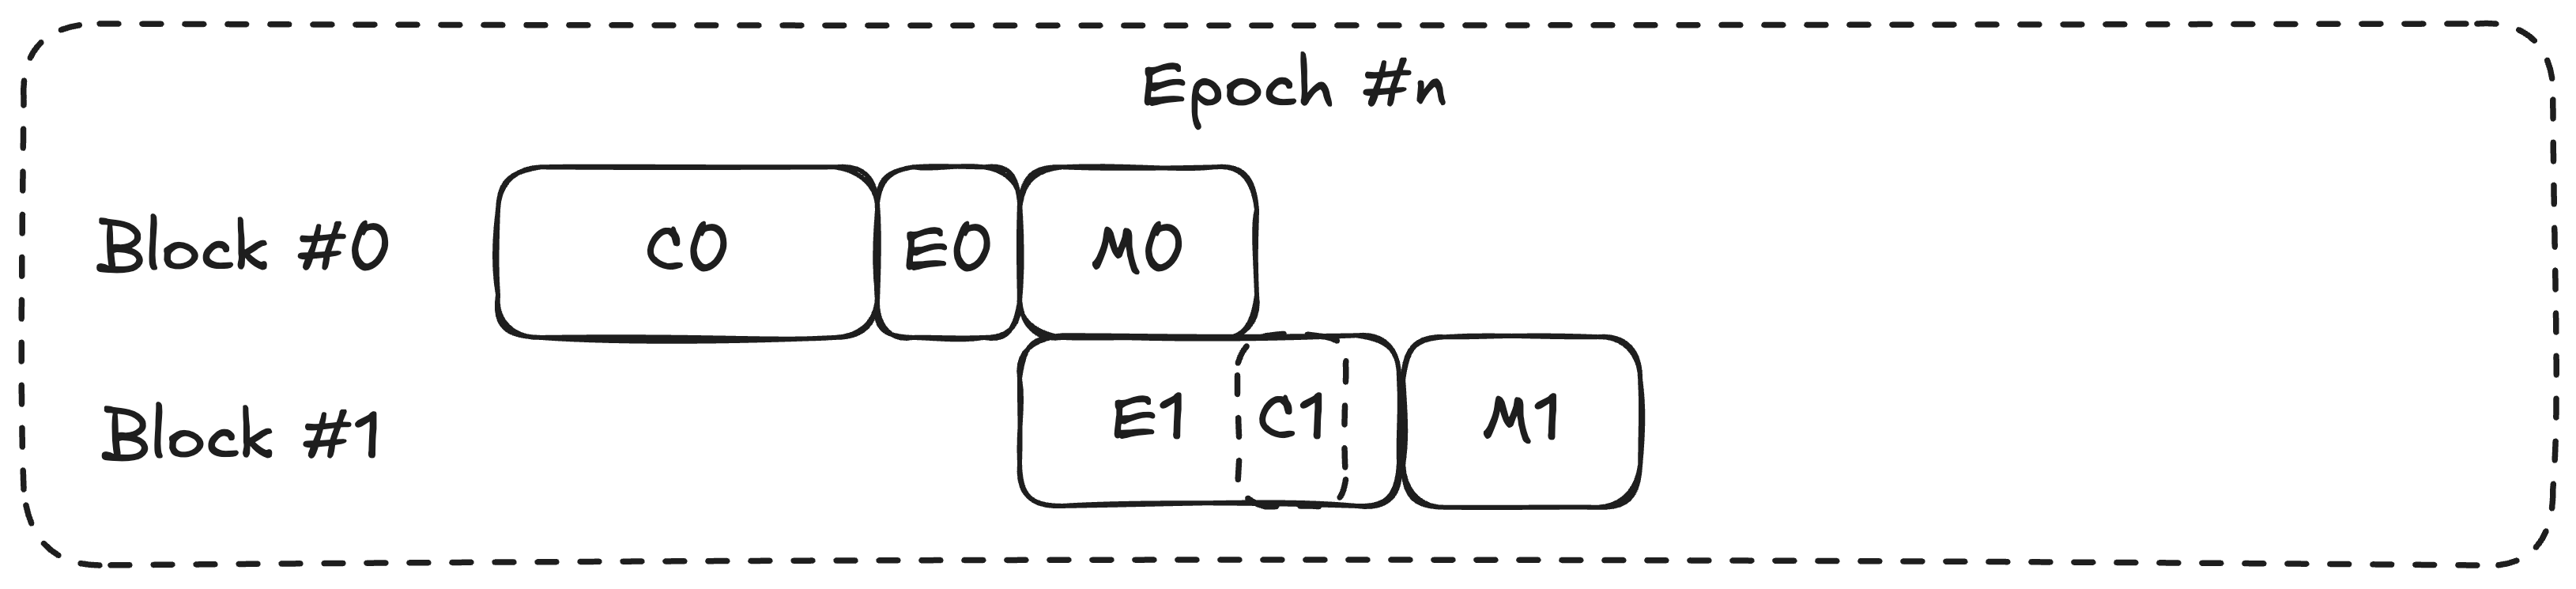
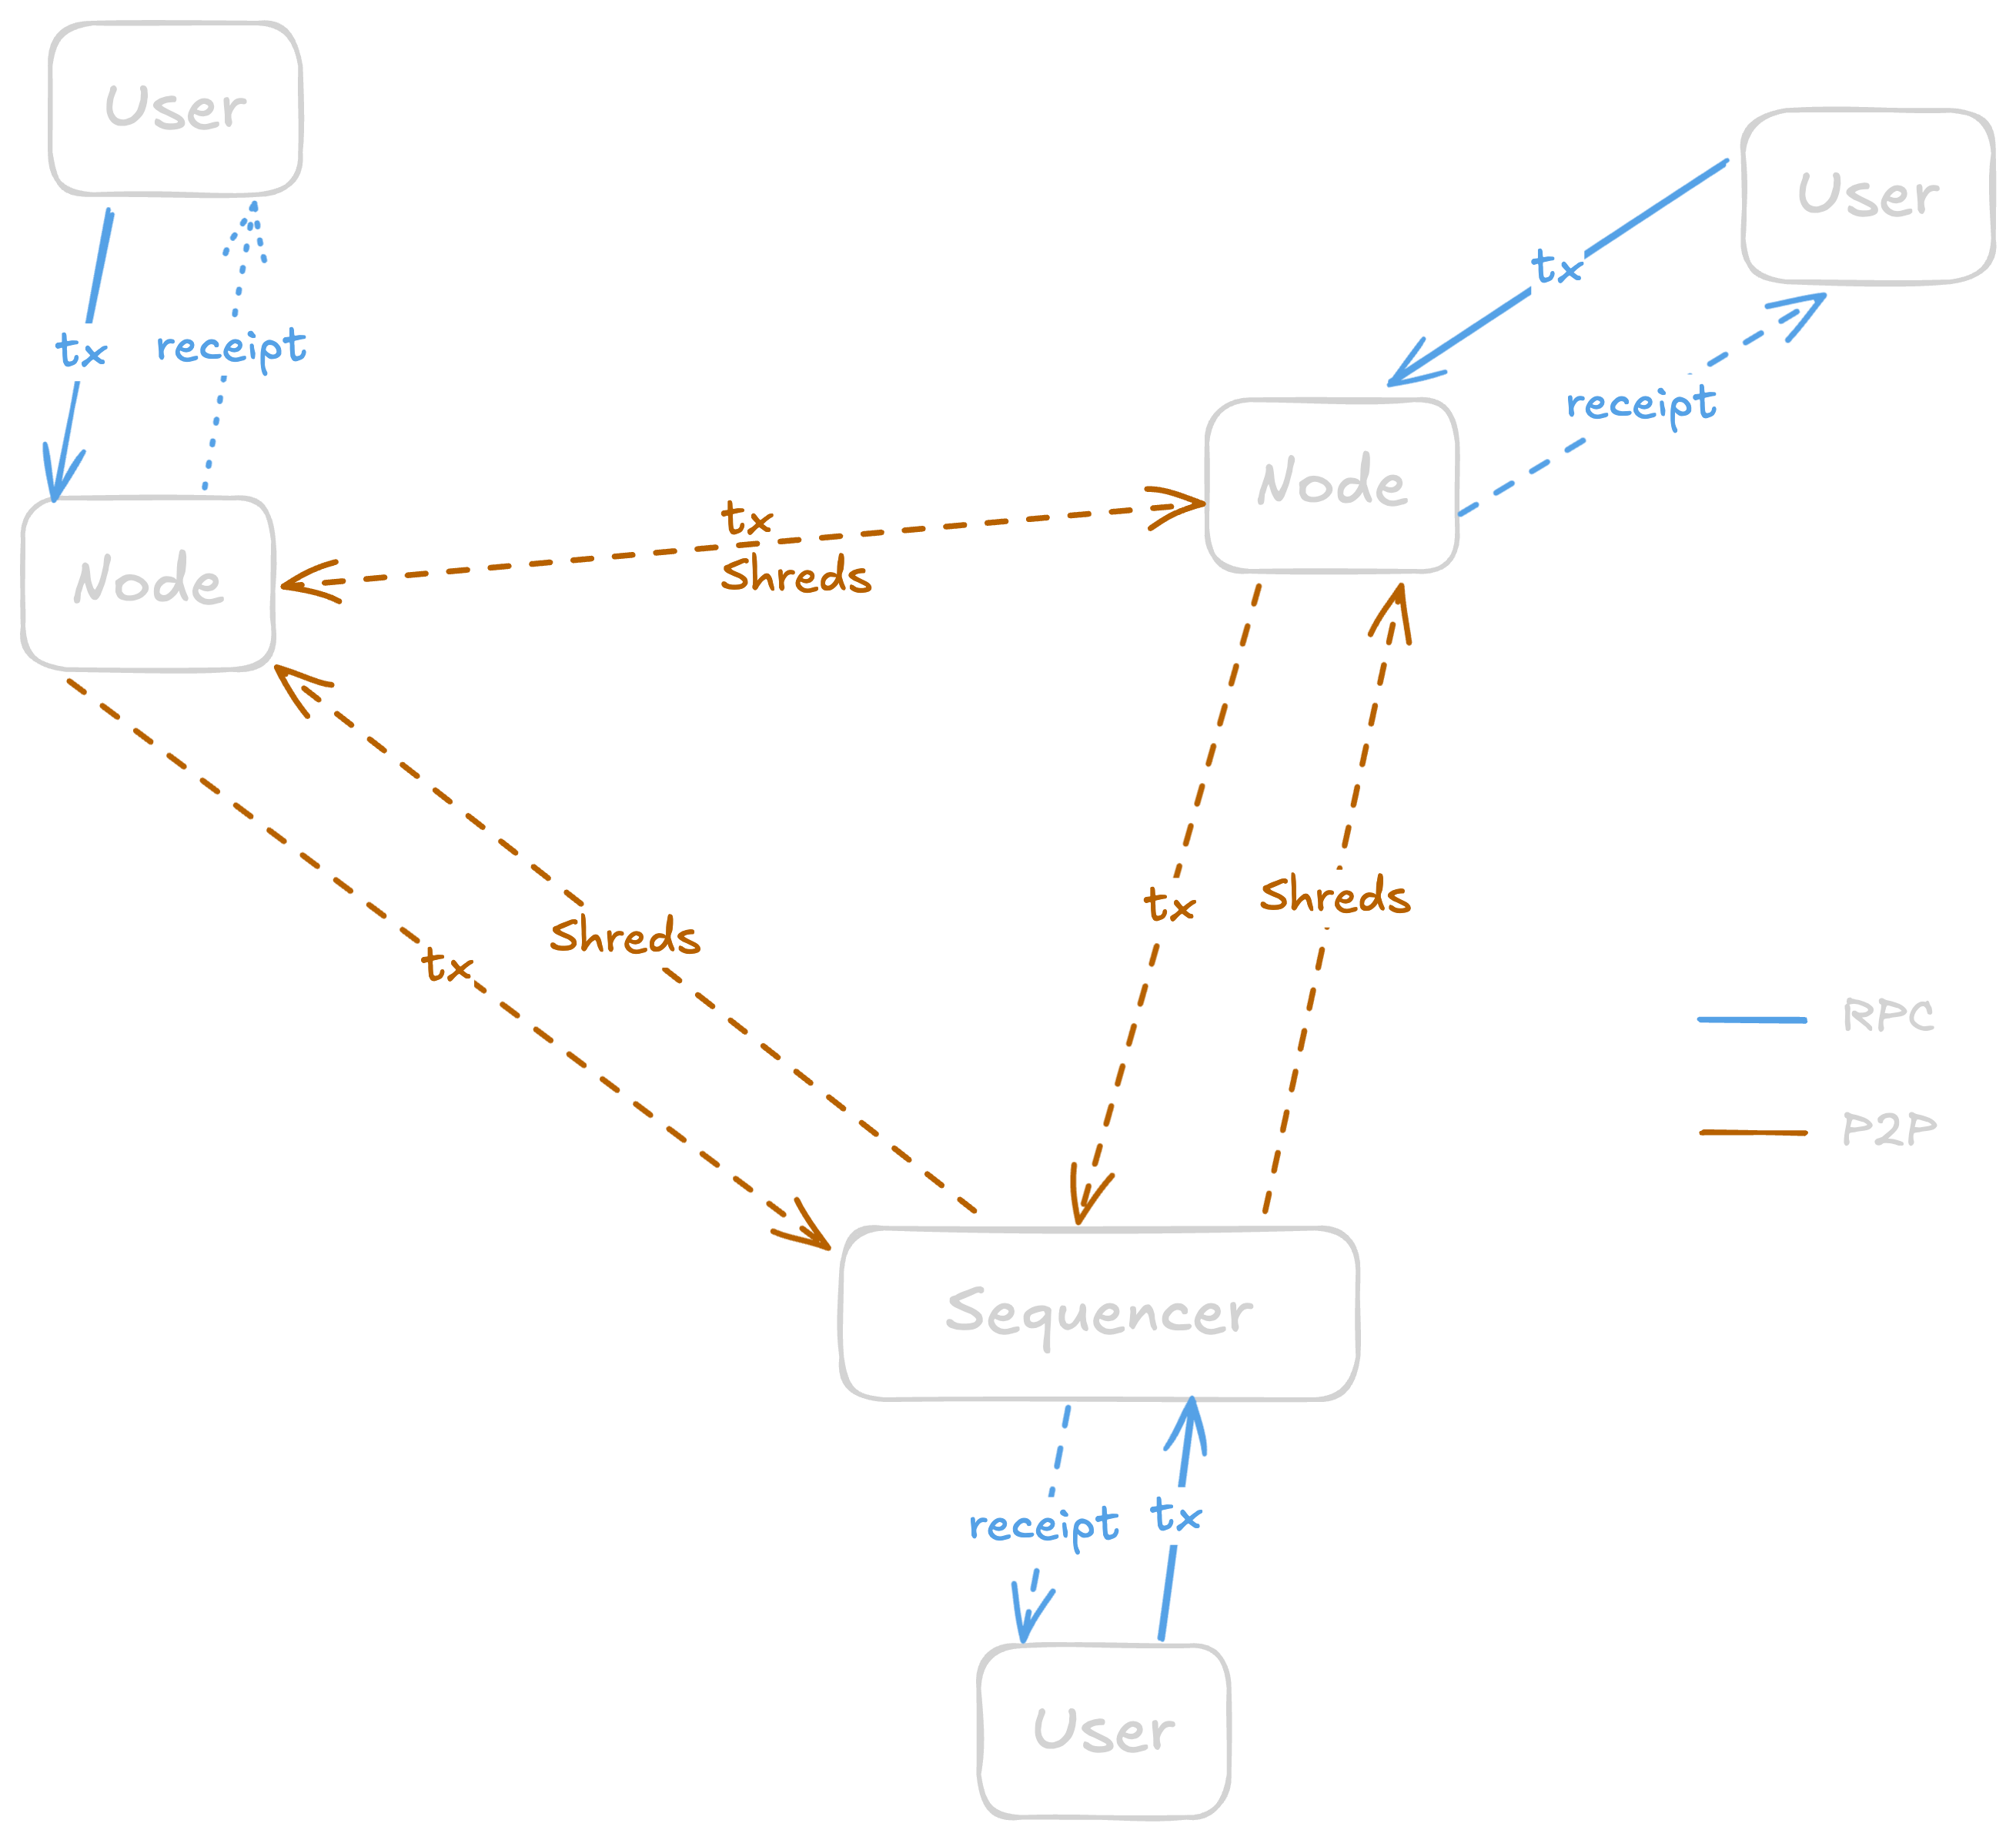
Users submit transactions to the current L1 proposer. The L1 proposer orders these transactions alongside regular L1 transactions. The rollup's execution node processes these transactions off-chain and generates a new state commitment. ## Based Preconfirmations While based sequencing solves centralization, it introduces a new problem: **latency**. Users must wait for L1 blocks to be included (typically 12 seconds) before seeing transaction confirmation, even though the sequencer is already part of L1. This is not wanted in a rollup as users are familiar with fast confirmations given by centralized sequencers. RISE solves this with **based preconfirmations**: cryptographically enforced promises from Ethereum proposers that certain events will happen in upcoming blocks. ### What Are Preconfirmations? A **preconfirmation** (or **preconf**) is a collateral-backed promise by the current proposer (or a **gateway**, whomever the proposer delegates to) that certain events will happen at a specific future timestamp. The fundamental shift is moving from **trust-based systems** to **a more trustless and cryptographically enforced system**. Instead of trusting a centralized sequencer, RISE uses Ethereum-enforced slashing mechanisms, and collateral requirements to reduce transaction latency from 12 seconds to milliseconds while maintaining security guarantees. ### Gateway Issuing preconfs adds many requirements to L1 proposers. To mitigate this sophistication, in our design, we assume the proposer delegates sequencing right to a sophisticated entity called a gateway (*a.k.a* a **preconfer**). Gateways function as intermediaries connecting Ethereum's block-building market to the L2. They serve as sequencers while providing L1-secured preconfs to users. Unlike traditional sequencers, gateways face slashing penalties for not honoring preconfs. Gateway The delegation is somewhat similar to how most proposers today delegate their block building tasks to builders. The delegation of preconf rights can occur through on-chain or off-chain mechanisms. We consider the off-chain approach (i.e, via the existing PBS pipeline) in this design. #### Registration and Collateral A registry contract is deployed for any L1 validators to sign up to become a sequencer for the RISE rollup. Upon registration, L1 validators also need to stake some collateral. This collateral requirement ensures that L1 validators are economically discouraged to misbehave as this will result in their collateral being slashed. #### Slashing The system penalizes two categories of violations: **liveness faults** (when preconfs were not included and the proposer's slot was missed) and **safety faults** (when preconfs were not included despite the proposer's slot being available). Both trigger slashing events that penalize the misbehaving validator's collateral. #### Gateway Delegation and PBS Integration Proposers delegate sequencing rights to gateways through existing PBS (Proposer-Builder Separation) pipelines. This architecture mirrors builder relationships in current Ethereum MEV workflows, ensuring compatibility with the existing block-building ecosystem. #### Batch Processing with Shreds Preconfs are issued in batches using [shreds](/docs/rise-evm/shreds). Batch preconfs inherently align with the operational efficiency of rollups, which are designed to process transactions in bulk. By issuing a single preconf for multiple transactions, rollups can potentially achieve lower overhead per transaction compared to providing individual preconf for each user. Shreds are currently variable in time to balance between throughput and latency. ### Preconf Propagation When users submit transactions, they send them to any node, which forwards them to the current gateway. The gateway orders these transactions into a shred, executes the shred, and broadcasts the resulting shred through the P2P network. This design ensures that preconfs are visible across the network in near realtime, giving users and applications strong assurance that their transactions will be included/executed. More details about shred propagation can be found [here](/docs/rise-evm/shreds#block-propagation). ### Fallback Gateway Mechanism To maintain liveness and availability, RISE employs a fallback gateway mechanism. This ensures the network continues functioning during gateway unavailability and addresses two critical scenarios: * **Cold-start problem**. In the early state of Phase 3 (see below), there might be only a few L1 validators opted into sequencing, creating gaps between preconf slots. A fallback gateway ensures continuous sequencing availability during this transition period. * **Liveness failures**. When an active gateway experiences operational issues that prevent rollup progression, a fallback sequencer steps in immediately rather than waiting for the full sequencing window to expire. The system monitors the maximum duration between consecutive state commitments. If no L2 state commitment is published within this period, the next gateway in rotation can take over immediately. This approach balances safety during early phases with the decentralization goals of the long-term vision, ensuring users always have confirmed transactions while progressively removing central dependencies. *** ## Implementation Roadmap RISE implements based sequencing in three phases, progressively decentralizing the network while maintaining operational maturity throughout the transition. ### Phase 1: The Taste The initial phase extends the current RISE sequencer to incorporate gateway functionalities. This phase proves that the gateway architecture works in practice and validates all necessary components before broader adoption. Key activities include implementing L1 interactions (slashing and delegation mechanisms), issuing L1-secured execution preconfs as shreds, testing gateway component maturity and reliability, and validating software stability under production conditions. By the end of this phase, a single gateway provides fast, L1-secured preconfs to users, slashing and delegation mechanisms are battle-tested, the system proves capable of handling transaction volume and latency requirements, and infrastructure is ready for decentralized participation. ### Phase 2: The Aligning This phase serves as a transitional phase before full permissionlessness. Multiple whitelisted gateways operate in a **round-robin rotation system**. RISE will remain in this phase long enough to ensure everything works correctly, the system is robust, and operational processes are mature before moving to full permissionlessness. During this phase, a default gateway (operated by RISE) serves as a fallback gateway to ensure the rollup's liveness. #### How Rotating Works Multiple gateways take turns to sequence the rollup. Each gateway operates during a fixed sequencing window (measured in L1 blocks) before handing off to the next gateway. Gateways rotate sequencing duties with each receiving equal opportunity to sequence during its window. The selection mechanism is fully deterministic and transparent on-chain: anyone can identify the current and next gateway using a deterministic formula derived from the L1 Registry contract. #### Efficient Handover The system ensures smooth handover through two mechanisms. * **Shred streaming** provides realtime block segments that deliver near-instantaneous state updates between gateways. * **Mempool synchronization** maintains a direct communication channel between current and the next gateways so they have consistent transaction pool views, allowing the next gateway to pre-process transactions not yet processed by the current gateway for instantaneous handover. #### Enhanced Liveness and Censorship Resistance This phase enhances the rollup's robustness in several ways. Multiple whitelisted but independent gateways share sequencing duties for decentralization, backup gateways prevent downtime if the current gateway goes offline, no single entity controls transaction ordering for censorship resistance, and the system survives individual gateway failures through redundancy. Rotation prevents any single entity from dominating block building over time, building long-term censorship capabilities. ### Phase 3: The Basedening The final phase removes gateway whitelisting entirely for full permissionless participation. Any Ethereum validator can become a gateway by delegating block-building rights through collateral staking. Gateways compete freely for users and transaction ordering, economic incentives align as validators earn fee portions for including rollup transactions. The economic incentives are straightforward: when proposers propose blocks, they include rollup transactions and receive fee revenue as compensation for sequencing. By this phase, rollup decentralization grows with Ethereum's validator set, no single entity can have full control over gateway participation, users benefit from free market competition among sequencers, and full permissionless composability with Ethereum is achieved. ## The Ultimate Vision When fully implemented, the boundary between RISE and Ethereum becomes smaller. RISE becomes not just a fast L2, but a natural extension of Ethereum itself, offering security with L1-enforced slashing, L1-secured near realtime preconf rather than waiting for L1 confirmation, full composability with Ethereum's block-building market. # Continuous Block Pipeline (/docs/rise-evm/cbp) # Continuous Block Pipeline (CBP) ## The Problem with Traditional Block Production In typical Layer 2 systems, block production follows a strictly sequential process, where only a small portion of the total blocktime is spent on actual transaction execution. This inefficiency stems from the traditional flow. * **Consensus (C)**: Deriving L1 transactions and new block attributes. This phase blocks all other operations. * **Execution (E)**: Executing derived transactions as well as L2 transactions from mempool. Execution is CPU-intensive. * **Merkleization (M)**: Sealing the block by computing the new commitment to the state. Merkleization is IO-intensive and increases in cost as state size grows.
Block Pipeline OP Stack Block Pipeline OP Stack
*A typical block pipeline for an L2 with a one-second block time and large state. The block gasLimit will be limited by how much gas can be processed in the time allocated to execution; however, in this system, execution accounts for only a minority of the block-building pipeline. The first block in an epoch has longer consensus time due to L1 and deposit derivation.* Typically, these steps are sequential. As (C) and (M) can be slow, only a fraction of a block time is spent on executing user transactions sent to the mempool. This insufficient use of blocktime leads to poor performance on many L2s. For instance, we measured in early 2024 that OP-Reth only spent 12%-36% of a second executing mempool transactions, meaning: * If a hardware is fast enough to execute 10k transactions a second, the throughput is unfortunately capped at only 1200-3600 TPS. * If a user transaction enters the mempool at an unlucky time, it may have to wait 640ms-880ms before processing, even without congestion. ## RISE's Continuous Block Pipeline RISE introduces **a multi-threaded block pipeline that parallelizes key computations**, most importantly transaction execution and state root calculation.
Continuous Block Pipeline Continuous Block Pipeline
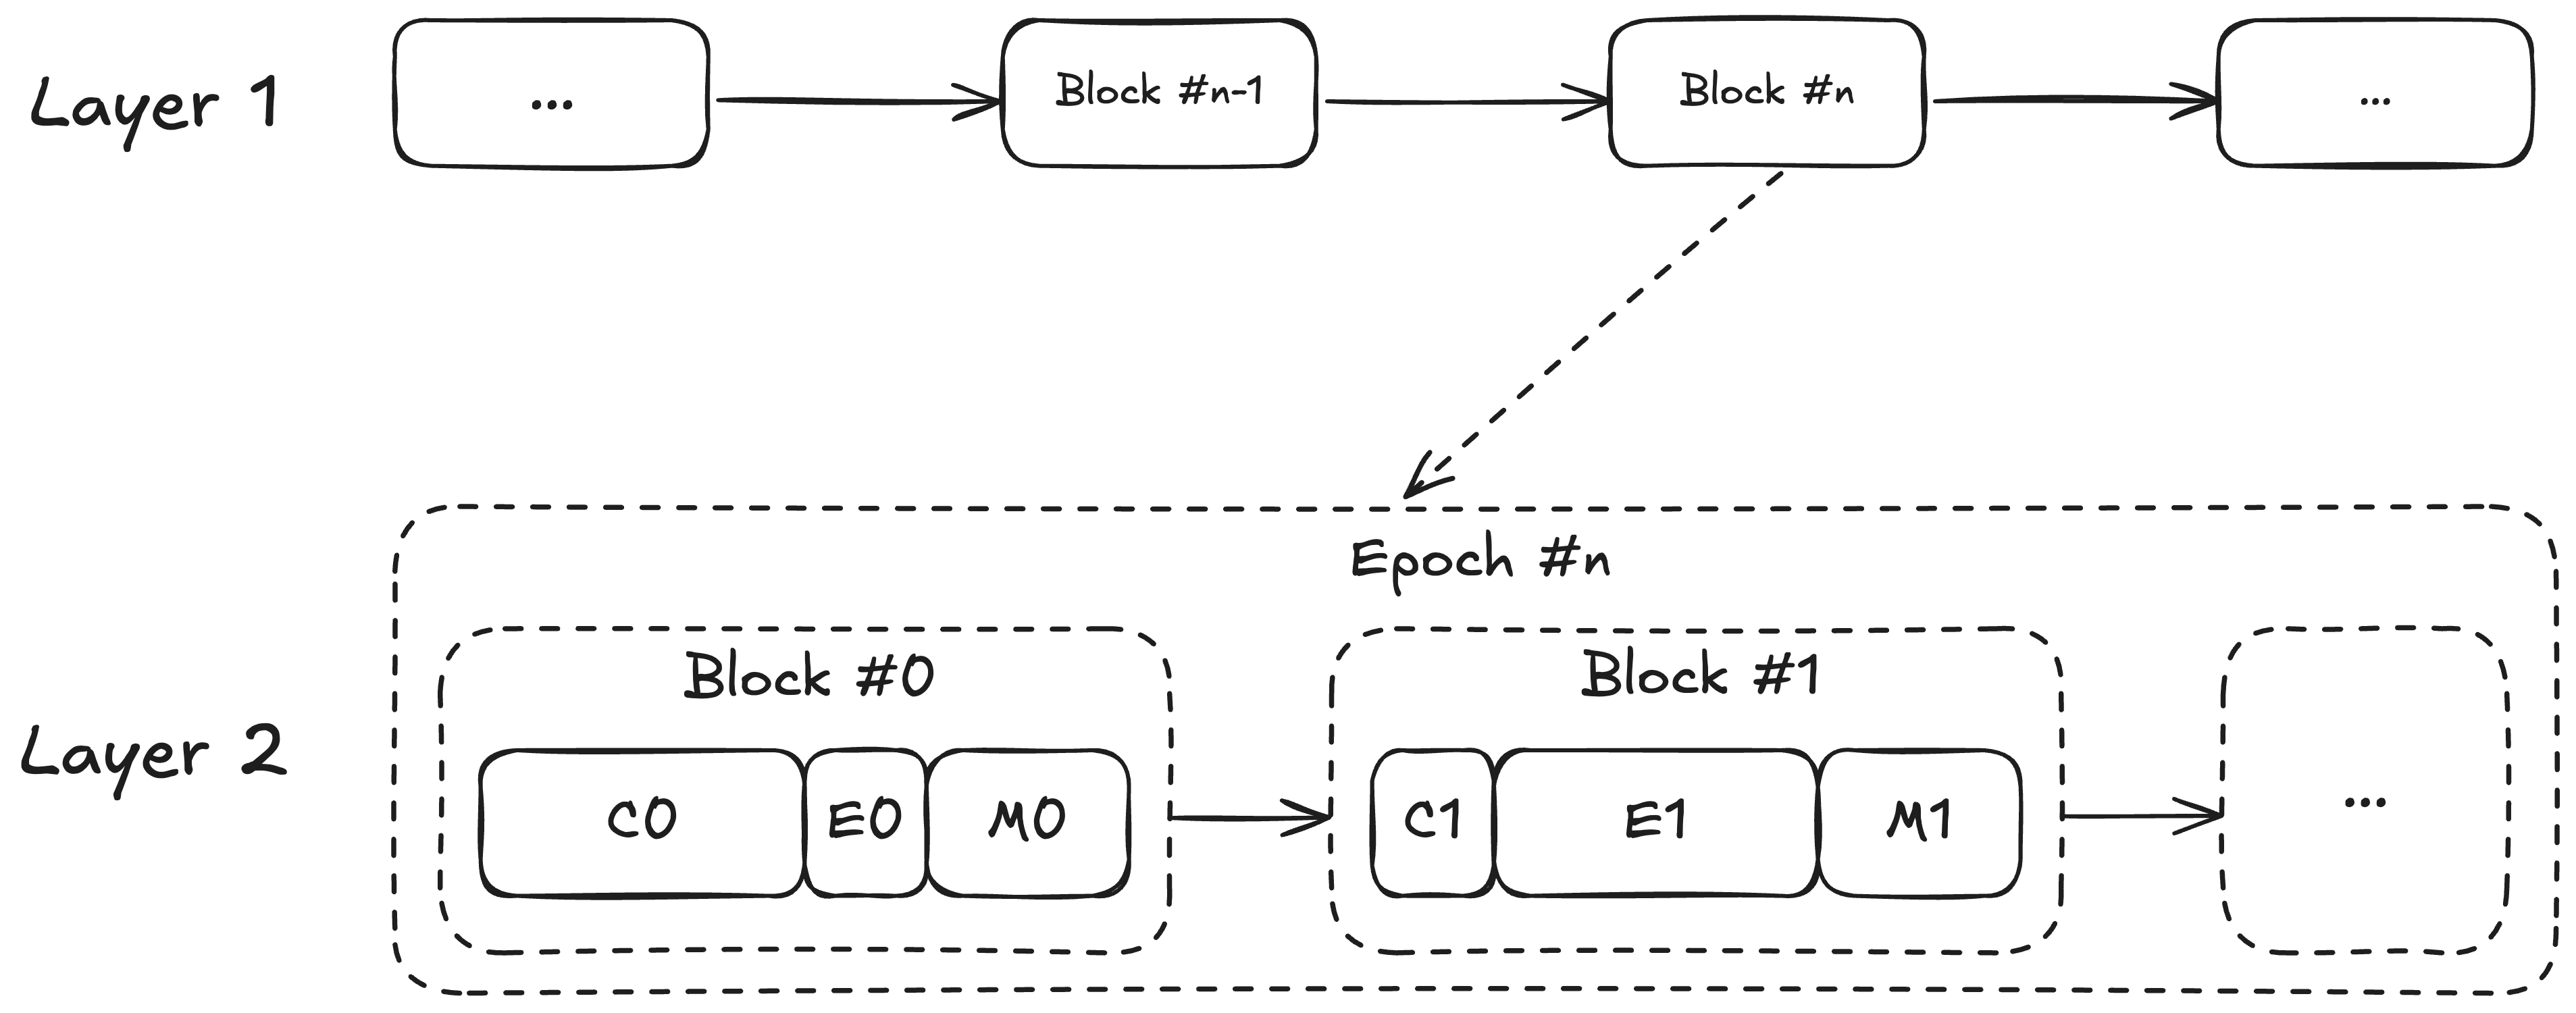
There are currently 3 threads: * A pre-execution thread constantly executes new L2 transactions from the mempool and no longer waits for CL to request a new block. * A dedicated thread for state root calculation. * A main driving thread that listens to new attributes and seals payloads from pre-executed results. The key idea is to pre-execute transactions for the next block as we calculate the state root of the current pending block, and to calculate the state root in parallel to other payload calculations (transactions root, receipts root, etc.). **The biggest effect is the RISE Block Pipeline executing transactions close to 100% of the available block time**. This ensures throughput can go as high as the hardware physically can execute transactions. A longer L2 transaction processing duration per block also makes it easier for a user transaction to land on the pending block immediately, instead of needing to wait for the next block cycle. In fact, when there is no congestion, transactions are executed immediately as they hit the RPC server and get inserted into the mempool. Furthermore, we override Reth's default implementation of `eth_getTransactionReceipt` to return receipts before the pending block is canonicalized, and add `eth_sendRawTransactionSync` ([EIP-7966](https://eips.ethereum.org/EIPS/eip-7966)) to submit a transaction and get back the receipt all-in-one round trip. Combined with [shreds](./shreds), the RISE Block Pipeline can return "real-time" receipts in ping plus 1\~3ms. We also had successful experiments running extra threads for bringing in new mempool transactions, post-processing, parallel state root calculation, etc., but the works are still in progress. The key is to maximize CPU time for transaction execution, and to an extent also merkleization. In conclusion, as is, RISE's Continuous Block Pipeline minimizes transaction (receipt) latency and 3x-8x the chain throughput. ## Key Challenges ### Pending Block Hash Pre-execution doesn't have access to the state root of the parent block (being calculated in parallel), so any transaction trying to read it via the `BLOCKHASH` opcode or EIP-2935 would fail. We handle this by scheduling an in-time executed block at most every 12 seconds if we notice there's such a transaction. Most applications reading the pending block hash use it for on-chain randomness, for which we are encouraging dApps to replace with [much better on-chain VRF](https://blog.risechain.com/instant-blockchains-need-instant-randomness) anyway. Historical block hashes are unaffected. ### L1 Origin Switches L1 data like `PREVRANDAO` and deposits affect L2 state transitions. Naively pre-executing an L2 block with stale L1 data would lead to wrong state transitions. To handle this, we extend CL to send an extra set of payload attributes when there's an L1 origin switch, for pre-execution to start with the correct L1 data immediately. Otherwise, attributes are mocked for in-between L2 blocks, which only require counting up the sequence number of the first L1 Block Info transaction in the L2 block.
Double Payloads Double Payloads
Long-term, we will replace Engine API with straightforward intra-process communication between an **L1 watcher** and the block pipeline. ## Ongoing & Future Plans * Add a new thread for adding incoming transactions in parallel to transaction execution. * Add a new thread for post-processing (shred building & broadcasting, etc.) in parallel to transaction execution. * Add more threads for state root calculation, first for parallel storage roots, and then for the parallel sparse trie. * Add more threads for execution with Parallel EVM. * Merge CL with EL and replace network-based payloads (Engine API) with intra-process communication. # Data Availability (/docs/rise-evm/data-availability) # Data Availability ## Motivation Data availability (DA) guarantees that all the necessary information to reconstruct the state of a rollup is available to anyone who needs it. This is crucial for the security of rollups, as it allows anyone to independently verify as well as challenge the validity of transactions and the state of the rollup. Furthermore, DA ensures that users can still access their funds and withdraw from the rollup even if the rollup itself (i.e, the sequencer) goes offline. Ethereum introduced a new DA layer (blobs) to complement to the old `calldata` DA in its [Dencun hardfork](https://ethereum.org/en/roadmap/dencun/) with EIP-4844. Blobs enable cheaper DA costs (compared to `calldata`) as blobs’ data is transient and will be expired in around 18 days. This in turn helps reduce the overall cost for a rollup. However, the current blob throughput is limited. At the current state, Ethereum targets 6 blobs per block, with the maximum of 9 blobs. This translates to the target throughput of 64KB/s. The blob throughput is expected to (theoretically) be 8x after the Fukasa upgrade (expected late 2025), this will scale the target throughput to 512KB/s through PeerDAS v1.x. However, even with the upgrade, this throughput is insufficient for a high-load rollup like RISE. *** ## EigenDA We use [EigenDA](https://www.eigenda.xyz/) as the main DA layer for our rollup in the normal case. EigenDA’s Mainnet currently supports a throughput of [100 MB/s](https://x.com/0xkydo/status/1950571973790363737), with the average confirmation of 5s. With this impressive throughput, EigenDA is able to provide sufficient throughput for RISE to operate upon. EigenDA also offers good Ethereum alignment as it leverages restaking through EigenLayer to achieve native Ethereum integration through EigenLayer, directly leveraging Ethereum's validator set via restaking. EigenDA uses Ethereum for operator registration, dispute resolution, and settlement, with no separate consensus layer. *** ## Ethereum Blob Fallback In the event of EigenDA unavailability, the rollup can fall back to posting transactions to Ethereum’s blobs. This helps maintain the rollup’s liveness and ensure users’ funds not getting stuck in the rollup’s bridge. Ethereum fallback is triggered whenever the `op-batcher` receives an error from EigenDA or fails to receive any acknowledgement from EigenDA, or in the case where the batcher does not have enough funds to pay EigenDA transaction fees. After issues with EigenDA have been addressed, the `op-batcher` will switch back to EigenDA as the main DA layer. # RISE Chain Architecture (/docs/rise-evm) # Architecture Traditional web servers update state in a continuous, interrupt-driven manner. This means transactions are processed as soon as they arrive. When demand is high, servers implement queueing to manage the load and process requests as resources become available. This is the exact UX we aim to achieve with RISE. RISE provides developers with exceptional performance and capabilities while delivering near-instant latency and seamless user experience. RISE achieves over 1 GGas/s with millisecond-latency for immediate transactions. ## Components The figure below details the high-level architecture of the RISE stack.
RISE Stack Architecture RISE Stack Architecture
* **Execution**. A revolutionary EVM-compatible execution engine that redefines performance with infinite speed. * **Parallel EVM (pevm)**. The ultimate parallel EVM engine * **Continuous Block Pipeline (CBP)**. Executing transactions while residing in mempool. * **Shreds**. Efficient interrupt-driven block construction. * **RiseDB**. A custom DB specifically designed for EVM chain states. * **Data Availability**. A highly performant DA layer with Ethereum fallbacks. * **ZK Fraud Proofs**. Simpler fraud proofs for better UX. * **Based Sequencing**. The RISE's plan for decentralization. ## Core Components The RISE stack delivers exceptional performance through these key components: ### Execution Engine * **[Continuous Block Pipeline](/docs/rise-evm/cbp)** - Continuous block processing pipeline for optimal throughput * **[Shreds](/docs/rise-evm/shreds)** - Fast transaction shredding for parallel execution ### Settlement & DA * **[ZK Fraud Proofs](/docs/rise-evm/zk-fraud-proofs)** - Hybrid rollup approach combining optimistic and ZK proving for efficient fraud resolution * **[Data Availability](/docs/rise-evm/data-availability)** - Modular DA layer leveraging Celestia and EigenDA for scalability ### Network Layer * **[Transaction Lifecycle](/docs/rise-evm/tx-lifecycle)** - Complete transaction processing pipeline from submission to finality * **[Network Participants](/docs/rise-evm/network-participants)** - Overview of RISE network participant types, roles, and hardware requirements ### Future Improvements * **[Parallel EVM (PEVM)](/docs/rise-evm/pevm)** - The ultimate parallel EVM engine * **[Based Sequencing](/docs/rise-evm/based-sequencing)** - Decentralized sequencing leveraging Ethereum L1 with cryptographically enforced preconfirmations and rotating gateways These components work together to deliver over 100,000 TPS with sub-10ms latency while maintaining full EVM compatibility and Ethereum's security guarantees. # Layer 2 Architecture (/docs/rise-evm/layer-2) Content coming soon. # Network Participants (/docs/rise-evm/network-participants) # Network Participants Traditional blockchains requiring every node to re-execute all transactions face significant drawbacks that hinder scalability, decentralization, and efficiency. This creates a problem when a blockchain wants to scale up its performance: **it needs to scale up the specs for all nodes in the network**. This is not wanted as fewer participants are able to join the network. RISE's architecture features specialized network participants with distinct roles and hardware requirements, designed to enable scalability without requiring all nodes to re-execute transactions. Together with different optimization strategies, nodes are aided by the sequencer when performing state updates, further lowering hardware requirements to minimums.
Network Architecture Network Architecture
In this doc, we use Capitalized words to denote distinct types of network participants. This convention helps clearly differentiate key roles such as **Sequencers**, **Replicas**, **Fullnodes**, **Challengers**, and **Provers** emphasizing their specific responsibilities within the network. *** ## Participants ### Sequencers Sequencers serve as the network's core, ordering and processing transactions, then batching them for L1 submission. They leverage optimized execution engines (including [pevm](/docs/rise-evm/pevm), [CBP](/docs/rise-evm/cbp) and [shreds](/docs/rise-evm/shreds)) to achieve high performance. In RISE's based sequencing model, sequencers are [gateways](/docs/rise-evm/based-sequencing) operated by Ethereum validators. ### Replicas Replicas synchronize with the chain by applying state-diffs from the Sequencer rather than re-executing transactions. This approach allows indexing services, block explorers, and archival nodes to operate on commodity hardware while relying on fraud proofs for security verification. Replicas maintain the full chain state without the computational overhead of re-execution. ### Fullnodes Fullnodes re-execute transactions to independently verify state updates, requiring higher hardware specs than Replicas but lower than Sequencers. They benefit from metadata (e.g, state-diff, dependency DAG) provided during synchronization, allowing them to verify state changes more efficiently than re-execution. Fullnodes provide a security checkpoint for the network because they can detect and challenge invalid state transitions. ### Challengers As an L2, we also need a special party to submit challenges to the L1 when it detects a misbehavior of the Sequencer. This party is called **Challenger**. A Challenger must maintain a Fullnode to be able to re-execute transactions provided by the Sequencer. It only requires a single honest Challenger to maintain the security of the L2 chain. This economic incentive model ensures that even if most participants are dishonest, one honest Challenger can protect all users. ### Provers Provers generate validity proofs using specialized hardware accelerators (FPGA/GPU) when fraud challenges occur. They operate only when needed, activated only when the Sequencer misbehaves, making them cost-effective participants. Provers don't need to run continuously; they can be brought online on-demand as disputes arise. *** ## Hardware Specs Sequencers consume the most resources because they must execute all transactions with high performance to maintain network throughput. Replicas are optimized for accessibility, requiring minimal hardware since they avoid transaction re-execution. Fullnodes and Challengers sit in the middle, requiring enough resources for independent verification. Provers operate on-demand with specialized accelerators, making them cost-effective despite their hardware needs. | Node Type | Sync Method | Security | Hardware Requirements | | --------------- | ---------------------- | ------------------------------ | ------------------------------------------ | | **Sequencers** | Self-execution | High | 32GB RAM | | **Replica** | State-diff appliance | Low, depending on fraud proofs | 8-16GB RAM | | **Fullnodes** | Re-execution with aids | High, same as the Sequencer | 16-32GB RAM | | **Challengers** | Same as Fullnodes | High, same as Fullnodes | 16-32GB RAM | | **Provers** | Trusting the Sequencer | N/A | Depending on proving services, rarely used | The diversity in hardware requirements ensures RISE can accommodate participants ranging from individual operators running lightweight Replicas to infrastructure providers operating high-performance Sequencers, all contributing to the security and resilience of the network. # Parallel EVM (PEVM) (/docs/rise-evm/pevm) # Parallel EVM (PEVM) Note the PEVM is not currently live on RISE & is a future improvement. We have already published the PEVM implementation in [GitHub](https://github.com/risechain/pevm) for reference. With our current architecture still able to achieve 1 GGas/s with sub 3 millisecond-execution. ## Motivation ### The Sequential Execution Bottleneck Ethereum's execution model processes transactions sequentially by design. This sequential constraint stems from a fundamental requirement for distributed consensus: **all network participants must compute identical results**. While this sequential guarantee ensures correctness, it creates a severe performance limitation. Modern CPUs contain 8 to 16 cores, yet the EVM execution path utilizes only a single core. The remaining cores are idle while waiting for the current transaction to complete. Additionally, independent transactions that could be executed in parallel are still executed in a sequential manner, creating unnecessary latency for users and limiting the network throughput. As a result, there exists a performance gap between Ethereum (and its rollups) and competitors like Solana: * Ethereum and its rollups combined are processing around only [200-300 TPS](https://rollup.wtf/) across 50+ rollups. * In contrast, Solana consistently produces 1000-2000 TPS, about 10 times larger than that of all rollups combined. ### EVM Parallelization Challenges Parallel execution for blockchains has gained prominence with Aptos, Sui, and Solana, but EVM-compatible implementations face unique challenges. Early attempts to parallelize EVM execution, notably by Polygon and Sei using [Block-STM](https://arxiv.org/abs/2203.06871), showed limited gains, mainly due to: 1. Lack of EVM-specific optimizations tailored to Ethereum's state access patterns. 2. Implementation limitations in languages like Go (with garbage collection pauses). 3. Overhead from synchronization mechanisms that negate parallelism benefits. ### Slow State Root Calculation Beyond transaction execution, the full block processing pipeline faces a secondary bottleneck. After executing all transactions, nodes must calculate the Merkle root of the new state (the state root). This computation can be as expensive or even more expensive than transaction execution itself. If state root calculation exceeds the block time, there will be less time left for execution, causing a performance loss. [RISE parallel EVM (pevm)](https://github.com/risechain/pevm) sets to address these limitations through a ground-up redesign focused on the EVM's unique characteristics that efficiently **executes transactions, broadcasts results, and calculates the state root in parallel**; tightly implemented in Rust for minimal runtime overheads. *** ## Technical Overview ### What is pevm? pevm is a revolutionary execution engine that enables concurrent processing of EVM transactions while maintaining deterministic outcomes. By distributing transaction execution across multiple CPU cores, pevm dramatically increases throughput and reduces latency compared to traditional sequential execution. Key features include: * Optimistic execution of transactions in parallel. * Detection of transaction dependencies and conflicts to ensure deterministic outcomes. * Compatibility with existing sequential executors for easy integration and performance boosts. ### Optimistic Concurrent Execution pevm is built upon the foundation of [Block-STM's](https://arxiv.org/abs/2203.06871) optimistic concurrent execution: rather than predicting dependencies, pevm assumes transactions are independent, executes them in parallel, then validates the execution afterward. The engine dynamically identifies transaction parallelism without requiring developers to change anything (like explicitly declaring access states in Solana and Sui). Regardless, dApps do need to innovate new parallel designs to get more out of the parallel engine, like [Sharded AMM](https://arxiv.org/abs/2406.05568) and RISE's upcoming novel CLOB; just like how multiprocessors gave rise to the design of multithreaded programs. Overall, this strategy trades computational work (re-executing conflicting transactions) for parallelism. On blocks with numerous independent transactions, re-execution overhead is minimal because few conflicts occur. On blocks with sequential dependencies (e.g., multiple transactions sequentially updating the same contract), re-execution occurs but the system gracefully degrades to near-sequential performance, avoiding the overhead of parallel coordination. ### EVM-Specific Innovations pevm's contribution is not just the Block-STM itself, but rather its adaptation to EVM's specific challenges. #### Lazy Updates All EVM transactions in the same block read and write to the same beneficiary account for gas payments, making all transactions interdependent by default. pevm addresses this by utilizing lazy updates for this account. We mock the balance on gas payment reads to avoid registering a state dependency and only evaluate it at the end of the block or when there is an explicit read. We apply the same technique to other common scenarios such as raw ETH or ERC20 transfers. This enables the ability to parallelize transfers from and to the same address, with only a minor post-processing latency for lazy evaluations. #### Mempool Preprocessing Unlike previous rollups that ordered transactions by first-come-first-served or gas auctions, RISE innovates a new mempool structure that balances latency and throughput. The goal is to pre-order transactions to z shared states and maximise parallel execution. This has a relatively similar effect as the local fee market on Solana, where congested contracts & states are more expensive regarding gas & latency. Since the number of threads to execute transactions is much smaller than our intended TPS, we can still arrange dedicated threads to execute high-traffic contract interactions sequentially and others in parallel in other threads. *** ## Architecture Design Blockchain execution must be deterministic so that network participants agree on blocks and state transitions. Therefore, parallel execution must arrive at the same outcome as sequential execution. Having race conditions that affect execution results would break consensus. ### Legacy Architecture RISE pevm started out with Block-STM's optimistic execution, with a collaborative scheduler and a multi-version data structure to detect state conflicts and re-execute transactions accordingly. pevm comprises several interacting layers: * **Scheduler** manages and distributes tasks to worker threads. It maintains atomic counters for execution and validation task indices, allowing worker threads to claim tasks without conflict. Besides, the scheduler tracks transaction status (ready for execution, currently executing, awaiting validation, validated, or aborting) and manages transaction incarnation numbers (re-execution counts). * **Worker Threads** are executor agents. In pevm, multiple worker threads operate in parallel and independently. Each worker thread executes a sequence of tasks assigned by the scheduler: execution tasks and validation tasks. Workers do not directly synchronize with each other; all coordination occurs through the scheduler and multi-version memory structures. * **Multi-Version Memory (MvMemory)** is the central data for conflict detection. MvMemory preserves a complete history of all writes, indexed by transaction index. For each location, MvMemory tracks which transaction wrote what value and in what order. When a transaction reads a location, it retrieves the most recent value written by any lower-indexed transaction. This versioning enables validation: after a transaction executes, validation can determine whether the specific transactions that wrote to each read location have changed. Legacy pevm Architecture We made several contributions fine-tuned for EVM. For instance, all EVM transactions in the same block read and write to the beneficiary account for gas payment, making all transactions interdependent by default. RISE pevm addresses this by lazy-updating the beneficiary balance. Rather than writing actual beneficiary balance changes during execution, pevm defers this update at the end of block execution. Similarly, for raw ETH transfers to non-contract addresses, it defers both sender and recipient balance updates. These lazily-accumulated values are accumulated throughout the block and evaluated once at execution completion, or on-demand if explicitly read. However, the legacy architecture has a limitation: it wraps the [revm](https://github.com/bluealloy/revm) EVM implementation as a black box. The custom database interface (VmDB) intercepts reads and writes but cannot optimize the internal execution flow. ### Early Performance Benchmarks Although the legacy pevm is in pre-alpha stage, [early benchmarks](https://github.com/risechain/pevm/tree/main/crates/pevm/benches) already show promising results: * For large blocks with few dependencies, Uniswap swaps saw a 22x improvement in execution speed. * On average, pevm is around 2x faster than typical sequential execution for a variety of Ethereum blocks. * The max speed-up is around 4x for a block with few dependencies. * For L2's with large blocks, pevm is expected to consistently surpass 5x improvement in execution speed. *** ## Future Works: pevm Evolution As we worked on our [continuous block pipeline](/docs/rise-evm/cbp), [shreds](/docs/rise-evm/shreds), and [Reth's parallel sparse trie](https://github.com/paradigmxyz/reth/tree/v1.9.3/crates/trie/sparse), we eventually found ways to innovate Parallel EVM way beyond what BlockSTM originally proposed. The ultimate goal is to achieve 10 Gigagas/s and beyond, making RISE pevm the fastest EVM execution engine available. New pevm Architecture The new architecture aims to accelerate the legacy architecture through the following optimizations. ### Inline Parallel-Aware EVM Rather than wrapping [revm](https://github.com/bluealloy/revm), the new architecture implements an EVM interpreter specifically designed for parallel execution. The inline interpreter sets to minimize VM overheads, and enable efficient sharing of read-only bytecode and state across worker threads. ### Shred Integration As [shreds](/docs/rise-evm/shreds) are becoming more mature, we will add shreds to broadcast pending states per committed transactions in realtime, enabling fullnodes and dApps to observe state changes in realtime. Furthermore, each shred contains a state-diff from the previous state, making it possible for following nodes to build a transaction dependency graph (i.e, DAG), further accelerate re-execution performance. ### Sparse Trie for State Root Calculation Computing the Merkle root of all state changes is computationally expensive and traditionally blocks the critical path. The new design employs a sparse trie to accelerate state root calculation. Rather than computing a state root after all transactions complete, the system progressively updates the trie as transactions validate, with background worker threads computing Merkle proofs in parallel. This reduces the overhead of state root calculation from the critical path, leaving more time for execution. ### Extended Resource-Aware Scheduler We extend the scheduler to also schedule shred committing and multiproof tasks, with a new design that is highly resource-aware. The new scheduler evolves beyond distributing execution and validation tasks to coordinating a richer task set: **execution, validation, multiproof generation, and shred commitment**. It becomes *resource-aware* by analyzing CPU and memory usage, dynamically adjusting task priorities and worker thread assignments. # RiseDB (/docs/rise-evm/rise-db) # RiseDB ## Motivation Every transaction in a blockchain updates state: account balances change or contract updates, and historical records accumulate. Managing this state efficiently is critical to blockchain performance. However, traditional state management architectures face significant bottlenecks that limit throughput and increase latency. The current state storage uses a two-layered architecture. * **Merkle Patricia Trie (MPT)**. An authenticated data structure that guarantees data integrity and is typically built using a Merkle tree-like structure. It also provides a mechanism to verify the presence of specific data within the state. Nodes in the ADS are usually connected via hashes, and each node is stored in the underlying database * **Backend database**. A component that helps persist data to disks; manages physical storage and retrieval; and handles compaction and organization of data. This backend database is often LSM-based. This diagram illustrates the structure:

A read to the state involves traversing the MPT from its root down to the target leaf node. During this traversal, the MPT must fetch the content of each node from the backend database (if not cached). Due to the LSM tree structure of the database, each query itself involves multiple disk accesses. Consequently, a single read operation often translates into many I/O operations. This amplification effect worsens as the state size increases. Simplified Merkle Patricia Trie *A simplified version of the Ethereum’s MPT (source: [CSDN](https://it007.blog.csdn.net/article/details/86551694?spm=1001.2101.3001.6650.19\&utm_medium=distribute.pc_relevant.none-task-blog-2%7Edefault%7EBlogCommendFromBaidu%7Edefault-19-86551694-blog-79992072.pc_relevant_multi_platform_whitelistv1_exp2\&depth_1-utm_source=distribute.pc_relevant.none-task-blog-2%7Edefault%7EBlogCommendFromBaidu%7Edefault-19-86551694-blog-79992072.pc_relevant_multi_platform_whitelistv1_exp2\&utm_relevant_index=25)). All keys have the same `a7` prefix so an extension node is created to save space and redundancy. The same goes for `a77d337` and `a77d397` which share the same `d3` prefix.* The MPT aims to reduce redundancy and I/Os by compressing nodes with a single child to form so-called extension nodes. As reads need to query all nodes along the path from the root down to the target leaf node, extension nodes help reduce the number of queries. Extension nodes are more effective when the underlying data is sparse. However, as the state grows, the data becoming less sparse, effectively reducing the effects of extension nodes. For a high-performance rollup like RISE targeting 100k+ TPS, this traditional architecture becomes a bottleneck. Every millisecond of latency in state access directly reduces the number of transactions RISE can process per second. *** ## RiseDB RiseDB is a high-performance verifiable key-value store with a specific focus on efficiently managing the state of blockchain networks. One key objective of RiseDB is to achieve significantly faster state updates and access compared to existing solutions. This high throughput is compulsory for blockchains striving to support a large and active user set with numerous transactions. ### Unified Architecture Traditional systems manage world state and Merkle trees separately, creating overhead and redundant operations. RiseDB merges world state and Merkle tree storage into a single, streamlined architecture, eliminating the overhead associated with managing separate layers, leading to more efficient data handling and merkleization processes. This unified design eliminates context switches between different storage engines, reduces data duplication, and streamlines state operations. ### Low Memory Footprint The memory footprint of RiseDB is very small, allowing it to operate efficiently on consumer-grade computers, potentially lowering the barrier to entry for participating in blockchain networks. As a result, it enables broader node participation, reduces operational costs for node operators, and maintains the network's resilience by not requiring expensive infrastructure. Furthermore, the low memory footprint does not come at the cost of performance, RiseDB achieves high-speed operations while remaining memory-efficient. ### SSD-Optimized Access Patterns RiseDB employs a storage design carefully tailored to leverage the strengths of modern SSDs, optimizing access patterns to maximize throughput and durability. By organizing data in a way that minimizes costly random writes and favors sequential, append-only operations, RiseDB efficiently utilizes SSD I/O capabilities. # Shreds (/docs/rise-evm/shreds) # Shreds Shreds enable a user experience that feels like the modern web, but on a blockchain. They generate transaction preconfirmations within single-digit milliseconds, reacting to demand in real time. Unlike traditional blockchains, which wait for discrete blocks to process, Shreds are continuous and interrupt-driven.
Latency with and without Shreds Latency with and without Shreds
## Breaking Down Blocks When posting summaries to L1 and DA, a rollup typically batches multiple L2 blocks together to reduce costs. Since merkleization is not required for every L2 block, we can break L2 blocks (12-second long) into **Shreds** (sub-second long), essentially **mini-blocks without a state root**. Constructing and validating these Shreds is much faster due to the omission of state root merkleization. Therefore, broadcasting them enables rapid transaction and state confirmations. This improved latency doesn't sacrifice security, as new L2 blocks can only provide unsafe confirmations anyway. [//]: # "![Shred flow](/shred_flow.png)" *** ## What are Shreds? Shreds partition an L2 block into multiple consecutive, connecting segments. Each Shred for an L2 block is identified via its sequence number. In other words, `block_num` and `seq_num` together can always identify a Shred. The sequence number increases for each Shred and resets when a new L2 block is constructed. A Shred contains a **ChangeSetRoot** that commits to all state changes made within the Shred. During execution, the sequencer uses the flatDB to access data and records all changes to a **ChangeSet**. The number of entries in a ChangeSet is relatively small compared to the state size because it only holds the changes, therefore the data is sparse and can fit in memory. As a result, constructing the ChangeSetRoot can be efficiently done. *** ## Block Propagation Broadcasting is done per Shred instead of waiting for the full L2 block. Shreds with invalid signatures are discarded. As peer nodes receive valid Shreds, they optimistically construct a local block and provide preconfirmations to users.
Shreds Propagation Shreds Propagation
The sequencer might also broadcast the ChangeSet within a Shred to its peers. This ChangeSet can be verified against the ChangeSetRoot attached to the Shred's header. Nodes trusting the sequencer can apply the ChangeSet immediately to their local state without re-executing transactions. *** ## Batch Preconfirmations Preconfirmations are issued per batch via Shreds instead of per individual transaction. Users can receive preconfirmations without waiting for the entire L2 block to be completed. The Shred blocktime can be configured to balance multiple factors, including preconfirmation latency and network bandwidth. *** ## Efficient Merkleization Merkleization's performance is influenced by both the size of state data and the number of changes (i.e., the size of the ChangeSet). Additionally, batch updates are more efficient than sequential updates. Merkleization for an L2 block only happens after the last Shred is generated. Accumulating changes over multiple Shreds reduces the number of final keys that need updating, thanks to transaction overlap. The same data is likely to be accessed multiple times across blocks, especially with popular dApps like Uniswap. Shreds enable RISE to provide instant transaction confirmations while maintaining the security and consistency guarantees of traditional rollups. # Transaction Lifecycle (/docs/rise-evm/tx-lifecycle) # Transaction Lifecycle RISE's transaction lifecycle facilitates a streamlined process, designed to reduce latency to as low as possible. Unlike other blockchains, RISE aims to provide near-instant responses to users' transactions.
Transaction Lifecycle Transaction Lifecycle
## 1. Transaction Preparation & Broadcasting The lifecycle of a transaction starts with a user creating and signing a transaction, and submitting it to an RPC node via their frontend. ## 2. P2P Propagation After receiving the transaction from the user, the RPC node performs sanity checks and then broadcasts this transaction to the sequencer using the P2P network. ## 3. Mempool Pre-Execution As described in the [CBP](cbp), the transaction is pre-executed as soon as it lands in the sequencer's mempool. The CBP makes use of idle time to execute transactions while other tasks are happening. This is one of the ways we reduce end-to-end latency for transaction processing. ## 4. Shred Inclusion Pending transactions (residing in the mempool) are included in a **Shred**. Shreds partition a canonical L2 block into multiple consecutive yet separately-verifiable segments. Shreds allow an L2 block to be incrementally constructed, with each Shred serving as a batch of preconfirmations for transactions it contains. Importantly, each Shred does not require merkleization, allowing RISE to reduce its latency to just a few milliseconds. Pending transactions are pre-executed while sitting in the mempool, therefore, at the time of Shred inclusion, we can reuse the pre-executed results from the previous step. ## 5. Shred Propagation & Early Updates The sequencer broadcasts a Shred to other nodes via the P2P network after it is created. As soon as a node receives a new Shred, it immediately executes transactions within this Shred (or applies changes provided by the Shred) to get the latest state of the network. This enables faster state synchronization across the network and a quicker response to the user's transaction. At this point, the receipt for the transaction is available and can be returned to the user. ## 6. L2 Block Inclusion After a predefined period of time (L2 blocktime), Shreds are batched together to create a canonical L2 block. At this time, merkleization is done to seal the L2 block. ## 7. L1 Block Inclusion Periodically, L2 blocks are batch-submitted to the DA layer and the L1 for finalizing. At this stage, transactions are considered safe (if no fraud challenge is triggered). ## Key Benefits * **Pre-execution**: Transactions are executed before inclusion, reducing confirmation time * **Shred-based confirmations**: Users get confirmations in milliseconds, not seconds * **Early state updates**: Nodes update state immediately upon receiving Shreds * **Optimized pipeline**: Each step is optimized to minimize latency while maintaining security This lifecycle enables RISE to provide the instant responsiveness users expect while maintaining the security and decentralization properties of a proper rollup. # ZK Fraud Proofs (/docs/rise-evm/zk-fraud-proofs) # ZK Fraud Proofs ## Motivation At the beginning, we adopted an optimistic design primarily due to the simplicity of the optimistic approach and the limitations of zero-knowledge (ZK) proving technology. At that time, simulating an EVM machine with ZK was not feasible, and ZK proving was unable to meet the desired throughput demands. Optimistic rollups, on the other hand, offered a simpler and more scalable solution. ### Complicated Interactive Fraud Proofs However, traditional optimistic rollups rely on **interactive fraud proofs** where validators engage in multiple back-and-forth interactive steps to identify the exact transaction or step where computation diverged. This process is complex to implement correctly, due to: * **Multi-round Interactions**. Parties must engage in multiple rounds of challenges and responses. * **State Management**. Tracking disputed ranges, bisection points, and commitments adds significant complexity. * **Latency Overhead**. Challenge-response cycles can take days or weeks, delaying final settlement. Although interactive fraud proofs work, the process is complex and time-consuming, and requires significant interactions and is unfriendly to challengers. ### Expensive ZK Proofs With recent advancements in the ZK ecosystem, we are now able to prove an EVM block in an order of seconds and transitioning to a full ZK rollup is feasible. Nevertheless, we realize that generating validity proofs is not always ideal. * Validity proofs offer fast finality but the proving performance might not keep up with our execution client on realtime proving. We aim to process 100k TPS at RISE, and ZK proving at this rate is not possible at the moment. * Verifying a validity proof on the L1 is expensive. If we do this frequently, users have to bear this cost, and thus, increase the transaction cost to users. * Furthermore, as long as the sequencer behaves honestly, we will never need to use validity proofs. However, generating validity proofs for every transaction incurs an additional cost for users. ### Inability of DA Commitment Challenging with AltDA Data Availability (DA) is crucial to fraud games, and the security of a rollup. Without DA, it is not possible to ensure the challenge and sequencer are playing a game on the same data. RISE's current design is built upon the battle-tested [OP Stack](https://github.com/ethereum-optimism/optimism) and leverages [EigenDA for its Data Availability (DA) layer](/docs/rise-evm/da). However, this design has a critical security issue that makes the sequencer highly trusted, discouraging users to use RISE. When rollups use an AltDA layer instead of posting all data to Ethereum L1, they introduce a new challenge: **verifying DA commitments on-chain becomes problematic**. OP Stack supports two AltDA systems: **Type 0 (Keccak)** commitments, which are simple hashes and can be challenged directly on-chain, and **Type 1 (DA-Service)** commitments, which have a flexible `da_layer_byte ++ payload` structure designed to be handled by the AltDA Server. The problem is, the existing OP Stack implementation [does not support AltDA challenge other than Type 0 (Keccak)](https://specs.optimism.io/experimental/alt-da.html?highlight=altDA#data-availability-challenge-contract). This creates a verification gap, the network must trust the AltDA Server's claim about data availability, making fraud proofs not possible, which in turn violates the security of the rollup. *** Therefore, we consider a hybrid approach in which we still adopt the optimistic design but utilizing ZK to generate validity proofs for a state commitment if challenged. *** ## ZK Fraud Proofs with OP Succinct Lite RISE's ZK Fraud Proofs are made possible by [OP Succinct Lite](https://github.com/succinctlabs/op-succinct). OP Succinct Lite allow us to resolve any dispute in a single round, without the interaction requirement between the challengers and the proposer. This is more efficient than the interactive bisecting game mentioned above. Moreover, OP Succinct Lite supports AltDA like EigenDA or Celestia, which is the perfect match for RISE. ### The Workflow The following diagram depicts the simplified flow of the hybrid approach. The sequencer publishes state commitments without proof similar to traditional optimistic rollups. If anyone detects an invalid state commitment, they can initiate a fraud challenge. Once challenged, the sequencer is responsible for generating a ZK validity proof demonstrating that the state transition was correct. Failures in providing a valid ZK proof in time will lead the sequencer to be slashed, and the corresponding commitment is considered invalid. The system's elegance lies in its economics: **most of the time (99.9999%), validity proofs are never needed**. This means users avoid bearing the costs associated with proof generation and verification. ### Implications The ZK fraud proof approach offers a more efficient, secure, and user-friendly experience. * **Shorter Challenge Period**. Validity proofs are only required once we have a challenge. If a challenge is invoked, the sequencer then has an additional window to submit the required validity proof. The additional window time should be on an order of the maximum proving time for the sake of security. * **Simpler and Robust Fraud Mechanism**. ZK proofs appear to be more robust than interactive fraud proofs and there are several ZK rollups that have been running on the mainnet. With this approach, a challenger can just focus on keeping up with the chain progress and identifying the incorrect state transition (same as the re-executing fraud proofs), no other interaction is required. * **Cost Saving**. The cost for users is the same as in an optimistic rollup and operational costs are lower than a ZK rollup. While ZK rollups have to bear the cost of generating validity proofs for every state transition, even if there is no transaction; this is not required in a hybrid mode. As a result, users do not have to pay extra costs of validity proof generation and verification. * **AltDA**. OP Succinct Lite's support for EigenDA means RISE can achieve the cost and scalability benefits of off-chain DA while maintaining on-chain verifiability through ZK proofs. No trust on the sequencer is required for security. *** ## The Path Forward: ZK Rollup RISE is designed to evolve toward a full ZK rollup as ZK proving technology matures and becomes more cost-effective. Rather than attempting to jump directly to pure ZK proving, we follow a phased approach that allows us to validate performance, optimize systems, and maintain user experience at each stage. ### Phase 1: ZK Fraud Proofs (Current) RISE currently operates as a hybrid rollup using ZK fraud proofs for security. The sequencer publishes state commitments optimistically, and ZK proofs are generated only when disputes arise. This phase delivers fast, low-cost transactions in the honest case, cryptographic security guarantees through on-demand ZK proving, and economic efficiency where users do not bear proving costs for normal operation. ### Phase 2: Proactive Proving ***Figure**. Lifecycle of a fraud game.* (\*: *resolve can only be processed if the parent game is already resolved*). As ZK proving technology continues to advance and costs decrease, RISE will transition to **proactive proving**, where the sequencer voluntarily submits ZK proofs for state commitments even without fraud challenges. This is a critical transitional phase for several reasons. First, transactions achieve cryptographic finality as soon as the proof is verified on L1, rather than waiting for a challenge window to pass, delivering faster finality to users. Second, this phase allows RISE to operationally validate ZK proving performance at scale without being dependent on it for security: running proofs continuously reveals performance bottlenecks and allows optimization before full ZK commitments. Third, users experience faster finality incrementally without a sudden transition. In this phase, fraud proof challenges still serve as a security backup: if a sequencer fails to submit a proof, the fraud proof mechanism activates. This provides a graceful fallback while allowing real-world testing of proving infrastructure at scale. ### Phase 3: Full ZK Rollup Once proving costs are sufficiently reduced and performance meets RISE's throughput demands, the network will transition to a **full ZK rollup**. At this point, validity proofs become mandatory for every state transition, delivering instant cryptographic finality as standard. The fraud proof mechanism is no longer needed since cryptographic correctness is always proven. Security is guaranteed cryptographically rather than through economic assumptions. The transition between phases is not time-bound but rather tied to technological maturity and cost-effectiveness of ZK proving. RISE will remain in Phase 1 until Phase 2 becomes practical, and will remain in Phase 2 until Phase 3 becomes economically viable. This phased approach ensures RISE maintains optimal performance and user experience at every stage of evolution. # FAQ (/docs/risex/faq) ## General ### What is RISEx? RISEx is a fully onchain orderbook DEX built on RISE Chain, supporting both perpetual futures and spot markets. Unlike hybrid exchanges with off-chain matching engines, RISEx executes all orders, matching, and settlement within the EVM. ### What's the relationship between RISEx and RISE? RISE and RISEx are one team, one vision, one token. RISE is the infrastructure layer that finally supports onchain orderbooks, and RISEx the flagship exchange built on that infrastructure. RISEx will bootstrap activity on RISE and fuel a thriving DeFi ecosystem on RISE. ### When will RISEx be live? RISEx private mainnet will go live in March! ### How do I get access to the private mainnet? Get access through: * Direct invite from the team * Via our waitlist referral [leaderboard](https://testnet.rise.trade) X DMs are open if you want to connect with the team [@risextrade](https://x.com/risextrade) ### How is RISEx different from Hyperliquid? Hyperliquid showed the world what's possible with onchain orderbooks, but it's missing one key structural feature - synchronous composability. Hyperliquid runs on a custom L1 with a separate execution environment. RISEx runs on RISE, an EVM-compatible chain, which means it's synchronously composable with all other DeFi protocols. Your positions can be used as collateral in lending protocols, yield strategies can manage your margin, and builders can integrate permissionlessly. [Read more](https://x.com/nvthnh/status/2000876359179231303). Hyperliquid vs RISE architecture ### How is RISEx decentralized? RISEx is powered by RISE, an Ethereum Optimistic L2 which has been fine-tuned to support realtime orderbooks onchain. L2s inherit Ethereum's security for settlement and data availability. Execution is managed by centralised sequencers, however, we are building toward progressive decentralization. ### Is RISEx matching onchain? All trading logic executes onchain and is verifiable, accessible with a familiar EVM block explorer. There are no off-chain components for matching or settlement. ### Does RISEx support spot trading? RISEx currently supports perps, spot will come soon. See our [roadmap](/docs/risex/features/roadmap) for details. *** ## Trading ### What leverage is available? Leverage varies by market. See [market configuration](/docs/risex/trading/markets) for current limits per asset. ### What are the fees? See the full [fee schedule](/docs/risex/trading/fees) details. ### How fast is execution? RISE Chain has sub-3ms execution. Cancel orders, for example, are sub-1ms. Orders and trades execute in realtime. *** ## Technical ### What collateral is accepted? USDC is the base collateral asset. [Portfolio Margin](/docs/risex/features/portfolio-margin) will unlock any ERC20 as collateral once available. ### Is there an API? Yes! See the [API documentation](/docs/risex/api). ### Where are the smart contracts? See the [Contracts](/docs/risex/contracts/deployments) page for architecture and addresses. *** ## Safety ### Is RISEx audited? RISEx contracts have undergone internal audits and are in the process of third-party audits. Audit reports will be published once complete. ### What happens if I get liquidated? RISEx uses partial liquidations first, giving you the best chance to stay in the market. Liquidation triggers when your health factor falls to 1 or below. See [liquidations](/docs/risex/trading/liquidations) for details. ### What is health factor? Health factor = cross\_margin\_balance / total\_maintenance\_margin. Above 1 is safe, at or below 1 triggers liquidation. # Introduction (/docs/risex) import { Card, Cards } from 'fumadocs-ui/components/card'; import { Activity, FileCode } from 'lucide-react'; ## Introduction to RISEx RISEx is a fully onchain perpetuals exchange built on RISE Chain. Every trade, every position, and every piece of collateral exists onchain, settled in realtime with the same guarantees as any other RISE transaction. Today, that means institutional-grade crypto perps with flexible collateral and programmable trading accounts. Tomorrow, that means equities, forex, commodities, and any asset with a price feed. ## What Makes RISEx Different? Before RISEx Orderbook DEXs took two approaches, the offchain matching or dual-core execution. Both of these approaches introduce fragmentation between the exchange and the rest of DeFi. RISEx makes no such tradeoff. The orderbook lives onchain and shares state with all of DeFi. Same block. Same transaction. Full atomicity. When you trade on RISEx, your order, your collateral, and every DeFi protocol on RISE exist in a single execution environment with unified liquidity. This isn't just a better exchange. It's programmable market infrastructure. Use any ERC20 as collateral. Build modular sub-accounts that automate strategies or create new order types. Compose across lending markets, vaults, and the orderbook in one transaction. The design space that opens up when execution and liquidity are truly unified. That's what we're building for. We call this Programmable Markets. Leverage anything, trade everything. ## Key Features **For Users** * **Permissionless Portfolio Margin**: Leverage everything. Use any supported collateral, LP positions, lending deposits, yield-bearing assets—as margin for your trades, with risk calculated across your entire portfolio. * **AutoYield**: Put your idle collateral to work. Earn yield on your collateral while you trade, powered by onchain yield. **For Builders** * **Unmatched Performance**: As little as 1ms execution with a target of 100k TPS, powered by RISE's continuous execution pipeline and sub-50ms block times. * **Synchronous Composability**: Orderbooks share state with AMMs, lending markets, and vaults in the same block, unlocking a design space impossible on fragmented venues. * **Modular Sub-accounts**: Programmable trading accounts that anyone can build on. Automate strategies, delegate execution, or create entirely new trading primitives—all permissionlessly. ## Investors RISE is backed by industry leaders investors including Galaxy Digital, Finality Capital, DACM, Vitalik Buterin and more. ## Documentation } title="API" href="/docs/risex/api/" description="REST API documentation with examples for trading, order management, and account operations" /> } title="Contract" href="/docs/risex/contracts/deployments" description="Smart contract interfaces, deployment addresses, and on-chain interaction guides" /> # Connecting Wallet (/docs/rise-wallet/connecting) import { WalletConnect } from "@/components/rise-wallet/WalletConnect"; import { ComponentPreviewTabs } from "@/components/rise-wallet/ComponentPreviewTabs"; import { CODE_EXAMPLES } from "@/components/rise-wallet/code-examples"; # Connecting Wallet Connecting to RISE Wallet is as simple as using any standard Wagmi connector. The RISE Wallet connector handles passkey authentication automatically, creating a seamless login experience. ## How it Works 1. **Find the RISE Wallet Connector**: Locate the RISE Wallet connector from the available connectors using its ID `com.risechain.wallet`. 2. **Trigger Connection**: Call the `connect` function with the RISE Wallet connector. 3. **Passkey Authentication**: The user is prompted to authenticate using their device's passkey (FaceID, TouchID, etc.). 4. **Account Ready**: Once authenticated, the account is connected and ready to transact. The RISE Wallet connector integrates seamlessly with Wagmi's standard hooks like `useAccount`, `useConnect`, and `useDisconnect`, requiring no specialized APIs. # How It Works (/docs/rise-wallet/how-it-works) import { Steps, Step } from 'fumadocs-ui/components/steps'; RISE Wallet is built on top of [Porto](https://porto.sh/), a next-generation account stack for Ethereum that leverages [EIP-7702](https://eip7702.io/) for native account abstraction. With our backend & SDK customised to utilise RISE high performance in addition to providing chain wide gas sponsorship for real users. This page explains how RISE Wallet works under the hood. ## Architecture Overview RISE Wallet consists of three main components: ### 1. Smart Account Infrastructure * **Porto Smart Accounts**: Audited contracts that provide account abstraction features * **EIP-7702 Integration**: Native account abstraction without smart contract wallets * **Key Management**: Support for multiple key types (P256, `secp256k1`, WebAuthn) ### 2. Relay Infrastructure * **Gas Sponsorship**: Automatic gas payment for eligible transactions * **Transaction Batching**: Bundle multiple operations into single atomic transactions * **Circuit Breakers**: Safety mechanisms to prevent abuse and overspending ### 3. Dialog Interface * **Passkey Authentication**: WebAuthn-based login with biometrics * **Cross-Platform Support**: Works on web, mobile, and desktop * **Session Management**: Secure storage and handling of session keys ## Transaction Flow When a user interacts with RISE Wallet, the following process occurs: ### User Action User initiates a transaction (transfer, swap, mint, etc.) ### Wallet Dialog\* RISE Wallet dialog opens to handle the request When a valid session key is available, this step is bypassed entirely. The transaction is signed automatically without requiring user interaction, enabling seamless high-frequency actions. ### Authentication Check The system checks if a valid session key exists: * **Has Session Key** → Sign automatically with session key * **No Session Key** → Request user signature via passkey ### Relay Processing The signed transaction is sent to the RISE Relay for processing ### Sponsorship Validation Relay checks sponsorship rules: * User tier and daily limits * Whitelisted contracts * Allowed functions ### Network Submission Valid transaction submitted to RISE network ### Instant Confirmation Shred confirmation received in \~3ms via WebSocket ## Key Technologies ### EIP-7702: Set Code Transaction EIP-7702 allows EOAs (Externally Owned Accounts) to temporarily delegate their functionality to smart contract code during a transaction. This enables account abstraction features without deploying a smart contract wallet, while maintaining compatibility with existing Ethereum infrastructure. Read more about EIP-7702 [here](https://eip7702.io/). ### WebAuthn & Passkeys RISE Wallet uses WebAuthn for authentication, supporting biometric login methods like FaceID, TouchID, and Windows Hello. Keys are stored securely in the device's secure enclave and can sync across devices via cloud providers. ### Session Keys Temporary keys with specific permissions enable apps to act on a user's behalf within defined limits. This allows high-frequency actions without user interruption, while maintaining safety through time and spend limits. ## Gas Sponsorship RISE Wallet implements intelligent gas sponsorship: ### Default Sponsorship * New users receive daily gas budget * Core protocol interactions (swaps, mints) are sponsored * RISEx trading is fully sponsored ## Security and Recovery RISE Wallet employs multi-layer security with passkeys stored in secure hardware, audited Porto contracts, and RISE's fast finality to prevent reorg attacks. Session keys use time-bound permissions with explicit scoping for safe temporary access. Account recovery is supported through guardian recovery with trusted addresses, time-locked recovery mechanisms for added security, and multi-signature options for high-value accounts. ## Integration with RISE RISE Wallet is optimized for RISE's unique architecture: ### Shred Integration * Instant confirmation notifications via WebSocket * Realtime balance updates * Immediate transaction feedback ## Technical Specifications ### Supported Chains * RISE Mainnet (coming soon) * RISE Testnet * Future: Cross-chain support via RISE bridges ### Key Types * **P256**: Native browser/device support * **`secp256k1`**: Ethereum standard compatibility * **WebAuthn P256**: Passkey integration {/* ### Performance - Transaction preparation: <100ms - Signature generation: <50ms - Network submission: <10ms - Total UX latency: <200ms + network time */} ## Learn More * [Porto Documentation](https://porto.sh/) - Original Porto implementation * [EIP-7702 Specification](https://eips.ethereum.org/EIPS/eip-7702) - Set code transaction details # RISE Wallet (/docs/rise-wallet) import { RiseWalletPlaygroundSimple } from "@/components/rise-wallet/RiseWalletPlaygroundSimple"; import { Card, Cards } from 'fumadocs-ui/components/card'; import { Cpu, Code, Key, Coins, ArrowLeftRight } from 'lucide-react'; RISE Wallet Stack is a chain-native wallet layer for the entire RISE ecosystem. It is a shared, trustless wallet experience that feels like Web2, backed by audited smart accounts from Porto and wired into RISE's ultra-fast EVM. ## Why RISE Wallet? Most of today's wallets were built for early crypto power users, requiring seed phrases, browser extensions, manual gas management, and complex bridging. RISE Wallet takes a different path: * **Gasless by Default**: Users receive a daily gas budget. You don't need to hold ETH to start using apps. * **Passkey Login**: No seed phrases. Sign in with biometrics (FaceID, TouchID) or WebAuthn. * **One Wallet, Everywhere**: A single global wallet experience that spans the entire RISE ecosystem. * **Works with Your Existing Wallet**: Connect via MetaMask, Rabby, or any injected wallet. No new wallet needed. * **Session Keys**: Delegate specific permissions (e.g., "spending 50 tokens/minute") to local keys for instant, popup-free transactions. ## Try It Out Connect your wallet below to experience the RISE Wallet flow. You can create a session key, mint test tokens, and swap them instantly. ## Features ### Chain-Native Integration RISE Wallet is wired directly into RISE's infrastructure, providing a seamless experience across all applications on the chain. ### Built for Speed Leveraging RISE's 3ms confirmations via shreds, wallet operations feel instant. ### Developer-First Simple SDK integration with standard `Wagmi` and `Viem` libraries means you can add wallet functionality without learning specialized APIs. ## Next Steps } title="How It Works" href="/docs/rise-wallet/how-it-works" description="Technical architecture and implementation details" /> } title="Viem Integration" href="/docs/rise-wallet/viem" description="Integrate with Viem for direct contract interactions" /> } title="Wagmi Integration" href="/docs/rise-wallet/wagmi" description="Add RISE Wallet to your React app with Wagmi" /> } title="Session Keys" href="/docs/rise-wallet/session-keys" description="Enable gasless, popup-free transactions" /> } title="Minting Example" href="/docs/rise-wallet/minting" description="Mint tokens with RISE Wallet integration" /> } title="Swapping Example" href="/docs/rise-wallet/swapping" description="Build token swap functionality with session keys" /> # Minting Tokens (/docs/rise-wallet/minting) import { MintWidget } from "@/components/rise-wallet/MintWidget"; import { ComponentPreviewTabs } from "@/components/rise-wallet/ComponentPreviewTabs"; import { CODE_EXAMPLES } from "@/components/rise-wallet/code-examples"; # Minting Tokens This example demonstrates how to interact with a smart contract on RISE. Because RISE Wallet users often start without gas, transactions are sponsored by the relay infrastructure. ## How it Works 1. **Contract Interaction**: We use `wagmi`'s `useSendCalls` (or a wrapper hook) to send transactions. 2. **Gas Sponsorship**: The RISE Paymaster automatically sponsors eligible transactions. 3. **User Experience**: The user signs the request with their Passkey (or Session Key if active), and the transaction is submitted instantly. ### Sending a Transaction To write to a contract, encode the function data using `viem` and send it using `sendCallsAsync`. ```tsx import { useSendCalls } from "wagmi"; import { encodeFunctionData } from "viem"; import { MintableERC20ABI } from "@/abi/erc20"; // ... inside your component const { sendCallsAsync } = useSendCalls(); const handleMint = async () => { const data = encodeFunctionData({ abi: MintableERC20ABI, functionName: "mintOnce", args: [], }); await sendCallsAsync({ calls: [ { to: "0x...", // Token Contract Address data, }, ], }); }; ``` # Session Keys (/docs/rise-wallet/session-keys) import { SessionKeysWidget } from "@/components/rise-wallet/SessionKeysWidget"; import { ComponentPreviewTabs } from "@/components/rise-wallet/ComponentPreviewTabs"; import { CODE_EXAMPLES } from "@/components/rise-wallet/code-examples"; # Session Keys Session keys are temporary keys that are granted specific permissions. They allow your app to sign transactions on behalf of the user without prompting them for confirmation every time. This is critical for: * **High-frequency trading**: Place and cancel orders instantly. * **Games**: Move characters or perform actions without interrupting gameplay. * **Social apps**: Like posts or follow users with a single tap. ## Creating a Session Key You use the `useGrantPermissions` hook from `rise-wallet/wagmi` to request a new session key. You must define exactly what this key can do (permissions) and how long it lasts (expiry). ```tsx import { Hooks } from "rise-wallet/wagmi"; import { P256, PublicKey } from "ox"; import { keccak256, parseEther, parseUnits, toHex } from "viem"; // ... inside component const grantPermissions = Hooks.useGrantPermissions(); const createSession = async () => { // 1. Generate a local key pair (P256) const privateKey = P256.randomPrivateKey(); const publicKey = PublicKey.toHex(P256.getPublicKey({ privateKey }), { includePrefix: false, }); // 2. Request the session key from the wallet with permissions await grantPermissions.mutateAsync({ key: { publicKey, type: "p256" }, expiry: Math.floor(Date.now() / 1000) + 3600, // 1 hour feeToken: null, // use native token for fees, or { limit: "0.01", symbol: "ETH" } // the permissions you want the session key to have permissions: { calls: [ { to: "0x...", // address of the contract on which the function is being called signature: keccak256(toHex("transfer(address,uint256)")).slice(0, 10), // function selector (in this case, 0xa9059cbb) } ], // token spend limits spend: [ { token: "0x0000000000000000000000000000000000000000", // native ETH limit: parseEther("20"), period: "hour", }, { token: "0xUSDC...", // USDC (6 decimals) limit: parseUnits("100", 6), period: "day", }, ], }, }); // 3. Store the private key securely (e.g., localStorage) to sign future requests localStorage.setItem("session_key", privateKey); }; ``` Once created, you can use the stored private key to sign and send `wallet_sendPreparedCalls` requests directly to the RISE RPC, bypassing the wallet popup completely. ## Using a Session Key After creating a session key, you can use it to sign and execute transactions without wallet popups. Here's a complete example: ```tsx import { Hex, P256, Signature } from "ox"; import { useAccount, useChainId } from "wagmi"; // ... inside component const { connector, address } = useAccount(); const chainId = useChainId(); const executeWithSessionKey = async (calls: any[]) => { // 1. Get the stored private key and public key const privateKey = localStorage.getItem("session_key"); const publicKey = PublicKey.toHex(P256.getPublicKey({ privateKey }), { includePrefix: false, }); // 2. Get the provider const provider = (await connector.getProvider()) as any; // 3. Prepare the calls (this simulates and estimates fees) const intentParams = [ { calls, // Array of { to: address, data?: hex, value?: bigint } chainId: Hex.fromNumber(chainId), from: address, atomicRequired: true, key: { publicKey, type: "p256", }, }, ]; // wallet_prepareCalls returns: { digest, capabilities, ...request } // digest: The hash you need to sign // capabilities: Optional wallet capabilities // request: Other fields needed for sending the transaction const { digest, capabilities, ...request } = await provider.request({ method: "wallet_prepareCalls", params: intentParams, }); // 4. Sign the digest with your session key const signature = Signature.toHex( P256.sign({ payload: digest as `0x${string}`, privateKey: privateKey as `0x${string}`, }) ); // 5. Send the prepared calls with the signature const result = await provider.request({ method: "wallet_sendPreparedCalls", params: [ { ...request, ...(capabilities ? { capabilities } : {}), signature, }, ], }); console.log("Transaction sent:", result); return result; }; // Example usage: Mint an NFT (async () => { await executeWithSessionKey([ { to: "0x..." as `0x${string}`, // NFT contract address data: "0x..." as `0x${string}`, // Encoded mint function call value: 0n, }, ]); })(); ``` The flow is: 1. **Prepare** - Call `wallet_prepareCalls` to simulate the transaction and get a digest 2. **Sign** - Sign the digest with your session key's private key using P256 3. **Send** - Call `wallet_sendPreparedCalls` with the signature to execute without popup # Swapping Tokens (/docs/rise-wallet/swapping) import { SwapWidget } from "@/components/rise-wallet/SwapWidget"; import { ComponentPreviewTabs } from "@/components/rise-wallet/ComponentPreviewTabs"; import { CODE_EXAMPLES } from "@/components/rise-wallet/code-examples"; # Swapping Tokens Swapping tokens often requires two steps: **Approval** and **Execution**. RISE Wallet supports batching these operations into a single atomic transaction when using EIP-5792 `sendCalls`, providing a much smoother UX. ## Atomic Batching Instead of asking the user to sign an "Approve" transaction, wait for it to land, and then sign a "Swap" transaction, you can bundle them together. ```tsx const approveData = encodeFunctionData({ abi: ERC20_ABI, functionName: "approve", args: [ROUTER_ADDRESS, amount], }); const swapData = encodeFunctionData({ abi: ROUTER_ABI, functionName: "swapExactTokensForTokens", args: [amount, minOut, path, recipient, deadline], }); // Send both calls in one user operation await sendCallsAsync({ calls: [ { to: TOKEN_ADDRESS, data: approveData }, { to: ROUTER_ADDRESS, data: swapData }, ], }); ``` This reduces the time users spend waiting and clicking popups, making DeFi feel instant. # Viem Integration (/docs/rise-wallet/viem) import { Tab, Tabs } from 'fumadocs-ui/components/tabs'; This guide covers integrating RISE Wallet with [Viem](https://viem.sh/), a TypeScript interface for Ethereum that provides low-level access to blockchain functionality. ## Overview RISE Wallet provides first-class Viem support through custom actions and account implementations. This integration is ideal for developers who need fine-grained control over wallet operations. ## Installation ```bash npm i rise-wallet viem ``` ```bash pnpm add rise-wallet viem ``` ```bash yarn add rise-wallet viem ``` ```bash bun add rise-wallet viem ``` ## Basic Usage ### Creating a Client Use RISE Wallet's EIP-1193 provider with Viem's custom transport: ```ts import { createClient, custom } from "viem"; import { RiseWallet } from "rise-wallet"; // Create RISE Wallet instance const rw = RiseWallet.create(); // Create Viem client with RISE Wallet provider const client = createClient({ transport: custom(rw.provider), }); ``` ### Using Wallet Actions RISE Wallet exports a `WalletActions` module with RISE Wallet-specific functionality: ```ts import { WalletActions } from "rise-wallet/viem"; // Connect to wallet const { accounts } = await WalletActions.connect(client); console.log("Connected account:", accounts[0]); // Get user assets const assets = await WalletActions.getAssets(client); console.log("User assets:", assets); ``` ## Standard Viem Actions All standard Viem wallet actions work with RISE Wallet: ### Send Transaction ```ts import { parseEther } from "viem"; import * as Actions from "viem/actions"; const hash = await Actions.sendTransaction(client, { to: "0x...", value: parseEther("0.001"), }); console.log("Transaction hash:", hash); ``` ### Send Calls (EIP-5792) ```ts const result = await Actions.sendCalls(client, { account: "0x...", calls: [ { to: "0x...", data: "0x...", }, ], }); ``` ### Sign Message ```ts const signature = await Actions.signMessage(client, { account: "0x...", message: "Hello RISE!", }); ``` ## RISE Wallet Actions ### Grant Permissions Create session keys with specific permissions: ```ts import { Key } from "rise-wallet/viem"; import { keccak256, toHex, parseEther } from "viem"; const permissions = await WalletActions.grantPermissions(client, { key: Key.createP256(), // Generate new P256 key expiry: Math.floor(Date.now() / 1000) + 3600, // 1 hour permissions: { calls: [ { to: "0x...", // Contract address signature: keccak256(toHex("transfer(address,uint256)")).slice(0, 10), } ], spend: [ { limit: parseEther("50"), period: "minute", token: "0x...", } ], }, }); ``` ### Get Permissions View active permissions: ```ts const permissions = await WalletActions.getPermissions(client); permissions.forEach(permission => { console.log("Key:", permission.key); console.log("Expiry:", permission.expiry); console.log("Allowed calls:", permission.calls); }); ``` ### Revoke Permissions Remove granted permissions: ```ts await WalletActions.revokePermissions(client, { keyId: "0x...", }); ``` ## Key Management RISE Wallet provides utilities for working with different key types: ### P256 Keys ```ts import { Key, PublicKey } from "rise-wallet/viem"; // Create new P256 key const key = Key.createP256(); // Import existing key const imported = Key.fromP256({ privateKey: "0x...", }); // Sign with key const signature = await Key.sign({ payload: "0x...", privateKey: key.privateKey, }); ``` ### WebAuthn Keys ```ts // Create WebAuthn credential const credential = await Key.createWebAuthnP256({ user: { name: "alice@example.com", displayName: "Alice", }, }); // Use for signing const webAuthnKey = Key.fromWebAuthnP256({ credential, publicKey: credential.publicKey, }); ``` ## Advanced Patterns ### Direct Provider Access For maximum control, access the provider directly: ```ts const provider = await rw.provider; // Use JSON-RPC methods directly const result = await provider.request({ method: "wallet_prepareCalls", params: [{ calls: [{ to: "0x...", data: "0x...", }], chainId: "0x...", from: "0x...", }], }); ``` ### Session Key Signing Sign transactions with session keys: ```ts import { P256, Signature } from "ox"; // Prepare transaction const { digest, ...request } = await provider.request({ method: "wallet_prepareCalls", params: [{ calls: [...], key: { publicKey, type: "p256" }, }], }); // Sign with session key const signature = Signature.toHex( P256.sign({ payload: digest, privateKey }) ); // Send signed transaction const result = await provider.request({ method: "wallet_sendPreparedCalls", params: [{ ...request, signature }], }); // Get the call bundle ID const bundleId = Array.isArray(result) ? result[0].id : result.id; // Poll for transaction status const status = await provider.request({ method: "wallet_getCallsStatus", params: [bundleId], }); if (status.status === 200) { console.log("Transaction confirmed!"); console.log("TX hash:", status.receipts[0].transactionHash); } else { console.error("Transaction failed with status:", status.status); } ``` ### Custom Actions Create your own actions by extending Viem: ```ts import { type Client } from "viem"; export async function myCustomAction(client: Client, params: any) { return client.request({ method: "my_custom_method", params, }); } // Use with client.extend() const extendedClient = client.extend(() => ({ myCustomAction, })); await extendedClient.myCustomAction({ ... }); ``` ## WebSocket Support For realtime updates, use WebSocket transport: ```ts import { createPublicClient, webSocket } from "viem"; import { riseTestnet } from "viem/chains"; const wsClient = createPublicClient({ chain: riseTestnet, transport: webSocket("wss://testnet.riselabs.xyz/ws"), }); // Watch for events in realtime wsClient.watchContractEvent({ address: "0x...", abi: [...], eventName: "Transfer", onLogs: (logs) => { console.log("Transfer events:", logs); }, }); ``` ## Type Safety RISE Wallet provides comprehensive TypeScript types: ```ts import type { PermissionsRequest } from "rise-wallet/viem"; // All actions are fully typed const permissions: PermissionsRequest = { key: { publicKey: "...", type: "p256" }, expiry: 123456789, permissions: { calls: [{ to: "0x..." as const, signature: "0x..." as const, }], }, }; ``` ## Polling Transaction Status After sending prepared calls, you need to poll for the transaction status using `wallet_getCallsStatus`: ```ts // Send prepared calls const result = await provider.request({ method: "wallet_sendPreparedCalls", params: [{ ...preparedRequest, signature }], }); // Extract bundle ID const bundleId = Array.isArray(result) ? result[0].id : result.id; // Poll for status const status = await provider.request({ method: "wallet_getCallsStatus", params: [bundleId], }); ``` ### Status Codes The `status` field provides a summary of the current bundle status: | Code | Description | | ---- | ------------------------------------------------------------------------------------- | | 100 | **Pending** - Bundle received but not executed onchain yet | | 200 | **Confirmed** - Bundle included onchain without reverts, receipts available | | 300 | **Failed (Offchain)** - Bundle not included onchain, wallet will not retry | | 400 | **Reverted (Complete)** - Bundle completely reverted, only gas charges may be onchain | | 500 | **Reverted (Partial)** - Bundle partially reverted, some changes may be onchain | ### Status Response ```ts type GetCallsStatusResponse = { id: string, // Bundle ID status: number, // Status code (100-500) receipts: { logs: { chainId: string, address: string, data: string, topics: string[], }[], status: string, // "0x1" for success, "0x0" for failure blockHash?: string, blockNumber?: string, gasUsed: string, transactionHash: string, // The actual transaction hash }[], capabilities?: { interopStatus?: 'pending' | 'confirmed' | 'failed', }, } ``` ### Example: Complete Flow with Polling ```ts import { P256, Signature } from "ox"; async function sendWithSessionKey(calls: any[], sessionKey: string) { const provider = await rw.provider; // 1. Prepare the calls const { digest, ...request } = await provider.request({ method: "wallet_prepareCalls", params: [{ calls, chainId: "0x...", from: "0x...", key: { publicKey: sessionKey, type: "p256" }, }], }); // 2. Sign with session key const signature = Signature.toHex( P256.sign({ payload: digest, privateKey: "0x..." }) ); // 3. Send signed calls const result = await provider.request({ method: "wallet_sendPreparedCalls", params: [{ ...request, signature }], }); // 4. Get bundle ID const bundleId = Array.isArray(result) ? result[0].id : result.id; // 5. Poll for status (simplified - you may want to add retries/timeouts) const status = await provider.request({ method: "wallet_getCallsStatus", params: [bundleId], }); // 6. Check status if (status.status !== 200) { throw new Error(`Transaction failed with status ${status.status}`); } // 7. Return transaction hash return status.receipts[0].transactionHash; } ``` **Note:** `wallet_sendCalls` and `sendCallsSync` handle polling internally. You only need to manually poll `wallet_getCallsStatus` when using `wallet_sendPreparedCalls` for session key transactions. ## Error Handling Handle Viem errors appropriately: ```ts import { BaseError } from "viem"; try { await Actions.sendTransaction(client, { ... }); } catch (error) { if (error instanceof BaseError) { console.error("Error name:", error.name); console.error("Error details:", error.details); console.error("Error version:", error.version); } } ``` ## Examples * [Session Key Implementation](/docs/rise-wallet/session-keys) * [Contract Interactions](/docs/rise-wallet/minting) ## Related Documentation * [Viem Documentation](https://viem.sh/) * [Wagmi Integration](/docs/rise-wallet/wagmi) # Wagmi Integration (/docs/rise-wallet/wagmi) import { Tab, Tabs } from 'fumadocs-ui/components/tabs'; This guide covers integrating RISE Wallet with [Wagmi](https://wagmi.sh/), the popular collection of React Hooks for Ethereum. ## Overview RISE Wallet implements a Wagmi connector and provides custom React hooks that map directly to the wallet's capabilities. The integration is designed to feel natural to developers already familiar with Wagmi. ## Installation ```bash npm i rise-wallet wagmi viem @tanstack/react-query ``` ```bash pnpm add rise-wallet wagmi viem @tanstack/react-query ``` ```bash yarn add rise-wallet wagmi viem @tanstack/react-query ``` ```bash bun add rise-wallet wagmi viem @tanstack/react-query ``` ## Basic Setup ### 1. Configure the RISE Wallet Connector ```ts title="config/wagmi.ts" import { Chains, RiseWallet } from "rise-wallet"; import { riseWallet } from "rise-wallet/wagmi"; import { createConfig, http } from "wagmi"; // Export the connector for advanced usage export const rwConnector = riseWallet(RiseWallet.defaultConfig); // Create wagmi config export const config = createConfig({ chains: [Chains.riseTestnet], connectors: [rwConnector], transports: { [Chains.riseTestnet.id]: http("https://testnet.riselabs.xyz"), }, }); ``` ### 2. Set Up Providers ```tsx title="app/providers.tsx" "use client"; import { QueryClient, QueryClientProvider } from "@tanstack/react-query"; import { WagmiProvider } from "wagmi"; import { config } from "@/config/wagmi"; import { useState } from "react"; export function Providers({ children }: { children: React.ReactNode }) { const [queryClient] = useState(() => new QueryClient()); return ( {children} ); } ``` ### 3. Wrap Your App in the Provider Add the `Providers` component to your root layout: ```tsx title="app/layout.tsx" import { Providers } from "./providers"; export default function RootLayout({ children, }: { children: React.ReactNode; }) { return ( {children} ); } ``` ## Standard Wagmi Hooks All standard Wagmi hooks work seamlessly with RISE Wallet: ### Connection Management ```tsx title="components/WalletButton.tsx" import { useConnect, useConnection, useDisconnect, useConnectors } from "wagmi"; export function WalletButton() { const { address, isConnected } = useConnection(); const connect = useConnect(); const disconnect = useDisconnect(); const connectors = useConnectors(); if (isConnected) { return (
{address}
); } const rwConnector = connectors.find(c => c.id === "com.risechain.wallet"); if (!rwConnector) return null; return ( ); } ``` ### Sending Transactions ```tsx title="components/SendTransaction.tsx" import { useSendCalls } from "wagmi"; import { parseEther } from "viem"; export function SendTransaction() { const sendCalls = useSendCalls(); //for sending 0.001 ETH to some address const handleSend = async () => { const result = await sendCalls.mutateAsync({ calls: [{ to: "0x...", value: parseEther("0.001"), }], }); console.log("Transaction sent:", result); }; return ( ); } ``` ## RISE Wallet Specific Hooks Import custom hooks via the `Hooks` namespace: ```tsx import { Hooks } from "rise-wallet/wagmi"; ``` or individually: ```tsx import { useGrantPermissions } from "rise-wallet/wagmi/Hooks"; ``` ### useGrantPermissions Create session keys with specific permissions: ```tsx import { parseEther } from "viem"; import { P256, PublicKey } from "ox"; const grantPermissions = Hooks.useGrantPermissions(); const createSession = async () => { // 1. Generate a local key pair const privateKey = P256.randomPrivateKey(); const publicKey = PublicKey.toHex(P256.getPublicKey({ privateKey }), { includePrefix: false, }); // 2. Grant permissions to the session key await grantPermissions.mutateAsync({ key: { publicKey, type: "p256" }, expiry: Math.floor(Date.now() / 1000) + 3600, // 1 hour feeToken: null, // use native token for fees, or { limit: "0.01", symbol: "ETH" } // the permissions you want the session key to have permissions: { calls: [{ // function calls to: "0x...", // address of the contract on which the function is being called signature: "0x...", // function signature. you can get this via: cast sig "transfer(address,uint256)" }], // token spend limits spend: [{ token: "0x...", // token contract address limit: parseEther("50"), // max amount (bigint) period: "minute", // time window (eg. "minute", "hour", "day") }], }, }); // 3. Store the private key to sign future transactions without popup localStorage.setItem("session_key", privateKey); }; ``` ### usePermissions View current permissions for the connected account: ```tsx const { data: permissions } = Hooks.usePermissions(); if (permissions) { console.log("Active permissions:", permissions); } ``` ### useRevokePermissions Revoke previously granted permissions: ```tsx const revokePermissions = Hooks.useRevokePermissions(); const revokeSession = async (keyId: string) => { await revokePermissions.mutateAsync({ keyId, }); }; ``` ### useAssets Get user's token balances and assets: ```tsx const { data: assets } = Hooks.useAssets(); return (
{assets?.map(asset => (
{asset.symbol}: {asset.balance}
))}
); ``` ## Polling Transaction Status When using session keys with `wallet_sendPreparedCalls`, you need to manually poll for transaction status using `wallet_getCallsStatus`: ```tsx import { P256, Signature } from "ox"; async function sendWithSessionKey(calls: any[], sessionPrivateKey: string, sessionPublicKey: string) { const provider = await connector.getProvider(); // 1. Prepare the calls const { digest, ...request } = await provider.request({ method: "wallet_prepareCalls", params: [{ calls, chainId: "0x...", from: address, key: { publicKey: sessionPublicKey, type: "p256" }, }], }); // 2. Sign with session key const signature = Signature.toHex( P256.sign({ payload: digest, privateKey: sessionPrivateKey }) ); // 3. Send signed calls const result = await provider.request({ method: "wallet_sendPreparedCalls", params: [{ ...request, signature }], }); // 4. Extract bundle ID const bundleId = Array.isArray(result) ? result[0].id : result.id; // 5. Poll for transaction status const status = await provider.request({ method: "wallet_getCallsStatus", params: [bundleId], }); // 6. Check status if (status.status !== 200) { throw new Error(`Transaction failed with status ${status.status}`); } // 7. Return transaction hash return status.receipts[0].transactionHash; } ``` ### Status Codes The `status` field in the response indicates the current state of the transaction bundle: | Code | Description | | ---- | ------------------------------------------------------------------------------------- | | 100 | **Pending** - Bundle received but not executed onchain yet | | 200 | **Confirmed** - Bundle included onchain without reverts, receipts available | | 300 | **Failed (Offchain)** - Bundle not included onchain, wallet will not retry | | 400 | **Reverted (Complete)** - Bundle completely reverted, only gas charges may be onchain | | 500 | **Reverted (Partial)** - Bundle partially reverted, some changes may be onchain | ### Response Structure ```ts type GetCallsStatusResponse = { id: string, // Bundle ID status: number, // Status code (100-500) receipts: { logs: { chainId: string, address: string, data: string, topics: string[], }[], status: string, // "0x1" for success, "0x0" for failure blockHash?: string, blockNumber?: string, gasUsed: string, transactionHash: string, // The actual transaction hash }[], capabilities?: { interopStatus?: 'pending' | 'confirmed' | 'failed', }, } ``` **Note:** Standard Wagmi hooks like `useSendCalls` handle polling internally using `sendCallsSync`. You only need to manually poll `wallet_getCallsStatus` when using session keys with `wallet_sendPreparedCalls`. ## Advanced Patterns ### Batched Transactions Execute multiple operations atomically: ```tsx const sendCalls = useSendCalls(); // Approve and swap in one transaction await sendCalls.mutateAsync({ calls: [ { to: TOKEN_ADDRESS, data: approveCalldata, }, { to: DEX_ADDRESS, data: swapCalldata, }, ], // Atomic execution - all succeed or all fail atomicRequired: true, }); ``` ### Reading Transaction Status Monitor transaction progress: ```tsx import { useWaitForTransactionReceipt } from "wagmi"; const { data: receipt, isLoading } = useWaitForTransactionReceipt({ hash: transactionHash, }); if (receipt) { console.log("Transaction confirmed:", receipt); } ``` ### Error Handling Properly handle wallet errors: ```tsx import { BaseError } from "wagmi"; const sendCalls = useSendCalls(); try { await sendCalls.mutateAsync({...}); } catch (error) { if (error instanceof BaseError) { // Handle specific error types if (error.shortMessage.includes("rejected")) { console.log("User rejected the request"); } } } ``` ## TypeScript Support RISE Wallet provides full TypeScript support: ```tsx import type { RiseWallet } from "rise-wallet"; import type { Config } from "wagmi"; // Config is fully typed const config: Config = createConfig({ chains: [Chains.riseTestnet], connectors: [rwConnector], transports: { [Chains.riseTestnet.id]: http(), }, }); ``` ## Best Practices ### 1. Check Connection State Always verify the connection state before attempting transactions: ```tsx const { isConnected } = useConnection(); if (!isConnected) { return ; } ``` ### 2. Handle Loading States Provide feedback during async operations: ```tsx const sendCalls = useSendCalls(); // Access: sendCalls.isPending, sendCalls.isSuccess, sendCalls.isError ``` ### 3. Use Error Boundaries Wrap your app with error boundaries to catch unexpected errors: ```tsx import { ErrorBoundary } from "react-error-boundary"; }> ``` ## Examples For complete working examples, check out: * [Basic Integration](https://github.com/risechain/wallet-demo) * [Session Keys Demo](https://demo.wallet.risechain.com/) * [DeFi Integration](/docs/rise-wallet/getting-started/swapping) ## Related Documentation * [Wagmi Documentation](https://wagmi.sh/) * [Viem Integration](/docs/rise-wallet/viem) * [Session Keys Guide](/docs/rise-wallet/session-keys) # API Methods (/docs/builders/shreds/api-methods) # API Methods Core methods that power RISE's realtime capabilities. For standard Ethereum methods, visit the [Ethereum JSON-RPC Documentation](https://ethereum.org/en/developers/docs/apis/json-rpc/). ## sendTransactionSync Creates, signs, and sends a transaction synchronously, returning the complete transaction receipt. This is a convenience method from viem that handles the entire transaction lifecycle in one call. It's simpler to use but makes multiple RPC calls (chainId, nonce, gas estimation). ### Parameters Standard viem transaction parameters: * `to` - Recipient address * `value` - Amount to send (optional) * `data` - Transaction data (optional) * Other standard transaction fields ### Returns Complete `TransactionReceipt` object ### Example ```typescript import { createWalletClient, http, parseEther } from 'viem' import { privateKeyToAccount } from 'viem/accounts' import { riseTestnet } from 'viem/chains' const account = privateKeyToAccount('0x...') const client = createWalletClient({ account, chain: riseTestnet, transport: http() }) // Simple one-call transaction const receipt = await client.sendTransactionSync({ to: '0x...', value: parseEther('1.0') }) console.log('Transaction confirmed:', receipt) ``` ### When to Use * **Quick prototyping**: Get started fast without manual signing * **Simple applications**: When RPC overhead isn't critical * **Standard workflows**: Works with existing viem patterns ## eth\_sendRawTransactionSync Sends a **pre-signed** transaction and waits for instant confirmation, returning the complete transaction receipt. This method is based on [EIP-7966](https://eips.ethereum.org/EIPS/eip-7966), which introduces synchronous transaction confirmation to Ethereum. RISE implements this standard to provide instant transaction finality. **Use this for maximum performance** when you need the absolute fastest transaction times, as it requires only a single RPC call. ### Parameters 1. `data` - Signed transaction data (hex string) ### Returns Complete `TransactionReceipt` object with all standard fields: ```typescript { transactionHash: string, blockNumber: string, blockHash: string, transactionIndex: string, from: string, to: string | null, gasUsed: string, cumulativeGasUsed: string, status: string, // "0x1" for success, "0x0" for failure logs: Log[], logsBloom: string, contractAddress: string | null } ``` ### Example ```typescript const receipt = await client.request({ method: 'eth_sendRawTransactionSync', params: ['0x...signed_transaction'] }) //Transaction receipt console.log('Transaction hash:', receipt.transactionHash) console.log('Status:', receipt.status === '0x1' ? 'Success' : 'Failed') ``` ### Using with viem ```typescript import { createWalletClient, createPublicClient, http, parseEther } from 'viem' import { privateKeyToAccount } from 'viem/accounts' import { shredActions } from 'shreds/viem' import { riseTestnet } from 'viem/chains' const account = privateKeyToAccount('0x...') // Wallet client for signing const walletClient = createWalletClient({ account, chain: riseTestnet, transport: http() }) // Public client for sending const publicClient = createPublicClient({ chain: riseTestnet, transport: http() }).extend(shredActions) // Prepare and sign transaction const request = await walletClient.prepareTransactionRequest({ to: '0x...', value: parseEther('1.0') }) const serializedTransaction = await walletClient.signTransaction(request) // Send with instant confirmation const receipt = await publicClient.sendRawTransactionSync({ serializedTransaction }) console.log('Transaction confirmed:', receipt) ``` ### When to Use * **Performance-critical applications**: Gaming, high-frequency trading, competitive scenarios * **Pre-signed transaction pools**: Batch signing transactions in advance * **Minimal RPC overhead**: Only 1 RPC call vs 3+ with `sendTransactionSync` ### Key Benefits * **Instant confirmation**: No waiting for block inclusion * **Complete receipt**: All transaction details immediately available * **Synchronous flow**: Simplifies application logic * **Error handling**: Failed transactions return immediately with status `0x0` * **Maximum performance**: Single RPC call for fastest possible transactions ## Comparison: sendTransactionSync vs sendRawTransactionSync | Feature | `sendTransactionSync` | `sendRawTransactionSync` | | -------------------- | ------------------------------------------ | ------------------------- | | **RPC Calls** | 3+ (chainId, nonce, gas estimation + send) | 1 (send only) | | **Setup Complexity** | Simple | Requires manual signing | | **Performance** | Good (\~10-20ms overhead) | Best (minimal overhead) | | **Use Case** | Prototyping, simple apps | Performance-critical apps | | **Viem Support** | Built-in | Via shreds library | ### Example: Simple Approach ```typescript // Using sendTransactionSync (simpler, more RPC calls) const receipt = await client.sendTransactionSync({ to: '0x...', value: parseEther('1.0') }) ``` ### Example: Performance-Optimized Approach ```typescript // Using sendRawTransactionSync (optimal, 1 RPC call) const request = await walletClient.prepareTransactionRequest({ to: '0x...', value: parseEther('1.0') }) const serialized = await walletClient.signTransaction(request) const receipt = await publicClient.sendRawTransactionSync({ serializedTransaction: serialized }) ``` ## Usage Patterns ### Synchronous Transaction Flow ```typescript import { sendRawTransactionSync } from 'shreds/viem' // Traditional async pattern (not needed with RISE) // const hash = await client.sendTransaction(tx) // const receipt = await client.waitForTransactionReceipt({ hash }) // RISE synchronous pattern // 1. Prepare and sign const request = await walletClient.prepareTransactionRequest(tx) const serialized = await walletClient.signTransaction(request) // 2. Send and get instant receipt const receipt = await sendRawTransactionSync(publicClient, { serializedTransaction: serialized }) // Transaction already confirmed! ``` ## Performance Characteristics ### RTT (Round-Trip Time) Targets * **Shred Confirmation**: 3-5ms (p50), 10ms (p99) * **Event Delivery**: \< 10ms from transaction execution * **State Updates**: Immediate upon shred confirmation ### Throughput * **Transactions per Shred**: 1-100 * **Shreds per Second**: 1000+ * **Total TPS**: 10,000+ ## Best Practices ### 1. Choose the Right Method ```typescript // For prototyping and simple apps - use sendTransactionSync const receipt = await client.sendTransactionSync({ to: '0x...', value: parseEther('1.0') }) // For performance-critical apps - use sendRawTransactionSync with pre-signing const request = await walletClient.prepareTransactionRequest(tx) const serialized = await walletClient.signTransaction(request) const receipt = await publicClient.sendRawTransactionSync({ serializedTransaction: serialized }) ``` ### 2. Pre-sign Transactions for Maximum Performance ```typescript // Sign a batch of transactions in advance const preSignedTxs = await Promise.all( txRequests.map(async (req, i) => { const request = await walletClient.prepareTransactionRequest({ ...req, nonce: baseNonce + i }) return await walletClient.signTransaction(request) }) ) // Send them instantly when needed (single RPC call each) for (const signedTx of preSignedTxs) { const receipt = await publicClient.sendRawTransactionSync({ serializedTransaction: signedTx }) } ``` ### 3. Handle Errors Immediately ```typescript try { const receipt = await client.sendTransactionSync({ to: '0x...', value: parseEther('1.0') }) // Transaction confirmed immediately } catch (error) { // Handle failure immediately - no need to wait console.error('Transaction failed:', error) } ``` ## Next Steps * [Watching Events](/docs/builders/shreds/watching-events) - Realtime subscriptions * [Quickstart](/docs/builders/shreds/quickstart) - Build your first app # Shreds (/docs/builders/shreds) import { Card, Cards } from 'fumadocs-ui/components/card'; import { Zap, Code, Radio } from 'lucide-react'; import { ShredsDemo } from '@/components/shreds/ShredsDemo'; import { ComponentPreviewTabs } from '@/components/rise-wallet/ComponentPreviewTabs'; import { CODE_EXAMPLES } from '@/components/rise-wallet/code-examples'; # Shreds Shreds are RISE's breakthrough innovation for realtime blockchain transactions. Rather than processing transactions in large batches (blocks), RISE processes them individually and immediately, providing confirmations in as little as **3 milliseconds**. ## Overview Traditional blockchains batch transactions into blocks, forcing users to wait seconds or minutes for confirmation. Shreds solve this by propagating incremental state updates across the network in realtime. Each shred is a lightweight, cryptographically signed packet containing state changes from one or more transactions, enabling instant confirmations while maintaining full EVM compatibility and security guarantees. ## Interactive Demo Try incrementing the counter below. Each transaction confirms in milliseconds and events arrive in realtime via WebSocket. Performance Optimization: This demo uses local nonce management and hardcoded gas values to minimize RPC calls, reducing network round-trips from 3+ calls (chainId, nonce, gas estimation) to just 1 (transaction submission). For simpler implementations, you can use sendTransactionSync() directly - it's easier but makes multiple RPC calls. Viem will soon integrate this optimization natively. See the commented code at the bottom for the simpler approach. } > ## Why Shreds? * **3ms confirmation times**: Transactions confirm faster than a blink of an eye * **Full EVM compatibility**: Works with existing Ethereum tools and libraries * **Realtime updates**: Subscribe to state changes as they happen * **Maintained security**: Cryptographically signed, deterministic state transitions ## Get Started } title="Quickstart" href="/docs/builders/shreds/quickstart" description="Build your first realtime app in 15 minutes" /> } title="API Methods" href="/docs/builders/shreds/api-methods" description="Learn the core Shred API methods" /> } title="Watching Events" href="/docs/builders/shreds/watching-events" description="Realtime shred subscriptions and event streaming" /> # Quickstart (/docs/builders/shreds/quickstart) import { Tab, Tabs } from 'fumadocs-ui/components/tabs'; import { Steps, Step } from 'fumadocs-ui/components/steps'; # Quickstart Build a realtime payment application using RISE's Shred API in under 15 minutes. This tutorial will demonstrate instant transaction confirmations and realtime balance updates. ## What We'll Build A simple payment application that: * Sends instant payments with immediate confirmation * Displays realtime balance updates * Shows live transaction history * Demonstrates shred subscriptions ## Prerequisites * Node.js 16+ installed * Basic TypeScript/JavaScript knowledge * A code editor (VS Code recommended) ## Project Setup ### Create a New Project ```bash mkdir rise-quickstart cd rise-quickstart npm init -y ``` ### Install Dependencies ```bash npm install shreds viem dotenv npm install -D typescript tsx @types/node ``` ```bash pnpm add shreds viem dotenv pnpm add -D typescript tsx @types/node ``` ```bash yarn add shreds viem dotenv yarn add -D typescript tsx @types/node ``` ```bash bun add shreds viem dotenv bun add -D typescript tsx @types/node ``` ### Configure TypeScript Create `tsconfig.json`: ```json title="tsconfig.json" { "compilerOptions": { "target": "ES2020", "module": "ESNext", "moduleResolution": "bundler", "strict": true, "esModuleInterop": true, "skipLibCheck": true, "resolveJsonModule": true } } ``` ### Set Up Environment Create `.env`: ```bash title=".env" # RISE Testnet RPC endpoints RISE_RPC_URL=https://testnet.riselabs.xyz RISE_WS_URL=wss://testnet.riselabs.xyz/ws # Test wallet (has testnet tokens) PRIVATE_KEY=0xac0974bec39a17e36ba4a6b4d238ff944bacb478cbed5efcae784d7bf4f2ff80 ``` This is a well-known test private key. Never use it for real funds! ## Build the Application Create `quickstart.ts`: ```typescript title="quickstart.ts" import 'dotenv/config' import { createWalletClient, createPublicClient, http, webSocket, parseEther, formatEther } from 'viem' import { privateKeyToAccount } from 'viem/accounts' import { riseTestnet } from 'viem/chains' import { shredActions } from 'shreds/viem' // Setup account from private key const account = privateKeyToAccount(process.env.PRIVATE_KEY as `0x${string}`) console.log('Wallet address:', account.address) // Create client and extend with shred actions const client = createWalletClient({ account, chain: riseTestnet, transport: http(process.env.RISE_RPC_URL) }).extend(shredActions) // Recipient address const recipient = '0x70997970C51812dc3A010C7d01b50e0d17dc79C8' async function main() { console.log('[START] RISE Quickstart\n') // Step 1: Check initial balances console.log('[INFO] Checking initial balances...') const senderBalance = await client.getBalance({ address: account.address }) const recipientBalance = await client.getBalance({ address: recipient }) console.log(`Sender: ${formatEther(senderBalance)} ETH`) console.log(`Recipient: ${formatEther(recipientBalance)} ETH\n`) // Step 2: Subscribe to shreds for realtime updates console.log('[SUBSCRIBE] Subscribing to realtime updates...\n') const wsClient = createPublicClient({ chain: riseTestnet, transport: webSocket(process.env.RISE_WS_URL) }).extend(shredActions) const unwatch = wsClient.watchShreds({ onShred: (shred) => { console.log(`[SHRED] New shred detected!`) console.log(` Index: ${shred.shredIndex}`) console.log(` Transactions: ${shred.transactions.length}`) console.log(` Timestamp: ${new Date(Number(shred.blockTimestamp) * 1000).toLocaleTimeString()}\n`) } }) // Step 3: Send instant transaction console.log('[SEND] Sending 0.1 ETH with instant confirmation...') const startTime = Date.now() try { const hash = await client.sendTransactionSync({ to: recipient, value: parseEther('0.1'), }) const confirmTime = Date.now() - startTime console.log(`[SUCCESS] Transaction confirmed in ${confirmTime}ms!`) console.log(`[HASH] ${hash}\n`) // Step 4: Check updated balances immediately console.log('[INFO] Checking updated balances...') const newSenderBalance = await client.getBalance({ address: account.address }) const newRecipientBalance = await client.getBalance({ address: recipient }) console.log(`Sender: ${formatEther(newSenderBalance)} ETH`) console.log(`Recipient: ${formatEther(newRecipientBalance)} ETH`) } catch (error) { console.error('[ERROR] Transaction failed:', error.message) } // Keep watching for a few seconds console.log('\n[WATCH] Watching for more shreds (10 seconds)...') setTimeout(() => { unwatch() console.log('\n[COMPLETE] Quickstart complete!') process.exit(0) }, 10000) } // Run the quickstart main().catch(console.error) ``` ## Run the Application Execute the quickstart: ```bash npx tsx quickstart.ts ``` You should see output like: ``` [START] RISE Quickstart [INFO] Checking initial balances... Sender: 10000.0 ETH Recipient: 10000.0 ETH [SUBSCRIBE] Subscribing to realtime updates... [SEND] Sending 0.1 ETH with instant confirmation... [SHRED] New shred detected! Index: 1234 Transactions: 1 Timestamp: 2:34:56 PM [SUCCESS] Transaction confirmed in 4ms! [HASH] 0x... [INFO] Checking updated balances... Sender: 9999.899... ETH Recipient: 10000.1 ETH [WATCH] Watching for more shreds (10 seconds)... ``` ## What Just Happened? 1. **Instant Confirmation**: The transaction confirmed in \~4ms, not minutes 2. **Realtime Updates**: Balances reflected the change immediately 3. **Shred Subscription**: We received the shred notification in realtime 4. **Full Compatibility**: Standard viem methods worked seamlessly ## Next Steps ### Enhance the Application Try these modifications: 1. **Batch Transactions**: Send multiple transactions rapidly 2. **Event Monitoring**: Watch for specific smart contract events 3. **Balance Streaming**: Display continuously updating balances 4. **Error Recovery**: Add retry logic for failed transactions ### Learn More * [API Methods](/docs/builders/shreds/api-methods) - Core Shred API methods * [Watching Events](/docs/builders/shreds/watching-events) - Realtime subscriptions # Watching Events (/docs/builders/shreds/watching-events) # Watching Events RISE enhances standard Ethereum subscriptions with realtime shred data, delivering events in milliseconds instead of seconds. ## Overview WebSocket subscriptions on RISE work just like standard Ethereum, but with dramatically faster event delivery. Events are streamed from shreds as transactions are processed, providing instant notifications for your applications. ## Shred Subscription Subscribe to new shreds in realtime for instant transaction visibility. ### Subscribe ```json { "jsonrpc": "2.0", "method": "eth_subscribe", "params": ["shreds"], "id": 1 } ``` You can add an extra `true` parameter to populate the `stateChanges` field in shred notifications: ```json { "jsonrpc": "2.0", "method": "eth_subscribe", "params": ["shreds", true], "id": 1 } ``` Without this parameter, `stateChanges` will be an empty array by default. ### Subscription Response ```json { "jsonrpc": "2.0", "result": "0x9ce59a13059e417087c02d3236a0b1cc", "id": 1 } ``` ### Notification Format ```json { "jsonrpc": "2.0", "method": "eth_subscription", "params": { "subscription": "0x9ce59a13059e417087c02d3236a0b1cc", "result": { "blockTimestamp": 123456789, "blockNumber": 1, "shredIdx": 0, "startingLogIndex": 0, "transactions": [ { "transaction": { "hash": "0x...", "signer": "0x...", "to": "0x...", "value": "0x0", "type": "0x2" }, "receipt": { "status": "0x1", "cumulativeGasUsed": "0x5208", "logs": [], "type": "0x2" } } ], "stateChanges": { "0x...": { "nonce": 1, "balance": "0x...", "storage": {}, "newCode": null } } } } } ``` ### Shred Object Structure ```typescript interface Shred { blockTimestamp: bigint; blockNumber: bigint; shredIndex: number; startingLogIndex: number; transactions: ShredTransaction[]; stateChanges: ShredStateChange[]; } type ShredTransactionBase = { hash: string; signer: string; // Address that signed the transaction to: string; value: bigint; gas: bigint; status: "success" | "reverted"; cumulativeGasUsed: bigint; logs: Array<{ address: string; topics: string[]; data: string; }>; chainId?: number; nonce?: bigint; } // Transaction type variants type ShredTransactionLegacy = ShredTransactionBase & { type: "legacy"; gasPrice: bigint; } type ShredTransactionEip1559 = ShredTransactionBase & { type: "eip1559"; maxFeePerGas: bigint; maxPriorityFeePerGas: bigint; accessList: AccessList; } type ShredTransactionEip2930 = ShredTransactionBase & { type: "eip2930"; gasPrice: bigint; accessList: AccessList; } type ShredTransactionEip7702 = ShredTransactionBase & { type: "eip7702"; maxFeePerGas: bigint; maxPriorityFeePerGas: bigint; accessList: AccessList; authorizationList: SignedAuthorizationList; } type ShredDepositTransaction = ShredTransactionBase & { type: "deposit"; sourceHash: string; mint: bigint; isSystemTransaction: boolean; } type ShredTransaction = | ShredTransactionLegacy | ShredTransactionEip1559 | ShredTransactionEip2930 | ShredTransactionEip7702 | ShredDepositTransaction; interface ShredStateChange { address: string; nonce: number; balance: bigint; // Note: bigint, not string storageChanges: Array<{ slot: string; value: string; }>; newCode: string | null; } ``` ### Using with viem ```typescript import { createPublicClient, webSocket } from 'viem' import { shredActions } from 'shreds/viem' import { riseTestnet } from 'viem/chains' const client = createPublicClient({ chain: riseTestnet, transport: webSocket('wss://testnet.riselabs.xyz/ws') }).extend(shredActions) // Watch for new shreds const unwatch = client.watchShreds({ includeStateChanges: true, // Optional: include state changes in shreds onShred: (shred) => { console.log(`Shred ${shred.shredIndex} confirmed`) console.log(`Transactions: ${shred.transactions.length}`) shred.transactions.forEach(tx => { console.log(`- ${tx.hash}: ${tx.status}`) }) }, onError: (error) => { console.error('Subscription error:', error) } }) // Stop watching // unwatch() ``` ## Logs Subscription Subscribe to contract event logs with shred-speed delivery. On RISE, logs are delivered from shreds instead of blocks for faster event processing. ### Subscribe with Filter ```json { "jsonrpc": "2.0", "method": "eth_subscribe", "params": [ "logs", { "address": "0x...", "topics": ["0x..."] } ], "id": 1 } ``` ### Enhanced Behavior * Events delivered immediately when transactions are processed in shreds * No waiting for block confirmation * Standard Ethereum log format maintained for compatibility * Filters work exactly like standard Ethereum ### Using with viem ```typescript // Watch for all Transfer events on a token contract const unwatch = client.watchContractEvent({ address: '0x...', abi: erc20Abi, eventName: 'Transfer', onLogs: logs => { // Events arrive in milliseconds! logs.forEach(log => { console.log(`Transfer: ${log.args.from} -> ${log.args.to}`) console.log(`Amount: ${formatEther(log.args.value)}`) }) } }) ``` ### Filter Specific Events ```typescript // Watch for transfers to a specific address client.watchContractEvent({ address: tokenAddress, abi: erc20Abi, eventName: 'Transfer', args: { to: myAddress // Filter by recipient }, onLogs: logs => { console.log(`Received ${logs.length} transfers`) } }) ``` ## Example ### Balance Monitor Monitor an address for balance changes in realtime: ```typescript let lastBalance = await client.getBalance({ address: monitoredAddress }) client.watchShreds({ onShred: async (shred) => { // Check if this shred affects the monitored address const affected = shred.stateChanges.find( change => change.address.toLowerCase() === monitoredAddress.toLowerCase() ) if (affected) { const newBalance = BigInt(affected.balance) const change = newBalance - lastBalance console.log(`Balance changed by ${formatEther(change)} ETH`) console.log(`New balance: ${formatEther(newBalance)} ETH`) lastBalance = newBalance } } }) ``` ## Multiple Subscriptions You can maintain multiple subscriptions simultaneously: ```typescript // Watch shreds const unwatchShreds = client.watchShreds({ onShred: handleShred }) // Watch token transfers const unwatchTransfers = client.watchContractEvent({ address: tokenAddress, abi: erc20Abi, eventName: 'Transfer', onLogs: handleTransfers }) // Watch DEX swaps const unwatchSwaps = client.watchContractEvent({ address: dexAddress, abi: dexAbi, eventName: 'Swap', onLogs: handleSwaps }) // Clean up when done // unwatchShreds() // unwatchTransfers() // unwatchSwaps() ``` ## Error Handling Handle connection errors and reconnection: ```typescript client.watchShreds({ onShred: (shred) => { console.log('New shred:', shred.shredIndex) }, onError: (error) => { console.error('Subscription error:', error) // Implement reconnection logic } }) ``` ## Performance Characteristics ### Event Delivery Times * **Shred Events**: 3-5ms from transaction execution * **Log Events**: 3-5ms from transaction execution * **State Changes**: Immediate in shred notification ### Throughput * **Events per Second**: 10,000+ * **Concurrent Subscriptions**: Unlimited * **Message Size**: Optimized for low latency ## Best Practices ### 1. Use Event Filters Filter events at the RPC level to reduce bandwidth: ```typescript // ✅ Good - filtered at source client.watchContractEvent({ address: tokenAddress, eventName: 'Transfer', args: { to: myAddress } }) // ❌ Avoid - filtering client-side client.watchContractEvent({ address: tokenAddress, eventName: 'Transfer', onLogs: logs => { const filtered = logs.filter(log => log.args.to === myAddress) } }) ``` ### 2. Handle High-Frequency Events Debounce or batch updates for high-frequency events: ```typescript let pendingUpdates = [] client.watchContractEvent({ eventName: 'PriceUpdate', onLogs: logs => { pendingUpdates.push(...logs) } }) // Batch process every 100ms setInterval(() => { if (pendingUpdates.length > 0) { processBatch(pendingUpdates) pendingUpdates = [] } }, 100) ``` ### 3. Clean Up Subscriptions Always unsubscribe when done: ```typescript const unwatch = client.watchShreds({ onShred }) // In cleanup (e.g., React useEffect) return () => { unwatch() } ``` ## Next Steps * [API Methods](/docs/builders/shreds/api-methods) - Core Shred API methods * [Quickstart](/docs/builders/shreds/quickstart) - Build your first app # Remix IDE (/docs/builders/smart-contracts/remix) import { Step, Steps } from 'fumadocs-ui/components/steps'; [Remix IDE](https://remix.ethereum.org) is a browser-based development environment for writing, compiling, and deploying smart contracts. No installation required. ## Prerequisites * A Web3 wallet (MetaMask, Rabby or similar) with RISE Testnet configured * Testnet ETH from the [RISE Faucet](https://faucet.testnet.riselabs.xyz/) ## Deploy a Contract ### Create the Contract Open [Remix IDE](https://remix.ethereum.org) and create a new file called `Counter.sol` in the File Explorer. Add the following code: ```solidity title="Counter.sol" // SPDX-License-Identifier: MIT pragma solidity ^0.8.30; contract Counter { uint256 public number; function setNumber(uint256 newNumber) public { number = newNumber; } function increment() public { number++; } } ``` ### Compile the Contract 1. Click the **Solidity Compiler** tab (in the left sidebar) 2. Select compiler version `0.8.30` or higher 3. Click **Compile Counter.sol** Enable **Auto compile** in the compiler settings for a better development experience. Your contracts will automatically compile as you make changes. ### Deploy to RISE Testnet 1. Click the **Deploy & Run Transactions** tab (in the left sidebar) 2. In the **Environment** dropdown, select **Injected Provider - MetaMask (or whichever wallet you have)** 3. Your wallet will prompt you to connect - approve the connection 4. **Important**: Make sure your wallet is connected to RISE Testnet (Chain ID: 11155931) 5. Ensure `Counter` is selected in the **Contract** dropdown 6. Click **Deploy** 7. Confirm the transaction in your wallet ### Interact with the Contract Once deployed, your contract will appear under **Deployed Contracts**: * Click `number` to read the current value (starts at 0) * Enter a value and click `setNumber` to set a new number * Click `increment` to increase the number by 1 Each write operation (`setNumber`, `increment`) will require a transaction confirmation in your wallet. ## View on Explorer After deployment, you can view your contract on the [RISE Testnet Explorer](https://explorer.testnet.riselabs.xyz) by searching for the contract address shown in Remix. # Fast VRF (/docs/builders/vrf) import { Card, Cards } from 'fumadocs-ui/components/card'; import { Zap, Code, Radio } from 'lucide-react'; import { DiceGameWidget } from '@/components/vrf/DiceGameWidget'; import { ComponentPreviewTabs } from '@/components/rise-wallet/ComponentPreviewTabs'; import { CODE_EXAMPLES } from '@/components/rise-wallet/code-examples'; # Fast VRF Fast VRF enables verifiable random number generation for smart contracts with realtime delivery through RISE's shred architecture. Results arrive in **3-5ms** via WebSocket, enabling responsive gaming experiences. The current VRF implementation on testnet is designed for development and testing. For mainnet deployment, additional security measures are required: * **Enhanced Verification**: Improved proof verification mechanisms must be implemented in contracts to ensure the backend cannot manipulate randomness outcomes * **Spam Prevention**: Production contracts should implement access control (whitelisting) or request fees to prevent spam and ensure fair usage ## Overview Fast VRF provides cryptographically secure randomness for smart contracts with millisecond-level response times. Traditional VRF solutions require multiple block confirmations, taking seconds or minutes. RISE's shred architecture delivers VRF results instantly through WebSocket subscriptions, enabling truly responsive gaming and DeFi applications with standard Solidity interfaces. ## Interactive Demo Try the dice game below. It uses RISE Wallet to request a random number, which is fulfilled instantly by the VRF Coordinator. ## Key Features * **3-5ms response times**: VRF results delivered faster than a blink * **Realtime updates**: WebSocket subscriptions for instant notifications * **Full EVM compatibility**: Standard Solidity interfaces work with existing tooling * **Cryptographically secure**: Verifiable randomness you can trust ## Common Use Cases * Gaming: dice rolls, card shuffling, loot generation * NFT minting with random trait generation * DeFi lottery and reward distribution * DAO jury selection and voting mechanisms ## VRF Coordinator | Network | Address | | :--------------- | :------------------------------------------------------------------------------------------------------------------------------------------------------------------------------------------------------------------------------------------------------------- | | **RISE Testnet** | [`0x9d57aB4517ba97349551C876a01a7580B1338909`](https://explorer.testnet.riselabs.xyz/address/0x9d57aB4517ba97349551C876a01a7580B1338909) | ## Get Started } title="Quickstart" href="/docs/builders/vrf/quickstart" description="Build a dice game in 15 minutes" /> } title="Smart Contracts" href="/docs/builders/vrf/smart-contracts" description="Integration guide and patterns" /> } title="Realtime Tracking" href="/docs/builders/vrf/real-time" description="WebSocket event subscriptions" /> # Quickstart (/docs/builders/vrf/quickstart) import { Steps, Step } from 'fumadocs-ui/components/steps'; import { Tabs, Tab } from 'fumadocs-ui/components/tabs'; # VRF Quickstart Build a dice game with verifiable randomness and realtime updates in under 15 minutes. This tutorial demonstrates VRF integration with instant result notifications. This quickstart is designed for testnet development and testing. For mainnet production deployment, additional security measures including cryptographic proof verification and spam prevention are required. See the [Smart Contracts](/docs/builders/vrf/smart-contracts) page for details. ## What We'll Build A dice game that: * Requests verifiable random numbers * Tracks player streaks for rolling sixes * Updates UI in realtime via WebSocket * Handles VRF callbacks securely ## Prerequisites * Node.js 16+ installed * Basic Solidity knowledge * MetaMask or similar wallet * RISE testnet tokens ## Smart Contract Setup ### Create the Project ```bash mkdir vrf-dice-game cd vrf-dice-game forge init ``` ### Write the Dice Game Contract Create `src/DiceGame.sol`: ```solidity title="src/DiceGame.sol" // SPDX-License-Identifier: MIT pragma solidity ^0.8.0; interface IVRFCoordinator { function requestRandomNumbers(uint32 numNumbers, uint256 seed) external returns (uint256); } interface IVRFConsumer { function rawFulfillRandomNumbers( uint256 requestId, uint256[] memory randomNumbers ) external; } contract DiceGame is IVRFConsumer { IVRFCoordinator public coordinator; mapping(address => bool) public hasPendingRoll; mapping(address => uint256) public currentStreak; mapping(address => uint256) public topStreak; mapping(uint256 => address) public requestOwners; uint256 public requestCount = 0; uint8 private constant DICE_SIDES = 6; event DiceRollRequested(address indexed player, uint256 indexed requestId); event DiceRollCompleted( address indexed player, uint256 indexed requestId, uint256 result, uint256 currentStreak, uint256 topStreak ); event NewTopScore(address indexed player, uint256 newTopStreak); constructor(address _coordinator) { coordinator = IVRFCoordinator(_coordinator); } function rollDice() external returns (uint256 requestId) { require(!hasPendingRoll[msg.sender], "Already has a pending roll"); hasPendingRoll[msg.sender] = true; uint256 seed = requestCount++; requestId = coordinator.requestRandomNumbers(1, seed); requestOwners[requestId] = msg.sender; emit DiceRollRequested(msg.sender, requestId); return requestId; } function rawFulfillRandomNumbers( uint256 requestId, uint256[] memory randomNumbers ) external { require(msg.sender == address(coordinator), "Only coordinator can fulfill"); require(randomNumbers.length > 0, "No random numbers provided"); address player = requestOwners[requestId]; require(player != address(0), "Unknown request ID"); require(hasPendingRoll[player], "No pending roll"); uint256 diceRoll = (randomNumbers[0] % DICE_SIDES) + 1; if (diceRoll == 6) { currentStreak[player] += 1; if (currentStreak[player] > topStreak[player]) { topStreak[player] = currentStreak[player]; emit NewTopScore(player, topStreak[player]); } } else { currentStreak[player] = 0; } hasPendingRoll[player] = false; emit DiceRollCompleted( player, requestId, diceRoll, currentStreak[player], topStreak[player] ); delete requestOwners[requestId]; } } ``` ### Deploy to RISE Testnet Configure `foundry.toml`: ```toml title="foundry.toml" [profile.default] src = "src" out = "out" libs = ["lib"] solc_version = "0.8.19" [rpc_endpoints] rise_testnet = "https://testnet.riselabs.xyz" [etherscan] rise_testnet = { key = "", url = "https://explorer.testnet.riselabs.xyz/api" } ``` Deploy: ```bash forge create --rpc-url rise_testnet \ --private-key $PRIVATE_KEY \ --constructor-args 0x9d57aB4517ba97349551C876a01a7580B1338909 \ src/DiceGame.sol:DiceGame ``` Verify on Blockscout: ```bash forge verify-contract \ src/DiceGame.sol:DiceGame \ --chain 11155931 \ --verifier blockscout \ --verifier-url https://explorer.testnet.riselabs.xyz/api \ --constructor-args $(cast abi-encode "constructor(address)" 0x9d57aB4517ba97349551C876a01a7580B1338909) ``` ## Frontend Integration ### Setup Frontend ```bash npm install viem ``` ```bash pnpm add viem ``` ```bash yarn add viem ``` ```bash bun add viem ``` ### Monitor VRF Events Create `monitor.ts` to track dice roll events: ```typescript title="monitor.ts" import { createPublicClient, webSocket } from 'viem'; import { riseTestnet } from 'viem/chains'; const wsUrl = 'wss://testnet.riselabs.xyz/ws'; const diceGameAddress = '0x...'; // Your deployed contract const vrfAbi = [ { type: 'event', name: 'DiceRollCompleted', inputs: [ { name: 'player', type: 'address', indexed: true }, { name: 'requestId', type: 'uint256', indexed: true }, { name: 'result', type: 'uint256' }, { name: 'currentStreak', type: 'uint256' }, { name: 'topStreak', type: 'uint256' } ] } ] as const; const client = createPublicClient({ chain: riseTestnet, transport: webSocket(wsUrl) }); const unwatch = client.watchContractEvent({ address: diceGameAddress, abi: vrfAbi, eventName: 'DiceRollCompleted', onLogs: (logs) => { logs.forEach((log) => { console.log(`Player rolled: ${log.args.result}`); console.log(`Streak: ${log.args.currentStreak}`); }); } }); ``` ## How It Works 1. **User initiates**: Click roll button in the DApp 2. **Request randomness**: DApp calls `rollDice()` on the contract 3. **VRF processing**: Contract requests random numbers from VRF coordinator 4. **Instant callback**: VRF calls `rawFulfillRandomNumbers()` with result 5. **Event emission**: Contract emits `DiceRollCompleted` event 6. **Realtime update**: WebSocket delivers event to DApp in \~4ms 7. **UI update**: DApp shows the dice result immediately ## Key Takeaways * **Instant Results**: VRF responds in milliseconds via shreds * **Realtime Updates**: WebSocket delivers events instantly * **Secure Randomness**: Cryptographically verifiable numbers * **Simple Integration**: Standard Solidity interfaces ## Next Steps * Add betting mechanics with token stakes * Create multiplayer dice battles * Implement leaderboards * Add different game modes # Realtime Tracking (/docs/builders/vrf/real-time) import { Card } from 'fumadocs-ui/components/card'; import { Radio } from 'lucide-react'; # Realtime Event Tracking Get instant notifications when VRF results are ready using WebSocket subscriptions powered by RISE's shred architecture. ## Overview VRF results arrive via events emitted by your contract. RISE Chain's shred-based architecture delivers these events in realtime through WebSocket subscriptions, eliminating the need for polling and providing instant updates when randomness is ready. } title="Watching Events" href="/docs/builders/shreds/watching-events"> For complete details on realtime event tracking with WebSockets and shred subscriptions, see the Watching Events guide. The same patterns apply to VRF events. ## Quick Example Here's how to watch for VRF completion events: ```typescript import { createPublicClient, webSocket } from 'viem' import { shredActions } from 'shreds/viem' import { riseTestnet } from 'viem/chains' const client = createPublicClient({ chain: riseTestnet, transport: webSocket('wss://testnet.riselabs.xyz/ws') }).extend(shredActions) const vrfAbi = [ { type: 'event', name: 'DiceRollCompleted', inputs: [ { name: 'player', type: 'address', indexed: true }, { name: 'requestId', type: 'uint256', indexed: true }, { name: 'result', type: 'uint256' }, { name: 'currentStreak', type: 'uint256' }, { name: 'topStreak', type: 'uint256' } ] } ] as const; // Watch for VRF completion events client.watchContractEvent({ abi: vrfAbi, address: '0x...', // Your VRF consumer contract eventName: 'DiceRollCompleted', onLogs: (logs) => { logs.forEach((log) => { console.log('Random result:', log.args.result); console.log('Streak:', log.args.currentStreak); // Update your UI here updateUI(log.args.result); }); } }); ``` ## Key Differences for VRF When watching VRF events, you'll typically want to track: 1. **Request Events**: Know when a randomness request is made 2. **Completion Events**: Get notified instantly when VRF fulfills the request (usually 3-5ms) 3. **Request IDs**: Match requests to their results The event watching patterns are identical to those used for shreds. For advanced patterns like multi-contract monitoring, React hooks, reconnection handling, and more, refer to the Watching Events guide linked above. # Smart Contracts (/docs/builders/vrf/smart-contracts) # Smart Contract Integration Learn how to integrate Fast VRF into your smart contracts for secure, verifiable randomness. The VRF contracts shown here are suitable for testnet development. Production mainnet deployment requires additional security measures: 1. **Cryptographic Proof Verification**: Contracts must verify cryptographic proofs to ensure the VRF backend cannot manipulate outcomes. 2. **Spam Prevention Mechanisms**: Production contracts should implement one or both of: * **Whitelisting**: Restrict VRF requests to approved contracts only * **Request Fees**: Charge a small fee per VRF request to prevent abuse ## VRF Coordinator The VRF Coordinator manages randomness requests and fulfillment on RISE Chain. ```solidity // RISE Testnet VRF Coordinator address constant VRF_COORDINATOR = 0x9d57aB4517ba97349551C876a01a7580B1338909; ``` ## Required Interfaces Your contract must implement these interfaces to interact with VRF: ```solidity // Interface for requesting random numbers interface IVRFCoordinator { function requestRandomNumbers( uint32 numNumbers, // How many random numbers you need uint256 seed // Seed for randomness generation ) external returns (uint256 requestId); } // Interface your contract must implement interface IVRFConsumer { function rawFulfillRandomNumbers( uint256 requestId, uint256[] memory randomNumbers ) external; } ``` ## Basic Implementation ### Minimal VRF Consumer ```solidity contract BasicVRFConsumer is IVRFConsumer { IVRFCoordinator public coordinator; mapping(uint256 => uint256) public results; event RandomnessRequested(uint256 indexed requestId); event RandomnessFulfilled(uint256 indexed requestId, uint256 randomNumber); constructor(address _coordinator) { coordinator = IVRFCoordinator(_coordinator); } function requestRandom() external returns (uint256) { uint256 requestId = coordinator.requestRandomNumbers(1, block.timestamp); emit RandomnessRequested(requestId); return requestId; } function rawFulfillRandomNumbers( uint256 requestId, uint256[] memory randomNumbers ) external override { require(msg.sender == address(coordinator), "Only VRF coordinator"); require(randomNumbers.length > 0, "No random numbers"); results[requestId] = randomNumbers[0]; emit RandomnessFulfilled(requestId, randomNumbers[0]); } } ``` ## Advanced Patterns ### Request Tracking Track who made each request and handle state properly: ```solidity contract TrackedVRFConsumer is IVRFConsumer { IVRFCoordinator public coordinator; struct Request { address requester; uint256 timestamp; bool fulfilled; uint256 result; } mapping(uint256 => Request) public requests; mapping(address => uint256[]) public userRequests; function requestRandomForUser() external returns (uint256) { uint256 requestId = coordinator.requestRandomNumbers( 1, uint256(keccak256(abi.encode(msg.sender, block.timestamp))) ); requests[requestId] = Request({ requester: msg.sender, timestamp: block.timestamp, fulfilled: false, result: 0 }); userRequests[msg.sender].push(requestId); return requestId; } function rawFulfillRandomNumbers( uint256 requestId, uint256[] memory randomNumbers ) external override { require(msg.sender == address(coordinator), "Only VRF coordinator"); Request storage request = requests[requestId]; require(request.requester != address(0), "Invalid request"); require(!request.fulfilled, "Already fulfilled"); request.fulfilled = true; request.result = randomNumbers[0]; // Process the result for the user _processRandomness(request.requester, randomNumbers[0]); } function _processRandomness(address user, uint256 randomNumber) internal { // Your custom logic here } } ``` ### Multiple Random Numbers Request and handle multiple random values in one call: ```solidity contract MultiRandomConsumer is IVRFConsumer { IVRFCoordinator public coordinator; event LotteryDrawn(uint256[] winningNumbers); function drawLottery() external returns (uint256) { // Request 6 random numbers for lottery return coordinator.requestRandomNumbers(6, block.timestamp); } function rawFulfillRandomNumbers( uint256 requestId, uint256[] memory randomNumbers ) external override { require(msg.sender == address(coordinator), "Only VRF coordinator"); require(randomNumbers.length == 6, "Expected 6 numbers"); uint256[] memory lotteryNumbers = new uint256[](6); for (uint i = 0; i < 6; i++) { // Generate lottery numbers 1-49 lotteryNumbers[i] = (randomNumbers[i] % 49) + 1; } emit LotteryDrawn(lotteryNumbers); } } ``` ## Common Use Cases ### Fair NFT Minting ```solidity contract FairNFTMint is IVRFConsumer, ERC721 { IVRFCoordinator public coordinator; uint256 public constant MAX_SUPPLY = 10000; uint256 public totalMinted = 0; mapping(uint256 => address) public mintRequests; mapping(uint256 => uint256) public tokenTraits; function requestMint() external payable { require(msg.value >= 0.1 ether, "Insufficient payment"); require(totalMinted < MAX_SUPPLY, "Sold out"); uint256 requestId = coordinator.requestRandomNumbers(1, totalMinted); mintRequests[requestId] = msg.sender; } function rawFulfillRandomNumbers( uint256 requestId, uint256[] memory randomNumbers ) external override { require(msg.sender == address(coordinator), "Only VRF coordinator"); address minter = mintRequests[requestId]; require(minter != address(0), "Invalid request"); uint256 tokenId = totalMinted++; uint256 traits = randomNumbers[0]; tokenTraits[tokenId] = traits; _mint(minter, tokenId); delete mintRequests[requestId]; } } ``` ### Random Rewards Distribution ```solidity contract RandomRewards is IVRFConsumer { IVRFCoordinator public coordinator; IERC20 public rewardToken; address[] public participants; mapping(uint256 => uint256) public pendingRewards; function distributeRewards(uint256 totalReward) external { require(participants.length > 0, "No participants"); uint256 requestId = coordinator.requestRandomNumbers( uint32(participants.length), block.timestamp ); pendingRewards[requestId] = totalReward; } function rawFulfillRandomNumbers( uint256 requestId, uint256[] memory randomNumbers ) external override { require(msg.sender == address(coordinator), "Only VRF coordinator"); uint256 totalReward = pendingRewards[requestId]; require(totalReward > 0, "No pending reward"); // Distribute proportionally based on random weights uint256 totalWeight = 0; for (uint i = 0; i < randomNumbers.length; i++) { totalWeight += randomNumbers[i] % 1000; } for (uint i = 0; i < participants.length; i++) { uint256 share = (totalReward * (randomNumbers[i] % 1000)) / totalWeight; rewardToken.transfer(participants[i], share); } delete pendingRewards[requestId]; } } ``` ## Security Considerations ### Access Control Always verify the caller is the VRF coordinator: ```solidity modifier onlyVRFCoordinator() { require(msg.sender == address(coordinator), "Only VRF coordinator"); _; } function rawFulfillRandomNumbers( uint256 requestId, uint256[] memory randomNumbers ) external override onlyVRFCoordinator { // Your logic here } ``` ### Request Validation Validate requests before processing: ```solidity function rawFulfillRandomNumbers( uint256 requestId, uint256[] memory randomNumbers ) external override onlyVRFCoordinator { // Check request exists require(requests[requestId].requester != address(0), "Unknown request"); // Check not already fulfilled require(!requests[requestId].fulfilled, "Already fulfilled"); // Check expected number count require(randomNumbers.length == expectedCount[requestId], "Wrong count"); // Process... } ``` ### Reentrancy Protection Use checks-effects-interactions pattern: ```solidity function rawFulfillRandomNumbers( uint256 requestId, uint256[] memory randomNumbers ) external override onlyVRFCoordinator nonReentrant { // 1. Checks require(requests[requestId].valid, "Invalid request"); // 2. Effects requests[requestId].fulfilled = true; requests[requestId].result = randomNumbers[0]; // 3. Interactions if (callbacks[requestId] != address(0)) { ICallback(callbacks[requestId]).onRandomness(randomNumbers[0]); } } ``` ## Best Practices 1. **Always validate** the VRF coordinator address 2. **Track request state** to prevent double processing 3. **Handle failures gracefully** with fallback mechanisms 4. **Use events** for off-chain monitoring 5. **Test thoroughly** with mock VRF before mainnet 6. **Consider gas costs** when requesting multiple numbers 7. **Implement timeouts** for unfulfilled requests # Implementation (/docs/cookbook/reaction-time-game/implementation) import { Tabs, Tab } from 'fumadocs-ui/components/tabs'; import { Steps, Step } from 'fumadocs-ui/components/steps'; import { Callout } from 'fumadocs-ui/components/callout'; ## Game Implementation Now let's build the core game component with Shreds integration for blockchain-backed precision. The complete implementation can be found in the [GitHub repository](https://github.com/awesamarth/reaction-time). We'll highlight only the key sections here. ### Key Concepts **Transaction Pool Pattern:** * Pre-sign 10 transactions at initialization * Each click retrieves a pre-signed transaction from the pool * Background refilling at 50% capacity ensures the pool never depletes * Zero signing latency during gameplay **Game State Machine:** * IDLE → WAITING → READY → FINISHED * Random delay (1-5s) between WAITING and READY * Measure reaction time with `performance.now()` * Record transaction confirmation time separately **Shreds Integration:** * Use `eth_sendRawTransactionSync` for synchronous confirmations * Returns when transaction is finalized (3ms), not just submitted * Critical for accurate timing measurements ### Core Implementation Highlights ```typescript title="src/app/single-player/page.tsx (excerpt)" // Transaction pool for pre-signed transactions const preSignedPool: { transactions: `0x${string}`[]; currentIndex: number; baseNonce: number; } = { transactions: [], currentIndex: 0, baseNonce: 0, }; // Pre-sign batch of transactions const preSignBatch = async (startNonce: number, batchSize: number) => { const signingPromises = Array.from({ length: batchSize }, async (_, i) => { const txData = { to: account.address, value: 0n, data: `0x${(i + 1).toString(16).padStart(2, "0")}` as `0x${string}`, nonce: startNonce + i, gasPrice: gasPrice, gas: gasLimit, type: "legacy" as const, }; return await client.signTransaction(txData); }); return await Promise.all(signingPromises); }; // Send transaction synchronously const handleClick = async () => { const signedTx = getNextTransaction(); const txStart = performance.now(); await client.request({ method: 'eth_sendRawTransactionSync', params: [signedTx] }); const txTime = Math.round(performance.now() - txStart); // Record result with reaction time + TX time }; ``` ### Complete Source Code For the full game implementation including: * Complete game state management * Landing page with animated background * Results table and statistics * Play again functionality Visit: [https://github.com/awesamarth/reaction-time](https://github.com/awesamarth/reaction-time) *** ## Running the Game ### Fund Your Burner Wallet Before playing, you need testnet ETH. Visit the [RISE Faucet](https://faucet.testnet.riselabs.xyz) and request funds for your burner wallet address (check the navbar after starting the app). ### Start Development Server ```bash npm run dev ``` ```bash yarn dev ``` ```bash pnpm dev ``` ```bash bun run dev ``` Open your browser and navigate to `http://localhost:3000`. ### Playing the Game ### Start the Game Click the "START GAME" button on the landing page. Wait for "INITIALIZING..." to change to "CLICK TO START". ### Round 1 Click the purple box to start. It will turn **red** with "WAIT..." - don't click yet! After 1-5 seconds, it turns **green** with "CLICK NOW!" - click as fast as you can! ### Transaction Recording The box turns yellow with "RECORDING..." while your click is being recorded on the blockchain. This takes only \~3ms! ### View Results After each round, your results appear in the table below: * **Reaction Time**: Your raw reflexes * **TX Time**: How long RISE took to confirm * **Total Time**: Combined time ### Complete 5 Rounds Repeat for rounds 2-5. After the final round, view your **FINAL STATS** showing averages and blockchain overhead percentage. The game in action should look like this: Reaction Time Game The average human reaction time is 200-300ms. If your TX time is only 3ms, RISE adds less than 2% overhead to your total response time! *** ## Understanding the Code ### Transaction Pool Pattern **Why this works:** 1. **Signing is slow** (\~50ms) - doing it during gameplay adds latency 2. **Pre-signing is instant** - transaction is ready to send immediately 3. **Background refilling** - pool never runs out during a 5-round game 4. **Synchronous confirmation** - `eth_sendRawTransactionSync` waits for finality ### Timing Precision The game uses `performance.now()` for microsecond precision: ```typescript // When box turns green greenTimeRef.current = performance.now(); // When user clicks clickTimeRef.current = performance.now(); // Calculate reaction time const reactionTime = Math.round(clickTimeRef.current - greenTimeRef.current) - ADJUSTMENT; ``` **The 100ms adjustment** accounts for: * Browser rendering delays * Monitor refresh rate (\~16ms at 60Hz) * Event propagation time *** ## Performance Insights ### What the Game Proves This game demonstrates three critical points: 1. **Blockchain Can Be Fast**: 3ms confirmations are comparable to database writes 2. **Pre-signing Works**: Zero-latency gameplay with background pool management 3. **RISE Enables New Use Cases**: Gaming, high-frequency trading, realtime auctions *** ## Advanced Optimizations ### Background Refilling Strategy The pool refills at 50% capacity to ensure transactions are always ready: ```typescript if (preSignedPool.currentIndex % 5 === 0 && !preSignedPool.hasTriggeredRefill) { preSignedPool.hasTriggeredRefill = true; const nextNonce = preSignedPool.baseNonce + preSignedPool.transactions.length; preSignBatch(nextNonce, 10).then(() => { preSignedPool.hasTriggeredRefill = false; // Ready for next refill }); } ``` **Why 50% threshold?** * Signing 10 transactions takes \~500ms * Typical game round takes 2-6 seconds * Pool will never deplete during gameplay *** ## Security Considerations ### Burner Wallet Best Practices This tutorial uses an exposed private key for simplicity. In production: * Use server-side signing with API routes * Implement rate limiting to prevent abuse * Never expose private keys in client code * Consider using threshold signatures or MPC ## Next Steps Congratulations! You've built a realtime blockchain game with 3ms confirmations. Here are some ideas to extend your game: 1. **Multiplayer Mode**: Add realtime leaderboards using Shreds events 2. **NFT Rewards**: Mint achievement NFTs for top scores 3. **Smart Contract Integration**: Record high scores on-chain 4. **Advanced Analytics**: Track improvement over time 5. **Tournament Mode**: Compete against other players ### Related Tutorials * [Shred Ninja](/docs/cookbook/shred-ninja) - Realtime event monitoring * [RISEx Trading Bot](/docs/cookbook/risex-telegram-bot) - Build a Telegram perp trading bot * [Deploy Your First Contract](/docs/cookbook/deploy-first-contract) - Smart contract deployment ### Resources * [GitHub Repository](https://github.com/awesamarth/reaction-time) - Complete source code * [Shreds Documentation](/docs/builders/shreds) - Complete Shreds API reference * [RISE Testnet Details](/docs/builders/testnet-details) - Network information * [Viem Documentation](https://viem.sh) - Ethereum client library * [RISE Faucet](https://faucet.testnet.riselabs.xyz) - Get testnet ETH # Reaction Time Game (/docs/cookbook/reaction-time-game) import { Cards, Card } from 'fumadocs-ui/components/card'; import { Callout } from 'fumadocs-ui/components/callout'; ## Introduction In this tutorial, you'll build an interactive reaction time game that proves blockchain doesn't have to be slow. The game challenges players to test their reflexes while simultaneously recording each click on the blockchain, showcasing RISE's groundbreaking **3ms transaction pre-confirmations**. ### What You'll Build An arcade-style game with: * 5-round reaction time test with millisecond precision * Realtime blockchain transaction recording for each click * Pre-signed transaction pool for zero-latency gameplay * Performance metrics comparing reaction time vs transaction time * Retro arcade UI with dynamic color transitions ### What You'll Learn * How to build latency-sensitive applications on blockchain * Using `eth_sendRawTransactionSync` for synchronous confirmations * Pre-signing transaction batches for optimal performance * Transaction pool management with background refilling * Measuring blockchain overhead with precision timing * Building game state machines in React ### The Secret Sauce: 3ms Confirmations Traditional blockchains take 100-300ms+ just to confirm transactions. too slow for realtime gaming. RISE's synchronous transactions confirm in **\~3ms**, making blockchain fast enough for arcade games, trading bots, and other latency-critical apps. **This game proves it**: Your total response time (reaction + blockchain) will be only \~3ms slower than your raw reaction time! ### Prerequisites Before starting, make sure you have: * Node.js 18+ installed * Basic knowledge of React and Next.js * Understanding of TypeScript * A burner wallet private key for testnet (we'll generate one) This tutorial uses a **burner wallet** (exposed private key) for simplicity. Never use real funds with this pattern! ### Source Code The complete source code for this project is available on GitHub: [awesamarth/reaction-time](https://github.com/awesamarth/reaction-time) ## Quick Links # Setup (/docs/cookbook/reaction-time-game/setup) import { Tabs, Tab } from 'fumadocs-ui/components/tabs'; import { Callout } from 'fumadocs-ui/components/callout'; ## Project Setup ### Create a New Next.js Project First, create a new Next.js application with TypeScript: ```bash npx create-next-app@latest reaction-time-game ``` ```bash yarn create next-app reaction-time-game ``` ```bash pnpm create next-app reaction-time-game ``` ```bash bun create next-app reaction-time-game ``` When prompted, select these options: * Use recommended Next.js defaults: **No, customize settings** * TypeScript: **Yes** * Linter: **None** * React Compiler: **Yes** * Tailwind CSS: **Yes** * `src/` directory: **Yes** * App Router: **Yes** * Customize import alias: **No** If you've completed another tutorial, you can select **No, reuse previous settings** to skip configuration. Navigate into your project: ```bash cd reaction-time-game ``` ### Install Dependencies Install the required packages for blockchain integration: ```bash npm install viem shreds lucide-react ``` ```bash yarn add viem shreds lucide-react ``` ```bash pnpm add viem shreds lucide-react ``` ```bash bun add viem shreds lucide-react ``` **Package breakdown:** * `viem` - Lightweight Ethereum client library for transactions * `shreds` - RISE Shreds SDK for 3ms confirmations * `lucide-react` - Icon library for UI elements ### Generate a Burner Wallet Create a burner wallet for testnet transactions. Run this in your terminal: ```bash node -e "console.log(require('crypto').randomBytes(32).toString('hex'))" ``` This generates a random private key. Copy the output. This is a **burner wallet** for demo purposes. Never use this pattern with real funds or mainnet! ### Set Up Environment Variables Create a `.env.local` file in your project root: ```bash title=".env.local" NEXT_PUBLIC_BURNER_KEY=0xYOUR_GENERATED_KEY_HERE ``` Replace `YOUR_GENERATED_KEY_HERE` with the key you just generated (add `0x` prefix). The `NEXT_PUBLIC_` prefix makes this variable accessible in the browser. This is acceptable for burner wallets but never use this for production keys! *** ## Configuration ### Configure Fonts Update your root layout to include arcade-style fonts: ```typescript title="src/app/layout.tsx" import type { Metadata } from "next"; import { Geist, Geist_Mono, Press_Start_2P, Rajdhani } from "next/font/google"; import "./globals.css"; import { Navbar } from "@/components/Navbar"; const geistSans = Geist({ variable: "--font-geist-sans", subsets: ["latin"], }); const geistMono = Geist_Mono({ variable: "--font-geist-mono", subsets: ["latin"], }); const pressStart = Press_Start_2P({ weight: "400", subsets: ["latin"], variable: "--font-doom", }); const rajdhani = Rajdhani({ weight: ["400", "500", "600", "700"], subsets: ["latin"], variable: "--font-rajdhani", }); export const metadata: Metadata = { title: "Reaction Time Game - RISE", description: "Test your reflexes with blockchain-backed precision", }; export default function RootLayout({ children, }: Readonly<{ children: React.ReactNode; }>) { return ( {children} ); } ``` **Fonts included:** * `Press Start 2P` - Retro arcade font for titles * `Rajdhani` - Modern gaming font for UI * `Geist` - Clean sans-serif for body text ### Update Global Styles Replace your `globals.css` with Tailwind imports: ```css title="src/app/globals.css" @import "tailwindcss"; ``` That's it! Tailwind CSS 4 uses a simplified import system. *** ## Building the Navbar Create a navbar to display wallet information and balance: ```typescript title="src/components/Navbar.tsx" "use client"; import { useEffect, useState } from "react"; import { createPublicClient, http, formatEther } from "viem"; import { riseTestnet } from "viem/chains"; import { privateKeyToAccount } from "viem/accounts"; import { Copy, Check } from "lucide-react"; const account = privateKeyToAccount( process.env.NEXT_PUBLIC_BURNER_KEY as `0x${string}` ); const publicClient = createPublicClient({ chain: riseTestnet, transport: http(), }); export function Navbar() { const [balance, setBalance] = useState("0"); const [copied, setCopied] = useState(false); useEffect(() => { const fetchBalance = async () => { const bal = await publicClient.getBalance({ address: account.address, }); setBalance(formatEther(bal)); }; fetchBalance(); const interval = setInterval(fetchBalance, 10000); // Update every 10s return () => clearInterval(interval); }, []); const copyAddress = async () => { await navigator.clipboard.writeText(account.address); setCopied(true); setTimeout(() => setCopied(false), 2000); }; return ( ); } ``` **Key features:** * Displays ETH balance (refreshes every 10 seconds) * Shows truncated burner wallet address * Copy address to clipboard with visual feedback * Arcade-themed styling with purple accents Now you're ready to implement the game logic in the [next section](/docs/cookbook/reaction-time-game/implementation). # Event Watching (/docs/cookbook/rise-slots/event-watching) import { Steps, Step } from 'fumadocs-ui/components/steps'; import { Callout } from 'fumadocs-ui/components/callout'; ## The Challenge: Ultra-Fast VRF RISE VRF is **incredibly fast** - it fulfills randomness requests in 3-5 milliseconds. This creates a unique challenge: The VRF result often arrives **before** your code finishes processing the transaction receipt! Traditional event watching patterns won't work. ## The Solution: Results Caching We'll use a pattern called **results caching**: 1. Start watching for SpinResult events **before** sending the transaction 2. Cache ALL events as they arrive (in a Map by requestId) 3. After getting the requestId from the receipt, check if result is already cached 4. If cached: return immediately (most common case) 5. If not cached: poll the cache every 100ms until result arrives This gives users a **sub-millisecond** experience - results feel instant! **Why This Works**: Shreds uses WebSocket for real-time event streaming. Events arrive via push notification as soon as they're emitted, while receipt fetching is pull-based and slightly slower. ## Shreds Overview Shreds is RISE's real-time event streaming library. Instead of polling every second (like traditional `eth_getLogs`), Shreds: * Opens a WebSocket connection to RISE nodes * Receives events as soon as they're emitted (push-based) * Handles reconnection and error recovery automatically * Filters events efficiently on the server side ## Implementation ### Create Shreds Client Add the Shreds client setup to your main page (`src/app/page.tsx`): ```typescript import { createPublicClient, webSocket, decodeEventLog } from 'viem' import { riseTestnet } from 'viem/chains' import { shredActions } from 'shreds/viem' import { SLOT_MACHINE_ADDRESS, SLOT_MACHINE_ABI } from '@/constants' // Create shreds client for event watching const shredClient = createPublicClient({ chain: riseTestnet, transport: webSocket('wss://testnet.riselabs.xyz/ws'), }).extend(shredActions) ``` **Key Points**: * Uses WebSocket transport (`wss://`) not HTTP * `.extend(shredActions)` adds `watchShreds` and `waitForTransactionReceipt` methods * This client is for read-only operations (watching events, getting receipts) ### Set Up Results Cache Add global cache and watcher to your component: ```typescript export default function Home() { // ... existing state ... // Global results cache for SpinResult events const resultsCache = useRef(new Map()).current // Start watching for SpinResult events on mount useEffect(() => { const unwatch = shredClient.watchShreds({ includeStateChanges: false, onShred: (shred) => { shred.transactions.forEach((tx) => { const spinResultLogs = tx.logs.filter( (log) => log.address.toLowerCase() === SLOT_MACHINE_ADDRESS.toLowerCase() && log.topics[0] === '0xc95f6b2ec3fb7d188682755102792da57a8ec34918faaab4b1b925f0c4556123' ) spinResultLogs.forEach((log) => { try { const decoded = decodeEventLog({ abi: SLOT_MACHINE_ABI, data: log.data, topics: log.topics, }) if (decoded.eventName === 'SpinResult') { const requestId = decoded.args.requestId.toString() const result = decoded.args.result as [number, number, number] const payout = decoded.args.payout as bigint console.log('📦 Cached SpinResult for requestId:', requestId, 'result:', result, 'payout:', payout.toString()) resultsCache.set(requestId, { result, payout }) } } catch (error) { console.error('Error decoding SpinResult:', error) } }) }) }, onError: (error) => { console.error('Shred error:', error) }, }) return () => unwatch() }, []) // ... rest of component } ``` **What's Happening**: 1. **useRef for cache**: Persists across renders but doesn't trigger re-renders 2. **watchShreds on mount**: Starts listening immediately when page loads 3. **Event filtering**: * Check contract address matches * Check event signature matches SpinResult (`0xc95f6b2ec3fb7d188682755102792da57a8ec34918faaab4b1b925f0c4556123`) 4. **Decode and cache**: Extract requestId, result, and payout, store in Map 5. **Cleanup on unmount**: `unwatch()` stops the WebSocket connection **Event Signature**: Use `cast sig-event "SpinResult(uint256,uint8[3],uint256)"` to get the event signature. The first topic (topics\[0]) is always the event signature hash. ### Implement Spin Handler with Cache Check Now implement the spin function that uses the cache: ```typescript const handleSpin = async (): Promise<[number, number, number]> => { if (!hasSession) throw new Error("No session key") // Send the spin request (watcher is already running from useEffect) const hash = await sendWithSessionKey([{ to: SLOT_MACHINE_ADDRESS, data: encodeFunctionData({ abi: SLOT_MACHINE_ABI, functionName: "spin", args: [] }), }]) console.log('Spin transaction:', hash) // Wait for tx receipt to get requestId const receipt = await shredClient.waitForTransactionReceipt({ hash: hash as `0x${string}` }) // Find SpinRequested event to extract requestId const requestedLog = receipt.logs.find(log => log.address.toLowerCase() === SLOT_MACHINE_ADDRESS.toLowerCase() && log.topics[0] === '0x616d9204a230e2286a32eb3295c697372bd4cc093a7de2ef2455df4bffbc97c9' // SpinRequested ) if (!requestedLog) throw new Error('SpinRequested event not found') const requestedEvent = decodeEventLog({ abi: SLOT_MACHINE_ABI, data: requestedLog.data, topics: requestedLog.topics, }) const myRequestId = requestedEvent.args.requestId.toString() console.log('📍 My requestId:', myRequestId) // Check if result already in cache (VERY likely!) if (resultsCache.has(myRequestId)) { console.log('✅ Result already in cache!') return resultsCache.get(myRequestId)!.result } // Wait for result to arrive (rare case - only if VRF was slower than receipt) const spinData = await new Promise<{ result: [number, number, number], payout: bigint }>((resolve, reject) => { const timeout = setTimeout(() => { reject(new Error('Timeout')) }, 10000) const checkInterval = setInterval(() => { if (resultsCache.has(myRequestId!)) { console.log('✅ Result arrived!') clearTimeout(timeout) clearInterval(checkInterval) resolve(resultsCache.get(myRequestId!)!) } }, 100) // Check every 100ms }) return spinData.result } ``` **Flow Breakdown**: 1. **Send spin transaction** via session key (gasless) 2. **Wait for receipt** from Shreds client (uses WebSocket, very fast) 3. **Extract requestId** from SpinRequested event in the receipt 4. **Check cache first** - 90%+ of the time, result is already there! 5. **Poll cache if needed** - Check every 100ms for up to 10 seconds (rarely needed) ### Understanding the Flow Here's what actually happens in practice: ``` - User clicks SPIN - Transaction sent via session key - VRF fulfills, SpinResult event emitted - Shreds WebSocket receives event, caches it - waitForTransactionReceipt returns - Extract requestId from receipt - Check cache → Result is there! ✅ - UI updates with result ``` The result is cached at 3ms, but we don't know the requestId until 6ms. That's why we need the cache! **Without caching**: ``` - User clicks SPIN - Get receipt and requestId - Start watching for SpinResult event - Wait for event... (might have already missed it!) ``` ## Event Signatures Reference You'll need these event signatures for filtering: ```bash # Get SpinResult signature cast sig-event "SpinResult(uint256,uint8[3],uint256)" # Output: 0xc95f6b2ec3fb7d188682755102792da57a8ec34918faaab4b1b925f0c4556123 # Get SpinRequested signature cast sig-event "SpinRequested(uint256,address)" # Output: 0x616d9204a230e2286a32eb3295c697372bd4cc093a7de2ef2455df4bffbc97c9 ``` Hardcode these in your filtering logic for better performance. ## Advanced: Handling Multiple Users The current implementation caches ALL SpinResult events from ALL users. This is fine because: 1. Each result is keyed by unique requestId 2. We only look up our specific requestId 3. Old entries can be garbage collected periodically If you want to clean up old cache entries: ```typescript // Clean cache entries older than 1 minute const cleanCache = () => { const now = Date.now() const maxAge = 60000 // 1 minute // Store cache with timestamps resultsCache.forEach((value, key) => { if (now - value.timestamp > maxAge) { resultsCache.delete(key) } }) } // Run cleanup every 30 seconds useEffect(() => { const interval = setInterval(cleanCache, 30000) return () => clearInterval(interval) }, []) ``` ## Debugging Tips ### Check if Events Are Being Received ```typescript onShred: (shred) => { console.log('🔵 Shred received at', new Date().toISOString()) console.log(' Transactions:', shred.transactions.length) shred.transactions.forEach((tx) => { console.log(' TX:', tx.hash) console.log(' Logs:', tx.logs.length) }) // ... rest of handler } ``` ### Log Cache State ```typescript // After caching resultsCache.set(requestId, { result, payout }) console.log('Cache size:', resultsCache.size) console.log('Cache keys:', Array.from(resultsCache.keys())) ``` ### Test with Delay To verify polling works (when result isn't already cached): ```typescript // Artificially delay cache lookup await new Promise(resolve => setTimeout(resolve, 100)) if (resultsCache.has(myRequestId)) { // ... } ``` ## Next Steps Event watching is complete! Next, we'll build the frontend UI with animated slot reels, win detection, and integrate everything together. # Frontend (/docs/cookbook/rise-slots/frontend) import { Steps, Step } from 'fumadocs-ui/components/steps'; import { Callout } from 'fumadocs-ui/components/callout'; ## Frontend Architecture The frontend brings together everything we've built: session keys for gasless gameplay, event watching with Shreds for instant results, and an animated UI built with Framer Motion. The UI dynamically adapts to the user's state, showing different buttons based on whether they're connected, have a session key, or need tokens. **Complete Source Code**: The full implementation is available at [github.com/awesamarth/rise-slots](https://github.com/awesamarth/rise-slots). This page covers the key concepts and patterns. ## Key Components ### SlotMachine Component The main game UI handles animated reels, win detection, and dynamic button states. The most important pattern here is the symbol mapping system. **Symbol Mapping**: ```typescript function getSymbol(index: number): string { if (index <= 3) return '🍒' // Cherry (0-3) if (index <= 6) return '🍋' // Lemon (4-6) if (index <= 8) return '💎' // Diamond (7-8) return '9️⃣' // Lucky 9 (9) } ``` This mapping is crucial for win detection. Instead of comparing raw numbers, we compare symbols: ```typescript const symbol0 = getSymbol(result[0]) const symbol1 = getSymbol(result[1]) const symbol2 = getSymbol(result[2]) const isWin = symbol0 === symbol1 && symbol1 === symbol2 ``` This ensures \[0, 1, 2] correctly wins as triple cherries, since all three map to 🍒. **Reel Animation**: Each reel spins independently at 80ms intervals, showing random symbols. When the VRF result arrives, reels stop one by one with a 200ms stagger for dramatic effect. Wins celebrate for 3 seconds with a banner, while losses return to idle immediately. ### Main Page Integration The main page (`src/app/page.tsx`) coordinates session keys, event watching, and game flow. Here's how the critical pieces work together. **Event Watching Setup** runs on mount: ```typescript useEffect(() => { const unwatch = shredClient.watchShreds({ includeStateChanges: false, onShred: (shred) => { shred.transactions.forEach((tx) => { const spinResultLogs = tx.logs.filter( (log) => log.address.toLowerCase() === SLOT_MACHINE_ADDRESS.toLowerCase() && log.topics[0] === '0xc95f6b2ec3fb7d188682755102792da57a8ec34918faaab4b1b925f0c4556123' ) spinResultLogs.forEach((log) => { const decoded = decodeEventLog({ abi: SLOT_MACHINE_ABI, data: log.data, topics: log.topics }) if (decoded.eventName === 'SpinResult') { const requestId = decoded.args.requestId.toString() const result = decoded.args.result as [number, number, number] const payout = decoded.args.payout as bigint resultsCache.set(requestId, { result, payout }) } }) }) } }) return () => unwatch() }, []) ``` The watcher runs continuously in the background, caching all SpinResult events as they arrive. This is what makes the UX feel instant. **Spin Handler** leverages the cache: ```typescript const handleSpin = async (): Promise<[number, number, number]> => { // Send spin transaction via session key (gasless!) const hash = await sendWithSessionKey([{ to: SLOT_MACHINE_ADDRESS, data: encodeFunctionData({ abi: SLOT_MACHINE_ABI, functionName: "spin", args: [] }), }]) // Wait for receipt and extract requestId const receipt = await shredClient.waitForTransactionReceipt({ hash: hash as `0x${string}` }) const requestedLog = receipt.logs.find(log => log.address.toLowerCase() === SLOT_MACHINE_ADDRESS.toLowerCase() && log.topics[0] === '0x616d9204a230e2286a32eb3295c697372bd4cc093a7de2ef2455df4bffbc97c9' ) const requestedEvent = decodeEventLog({ abi: SLOT_MACHINE_ABI, data: requestedLog.data, topics: requestedLog.topics }) const myRequestId = requestedEvent.args.requestId.toString() // Check cache - result is almost always already there! if (resultsCache.has(myRequestId)) { return resultsCache.get(myRequestId)!.result } // Fallback: poll cache if not found (rare) return await new Promise((resolve, reject) => { const timeout = setTimeout(() => reject(new Error('Timeout')), 10000) const checkInterval = setInterval(() => { if (resultsCache.has(myRequestId!)) { clearTimeout(timeout) clearInterval(checkInterval) resolve(resultsCache.get(myRequestId!)!.result) } }, 100) }) } ``` The pattern is: send transaction, get requestId from receipt, check cache. In 90%+ of spins, the result is already cached by the time we check. ### Token Management Claiming RCT and using the faucet both use session keys for gasless transactions: ```typescript const claimRCT = async () => { const hash = await sendWithSessionKey([{ to: RCT_TOKEN_ADDRESS, data: encodeFunctionData({ abi: RCT_ABI, functionName: "mintInitial", args: [] }), }]) await new Promise(resolve => setTimeout(resolve, 1000)) refetchRCT() refetchHasMinted() } const useFaucet = async () => { const hash = await sendWithSessionKey([{ to: RCT_TOKEN_ADDRESS, data: encodeFunctionData({ abi: RCT_ABI, functionName: "faucet", args: [] }), }]) await new Promise(resolve => setTimeout(resolve, 1000)) refetchRCT() } ``` Both functions are completely gasless thanks to session keys. No wallet popups, instant execution. ## UI Flow States The app shows different buttons based on user state: 1. **Not Connected**: "Connect Wallet" button in place of spin button 2. **No Session Key**: "Create Session Key to Play" 3. **No RCT**: "Claim 1000 RCT" 4. **Broke (0 RCT)**: "Get More RCT (Broke? 😅)" 5. **Ready**: "SPIN" This progression ensures users are guided through setup before they can play. The SlotMachine component handles this through conditional rendering based on props. ## Animation Details The reel animation creates anticipation through timing. All three reels start spinning simultaneously with random symbols updating every 80ms. When VRF results arrive, reels stop sequentially with a 200ms delay between each stop. This staggered reveal builds tension and makes wins more satisfying. Win celebrations use Framer Motion for smooth animations: ```typescript {gameState === 'result' && isWin && lastWin !== null && (
+{getPayout(lastWin)} RCT!
Triple {getSymbol(lastWin)} • Instant VRF Result
)}
``` The banner scales in, displays for 3 seconds, then fades out. Losses skip the celebration entirely and return to idle immediately. ## Stats Tracking The app tracks wins and losses throughout the session: ```typescript const [wins, setWins] = useState(0) const [losses, setLosses] = useState(0) const handleResult = (result: [number, number, number], isWin: boolean, payout: number) => { if (isWin) { setWins(prev => prev + 1) } else { setLosses(prev => prev + 1) } refetchRCT() } ``` These stats display in the sidebar along with calculated win rate. It's simple but effective for showing progress. ## Complete Implementation The GitHub repository contains the full frontend code including the complete SlotMachine component with all animations, the main page with all features integrated, navbar with wallet connection UI, and sidebar with stats and session key management. **Key files to explore**: * `src/components/SlotMachine.tsx` - Main game component * `src/app/page.tsx` - Main page with all integrations * `src/app/layout.tsx` - Root layout with providers * `src/app/globals.css` - Custom animations Visit [github.com/awesamarth/rise-slots](https://github.com/awesamarth/rise-slots) for the complete source. ## Testing the Game Start the development server with `bun dev` and test the complete flow: connect with RISE Wallet, create a session key (one popup), claim 1000 RCT tokens (gasless), then spin multiple times with zero popups. Experience the instant VRF results, win and see payouts, go broke and use the faucet. RISE Slots Main Page ### Winning Results When you hit a winning combination, payouts are instant thanks to session keys: Winning Result with Payout Watch the console to see the caching pattern in action: ``` 📦 Cached SpinResult for requestId: 4685 result: [2,2,2] payout: 15000000000000000000 Spin transaction: 0x... 📍 My requestId: 4685 ✅ Result already in cache! ``` The result arrives and gets cached before we even finish extracting the requestId from the receipt. ## Key Production Patterns This tutorial demonstrates several production-ready patterns: results caching for handling race conditions, WebSocket event streaming for real-time updates, session key management with localStorage, responsive UI with proper loading states, comprehensive error handling with timeouts, and token balance tracking throughout gameplay. The UX achievements include sub-millisecond perceived latency, zero wallet popups during gameplay, instant visual feedback, and smooth animations with a clear game flow that guides users through setup. ## Next Steps You've built a complete production-ready slot machine on RISE with VRF integration for provably fair randomness, session keys for gasless gameplay, Shreds for real-time event streaming, results caching for ultra-fast UX, and proper token economics. **Deploy to production** by deploying contracts to RISE Mainnet, deploying the frontend to Vercel or Netlify, updating contract addresses, and testing end-to-end. **Consider enhancements** like leaderboards for tracking top players and biggest wins, daily free spins to encourage return visits, multiplayer tournaments for competitive play, NFT rewards for big wins, and an analytics dashboard for tracking game metrics. ### Resources * [GitHub Repository](https://github.com/awesamarth/rise-slots) - Complete source code * [RISE VRF Documentation](/docs/builders/vrf) - Learn more about Fast VRF * [Session Keys Guide](/docs/rise-wallet/session-keys) - Deep dive into session keys * [Shreds Documentation](/docs/builders/shreds) - Real-time event streaming * [RISE Discord](https://discord.gg/rise) - Get support and share your game # RISE Slots (/docs/cookbook/rise-slots) import { Cards, Card } from 'fumadocs-ui/components/card'; import { Callout } from 'fumadocs-ui/components/callout'; ## Introduction In this tutorial, you'll build a fully onchain slot machine that showcases RISE's three most powerful features working together: **Fast VRF** for instant provably-fair randomness, **Session Keys** for gasless gameplay without popups, and **Shreds** for 3ms event streaming. This is a complete production-ready game with real token economics. ### What You'll Build A complete casino-style slot machine with: * Smart contracts: ERC20 game token + VRF-powered slot machine * Symbol-based win detection with weighted probabilities * Four payout tiers (15x to 500x) * Session keys for completely gasless, popup-free gameplay * Token faucet for broke players * Real-time event watching with results caching * Animated slot reels with instant VRF results * Full game economy (10 RCT per spin, tiered payouts) **Production Ready**: Unlike many tutorials that just demo features, this is a complete game ready for real users. All RISE features (VRF, Session Keys, Shreds) work together seamlessly in production. ### What You'll Learn * Building VRF consumer contracts with symbol mapping * Creating ERC20 tokens with game-specific features * Session key permissions for gasless gameplay * Ultra-fast event watching with Shreds WebSocket * Results caching pattern for sub-millisecond UX * P256 session key management in the browser * Token economics and payout calculations * Production patterns for onchain gaming ### Game Flow 1. **Player connects wallet** with RISE Wallet (passkey-based) 2. **Creates session key** (one popup, grants 7-day permissions) 3. **Claims 1000 RCT tokens** (one-time free claim) 4. **Player spins** (10 RCT per spin, completely gasless via session key) 5. **VRF returns 3 random numbers** in 3-5ms 6. **Contract maps numbers to symbols** and checks for matches 7. **Payouts distributed instantly** if player wins 8. **Events streamed via Shreds** for real-time UI updates 9. **Faucet refills broke players** with 1000 RCT ### Why This Matters Traditional VRF solutions take seconds to minutes. RISE's VRF delivers results in **3-5 milliseconds**, and with Session Keys, players spin **without any wallet popups**. This tutorial shows you how to build the responsive, gasless UX that onchain gaming needs. ### Game Mechanics **Symbol Probabilities** (for triple match): * 🍒 Cherry (0-3): 6.4% chance → 15 RCT payout * 🍋 Lemon (4-6): 2.7% chance → 30 RCT payout * 💎 Diamond (7-8): 0.8% chance → 100 RCT payout * 9️⃣ Lucky 9 (9): 0.1% chance → 500 RCT payout **Economics**: * Cost per spin: 10 RCT * House starts with 10M RCT bankroll * Expected return: \~31% (69% house edge) ### Prerequisites Before starting, make sure you have: * Node.js 18+ installed * Basic knowledge of Solidity and React * Foundry installed ([getfoundry.sh](https://getfoundry.sh)) * Some testnet ETH (get from [RISE Faucet](https://faucet.testnet.riselabs.xyz)) This tutorial uses RISE Wallet for gasless transactions. No private keys in code - everything is passkey-based and secure. ### Source Code The complete source code for this project is available on GitHub: [awesamarth/rise-slots](https://github.com/awesamarth/rise-slots) ## Quick Links # Session Keys (/docs/cookbook/rise-slots/session-keys) import { Steps, Step } from 'fumadocs-ui/components/steps'; import { Callout } from 'fumadocs-ui/components/callout'; ## What Are Session Keys? Session keys are temporary signing keys that you grant limited permissions to. Instead of asking for wallet approval on every spin, users: 1. Grant permissions once (approve session key for 7 days) 2. App signs transactions locally with the session key 3. All future spins are completely gasless and instant - no popups! This is perfect for gaming where you want rapid, uninterrupted gameplay. **Security**: Session keys have scoped permissions. You control exactly which functions they can call and how much they can spend. If stolen, attackers are limited to those permissions. ## How Session Keys Work ``` ┌─────────────┐ │ User │ │ (Wallet) │ └──────┬──────┘ │ 1. Grant permissions (ONE popup) ▼ ┌─────────────────────────────────┐ │ On-chain Permission Registry │ │ • Public Key: 0xabc... │ │ • Can call: spin(), faucet() │ │ • Can spend: 10k RCT/hour │ │ • Expires: 7 days │ └─────────────────────────────────┘ │ │ 2. App stores private key in localStorage ▼ ┌─────────────────────────────────┐ │ Frontend Application │ │ • Private key: localStorage │ │ • Signs all spins locally │ │ • NO MORE POPUPS! │ └─────────────────────────────────┘ ``` ## Implementation ### Session Key State Management Add session key state to your main page (`src/app/page.tsx`): ```typescript "use client" import { useState, useEffect, useCallback, useRef } from 'react' import { useConnection, useConnectors, useChainId } from 'wagmi' import { Hex, P256, PublicKey, Signature } from 'ox' import { Hooks } from 'rise-wallet/wagmi' import { encodeFunctionData, parseEther } from 'viem' import { SLOT_MACHINE_ADDRESS, RCT_TOKEN_ADDRESS, SLOT_MACHINE_ABI, RCT_ABI } from '@/constants' // Storage key for session keys (per address) function storageKey(address: string) { return `rise_slots_${address}_session_key` } export default function Home() { const { address, isConnected, connector } = useConnection() const chainId = useChainId() // Session key state const [sessionPrivateKey, setSessionPrivateKey] = useState(null) const [sessionPublicKey, setSessionPublicKey] = useState(null) // RISE Wallet session key hooks const grantPermissions = Hooks.useGrantPermissions() const revokePermissions = Hooks.useRevokePermissions() const { data: permissions, refetch: refetchPermissions } = Hooks.usePermissions() // Find active session permission const activePermission = permissions?.find( (p) => sessionPublicKey && p.key.publicKey === sessionPublicKey && p.expiry > Math.floor(Date.now() / 1000) ) const hasSession = !!activePermission && !!sessionPrivateKey // Load session key from localStorage on mount useEffect(() => { if (!address) return const pk = localStorage.getItem(storageKey(address)) if (pk) { setSessionPrivateKey(pk) setSessionPublicKey(PublicKey.toHex(P256.getPublicKey({ privateKey: pk as `0x${string}` }), { includePrefix: false })) } }, [address]) // Refetch permissions when connected useEffect(() => { if (isConnected && connector) { refetchPermissions() } }, [isConnected, connector, refetchPermissions]) // ... rest of component } ``` **Key Concepts**: * Session keys are P256 elliptic curve keys (not secp256k1 like Ethereum) * Private key stored in localStorage (per address) * Public key registered on-chain with permissions * `hasSession` checks: key exists + permissions exist + not expired ### Create Session Key Function Add the session creation function: ```typescript // Create session key const createSession = async () => { // Generate P256 key pair const privateKey = P256.randomPrivateKey() const publicKey = PublicKey.toHex(P256.getPublicKey({ privateKey }), { includePrefix: false }) // Grant on-chain permissions for spin(), mintInitial(), and faucet() await grantPermissions.mutateAsync({ connector, key: { publicKey, type: "p256" }, expiry: Math.floor(Date.now() / 1000) + (86400 * 7), // 7 days feeToken: null, permissions: { calls: [ { to: SLOT_MACHINE_ADDRESS, signature: "0xf0acd7d5" }, // spin() { to: RCT_TOKEN_ADDRESS, signature: "0x0d16e21a" }, // mintInitial() { to: RCT_TOKEN_ADDRESS, signature: "0xde5f72fd" }, // faucet() ], spend: [ { token: RCT_TOKEN_ADDRESS, limit: parseEther("10000"), period: "hour" }, ], }, }) localStorage.setItem(storageKey(address!), privateKey) setSessionPrivateKey(privateKey) setSessionPublicKey(publicKey) refetchPermissions() } ``` **Permission Breakdown**: * **calls**: Which functions the session key can call * `spin()`: Main gameplay function * `mintInitial()`: One-time RCT claim * `faucet()`: Refill when broke * **spend**: Token spending limits * Max 10,000 RCT per hour * Prevents abuse if session key is compromised * **expiry**: Session key valid for 7 days * Automatic expiration for security * Users can revoke earlier if needed **Function Signatures**: Use `cast sig "functionName()"` to get function signatures. For example: `cast sig "spin()"` returns `0xf0acd7d5`. ### Revoke Session Key Function Add the ability to revoke sessions: ```typescript // Revoke session key const revokeSession = async () => { if (!activePermission) return await revokePermissions.mutateAsync({ connector, id: activePermission.id }) localStorage.removeItem(storageKey(address!)) setSessionPrivateKey(null) setSessionPublicKey(null) refetchPermissions() } ``` This lets users revoke permissions if: * They want to stop playing * They suspect their session key was compromised * They want to create a new session with different permissions ### Send Transactions with Session Keys Add the core function that signs transactions with session keys: ```typescript // Send transaction with session key const sendWithSessionKey = useCallback(async (calls: { to: string; data: string }[]) => { const privateKey = sessionPrivateKey! as `0x${string}` const publicKey = sessionPublicKey! const provider = (await connector!.getProvider()) as any // Prepare the calls (get digest to sign) const { digest, capabilities, ...request } = await provider.request({ method: "wallet_prepareCalls", params: [{ calls, chainId: Hex.fromNumber(chainId), from: address, atomicRequired: true, // All calls must succeed or all fail key: { publicKey, type: "p256" }, }], }) // Sign the digest with session private key const signature = Signature.toHex( P256.sign({ payload: digest as `0x${string}`, privateKey }) ) // Send the signed calls const result = await provider.request({ method: "wallet_sendPreparedCalls", params: [{ ...request, ...(capabilities ? { capabilities } : {}), signature }], }) // Get transaction hash from result const id = Array.isArray(result) ? result[0].id : result.id const status = await provider.request({ method: "wallet_getCallsStatus", params: [id], }) if (status.status !== 200) { throw new Error(`Call failed: status ${status.status}`) } return status.receipts[0].transactionHash }, [address, chainId, connector, sessionPrivateKey, sessionPublicKey]) ``` **Flow Explained**: 1. **Prepare Calls**: RISE Wallet prepares the transaction and returns a digest 2. **Sign Locally**: App signs digest with session private key (P256.sign) 3. **Send Prepared**: RISE Wallet executes the pre-signed transaction 4. **Get Receipt**: Wait for transaction confirmation This all happens **without any wallet popups** - signing is done locally with your session key! ### Example: Claim RCT Function Here's how to use session keys to claim RCT tokens: ```typescript const claimRCT = async () => { if (!hasSession) throw new Error("No session key") try { setIsClaimingRCT(true) const hash = await sendWithSessionKey([{ to: RCT_TOKEN_ADDRESS, data: encodeFunctionData({ abi: RCT_ABI, functionName: "mintInitial", args: [] }), }]) console.log('Claim RCT transaction:', hash) // Wait a bit then refetch balances await new Promise(resolve => setTimeout(resolve, 1000)) refetchRCT() refetchHasMinted() } finally { setIsClaimingRCT(false) } } ``` **No Wallet Popup!** The transaction is signed locally and executed instantly. ### Example: Faucet Function Similarly for the faucet: ```typescript const useFaucet = async () => { if (!hasSession) throw new Error("No session key") try { setIsClaimingRCT(true) const hash = await sendWithSessionKey([{ to: RCT_TOKEN_ADDRESS, data: encodeFunctionData({ abi: RCT_ABI, functionName: "faucet", args: [] }), }]) console.log('Faucet transaction:', hash) await new Promise(resolve => setTimeout(resolve, 1000)) refetchRCT() } finally { setIsClaimingRCT(false) } } ``` ## Security Considerations ### Limited Scope Session keys can only: * Call specific functions (spin, mintInitial, faucet) * Spend up to 10k RCT per hour * Work for 7 days before expiring They **cannot**: * Transfer ETH * Call other contracts * Spend unlimited tokens * Work after expiration ### Client-Side Storage Session private keys are stored in localStorage: * ✅ Convenient for users (no re-authorization) * ✅ Cleared when browser cache is cleared * ⚠️ Lost if user clears browser data ### Revocation Users can revoke session keys at any time: ```typescript await revokePermissions.mutateAsync({ connector, id: activePermission.id }) ``` This removes on-chain permissions, making the session key useless even if someone still has the private key. ## UI Integration Show session key status to users: ```typescript {!hasSession ? ( ) : (
Session Active (Expires: {new Date(activePermission.expiry * 1000).toLocaleDateString()})
)} ``` ## Testing Session Keys Test the flow: 1. **Create Session**: Click button → One wallet popup → Key created 2. **Claim RCT**: No popup, instant transaction 3. **Spin**: No popups, completely gasless 4. **Check Permissions**: Verify in wallet or on-chain 5. **Revoke**: Remove permissions, verify spins fail ## Next Steps Session keys are set up! Next, we'll implement event watching with Shreds to capture VRF results in real-time and build the results caching pattern for ultra-fast UX. # Setup (/docs/cookbook/rise-slots/setup) import { Steps, Step } from 'fumadocs-ui/components/steps'; import { Callout } from 'fumadocs-ui/components/callout'; ## Project Setup We'll build this as a monorepo combining a Foundry smart contract project with a Next.js frontend. ### Create Project Structure ```bash mkdir rise-slots && cd rise-slots ``` ### Initialize Foundry Project ```bash mkdir foundry-app && cd foundry-app forge init ``` This creates the Foundry structure: * `src/` for contracts * `test/` for tests * `script/` for deployment scripts * `foundry.toml` for configuration ### Install OpenZeppelin Contracts We'll use OpenZeppelin's ERC20 implementation for the RCT token: ```bash forge install OpenZeppelin/openzeppelin-contracts ``` Add to `foundry.toml`: ```toml [profile.default] src = "src" out = "out" libs = ["lib"] remappings = ["@openzeppelin/=lib/openzeppelin-contracts/"] ``` ### Initialize Next.js Project Return to the root directory and create the Next.js app: ```bash cd .. bun create next-app@latest . --typescript --tailwind --app ``` Select the following options: * Use recommended Next.js defaults: **No, customize settings** * TypeScript: **Yes** * Linter: **None** * React Compiler: **Yes** * Tailwind CSS: **Yes** * `src/` directory: **Yes** * App Router: **Yes** * Customize import alias: **No** If you've completed another tutorial, you can select **No, reuse previous settings** to skip configuration. ### Install Core Dependencies Install the required packages for blockchain interaction: ```bash bun add viem wagmi rise-wallet @tanstack/react-query shreds ox ``` Package breakdown: * `viem`: Ethereum library for contract interaction * `wagmi`: React hooks for Ethereum * `rise-wallet`: RISE Wallet connector with passkey support * `@tanstack/react-query`: Async state management (required by wagmi) * `shreds`: RISE's real-time event streaming library * `ox`: Cryptography library for session key P256 operations ### Install UI Dependencies ```bash bun add framer-motion class-variance-authority clsx tailwind-merge ``` These provide: * `framer-motion`: Animations for spinning reels * Tailwind utility functions for styling ### Project Structure Your project should now look like this: ``` rise-slots/ ├── foundry-app/ │ ├── src/ │ ├── test/ │ ├── script/ │ ├── lib/ │ │ └── openzeppelin-contracts/ │ └── foundry.toml ├── src/ │ └── app/ │ ├── page.tsx │ ├── layout.tsx │ └── providers.tsx (we'll create this) ├── package.json └── next.config.ts ``` ## Configuration Files ### Wagmi Configuration Create `src/config/wagmi.ts`: ```typescript import { http, createConfig } from 'wagmi' import { Chains, RiseWallet } from "rise-wallet" import { riseWallet } from "rise-wallet/wagmi" // RISE Wallet connector with default config (passkey-based) export const rwConnector = riseWallet(RiseWallet.defaultConfig) // Wagmi configuration for RISE Testnet export const config = createConfig({ chains: [Chains.riseTestnet], connectors: [rwConnector], transports: { [Chains.riseTestnet.id]: http("https://testnet.riselabs.xyz") } }) declare module 'wagmi' { interface Register { config: typeof config } } ``` RISE Wallet uses passkeys for authentication - no seed phrases or private keys to manage! Users create an account with biometrics or a security key. ### Provider Setup Create `src/app/providers.tsx`: ```typescript "use client" import { QueryClient, QueryClientProvider } from '@tanstack/react-query' import { WagmiProvider } from 'wagmi' import { config } from '@/config/wagmi' import { ReactNode, useState } from 'react' export function Providers({ children }: { children: ReactNode }) { const [queryClient] = useState(() => new QueryClient()) return ( {children} ) } ``` ### Update Root Layout Modify `src/app/layout.tsx`: ```typescript import type { Metadata } from "next" import { Providers } from "./providers" import "./globals.css" export const metadata: Metadata = { title: "RISE Slots", description: "Instant VRF-powered slot machine with gasless gameplay", } export default function RootLayout({ children, }: { children: React.ReactNode }) { return ( {children} ) } ``` ## Constants Setup Create `src/constants/index.ts` (we'll populate this after deploying contracts): ```typescript // Contract addresses (update after deployment) export const SLOT_MACHINE_ADDRESS = "0x..." as const export const RCT_TOKEN_ADDRESS = "0x..." as const // Contract ABIs (we'll import these after compilation) export const SLOT_MACHINE_ABI = [] as const export const RCT_ABI = [] as const ``` ## Next Steps Your development environment is ready! Next, we'll write the smart contracts: an ERC20 token (RCT) and a VRF-powered slot machine. Make sure you have some testnet ETH for deploying contracts. Get free testnet ETH from [RISE Faucet](https://faucet.testnet.riselabs.xyz). # Smart Contracts (/docs/cookbook/rise-slots/smart-contracts) import { Steps, Step } from 'fumadocs-ui/components/steps'; import { Callout } from 'fumadocs-ui/components/callout'; ## Contract Architecture We'll build two contracts: 1. **RCT (RISE Casino Token)**: ERC20 token that powers the game economy * Pre-mints 10M tokens to the slot machine (house bankroll) * One-time 1000 token claim for new players * Faucet for broke players (only works at 0 balance) * Auto-approves SlotMachine for seamless UX 2. **SlotMachine**: VRF-powered gaming contract * Accepts 10 RCT per spin * Requests 3 random numbers from RISE VRF * Maps numbers to symbols with weighted probabilities * Distributes tiered payouts for matching symbols * Emits events for real-time UI updates ## VRF Integration Overview RISE VRF uses a standard consumer pattern: 1. Your contract implements `IVRFConsumer` interface 2. Call `coordinator.requestRandomNumbers()` to request randomness 3. Coordinator calls back your `rawFulfillRandomNumbers()` with results (3-5ms!) 4. Process the random numbers and emit events ## Writing the Contracts ### Create RCT Token Contract Navigate to your Foundry project: ```bash cd foundry-app ``` Create `src/RCT.sol`: ```solidity // SPDX-License-Identifier: MIT pragma solidity ^0.8.30; import "@openzeppelin/contracts/token/ERC20/ERC20.sol"; contract RCT is ERC20 { mapping(address => bool) public hasMinted; address public immutable slotMachine; constructor(address _slotMachine) ERC20("RISE Casino Token", "RCT") { slotMachine = _slotMachine; // Mint 10,000,000 RCT to SlotMachine contract as house bankroll _mint(_slotMachine, 10_000_000 * 10**decimals()); } function mintInitial() external { require(!hasMinted[msg.sender], "Already minted initial tokens"); hasMinted[msg.sender] = true; _mint(msg.sender, 1000 * 10**decimals()); // Auto-approve SlotMachine to spend user's RCT tokens _approve(msg.sender, slotMachine, type(uint256).max); } function faucet() external { require(balanceOf(msg.sender) == 0, "Balance must be 0 to use faucet"); _mint(msg.sender, 1000 * 10**decimals()); } } ``` **Key Features**: * `constructor`: Mints 10M RCT to the SlotMachine address (house bankroll) * `mintInitial()`: One-time claim of 1000 RCT + auto-approves SlotMachine for unlimited spending * `faucet()`: Refills broke players with 1000 RCT (only works at 0 balance) * `hasMinted` mapping: Tracks which users have claimed their initial tokens The auto-approve in `mintInitial()` is crucial for UX - users never need to approve spending! ### Create SlotMachine Contract Create `src/SlotMachine.sol`: ```solidity // SPDX-License-Identifier: MIT pragma solidity ^0.8.30; import "@openzeppelin/contracts/token/ERC20/IERC20.sol"; import "@openzeppelin/contracts/token/ERC20/utils/SafeERC20.sol"; // RISE VRF Interfaces interface IVRFCoordinator { function requestRandomNumbers( uint32 numNumbers, uint256 seed ) external returns (uint256 requestId); } interface IVRFConsumer { function rawFulfillRandomNumbers( uint256 requestId, uint256[] memory randomNumbers ) external; } contract SlotMachine is IVRFConsumer { using SafeERC20 for IERC20; error OnlyCoordinator(); error InsufficientTokenBalance(); event SpinRequested(uint256 indexed requestId, address indexed player); event SpinResult(uint256 indexed requestId, uint8[3] result, uint256 payout); uint256 constant COST_PER_SPIN = 10 * 10**18; // 10 RCT // Payout structure based on symbol rarity uint256 constant CHERRY_PAYOUT = 15 * 10**18; // 15 RCT (0-3) uint256 constant LEMON_PAYOUT = 30 * 10**18; // 30 RCT (4-6) uint256 constant DIAMOND_PAYOUT = 100 * 10**18; // 100 RCT (7-8) uint256 constant LUCKY9_PAYOUT = 500 * 10**18; // 500 RCT (9) IVRFCoordinator public coordinator; IERC20 public rctToken; address public owner; mapping(uint256 => address) public requestToPlayer; modifier onlyCoordinator() { if (msg.sender != address(coordinator)) revert OnlyCoordinator(); _; } modifier onlyOwner() { require(msg.sender == owner, "Not owner"); _; } constructor(address _coordinator, address _rctToken) { coordinator = IVRFCoordinator(_coordinator); rctToken = IERC20(_rctToken); owner = msg.sender; } function setRCTToken(address _rctToken) external onlyOwner { rctToken = IERC20(_rctToken); } // Helper function to map number to symbol ID function getSymbolId(uint8 num) internal pure returns (uint8) { if (num <= 3) return 0; // Cherry if (num <= 6) return 1; // Lemon if (num <= 8) return 2; // Diamond return 3; // Lucky 9 } function spin() external returns (uint256) { // Check player has enough RCT tokens if (rctToken.balanceOf(msg.sender) < COST_PER_SPIN) { revert InsufficientTokenBalance(); } // Transfer 10 RCT from player to contract rctToken.safeTransferFrom(msg.sender, address(this), COST_PER_SPIN); // Request 3 random numbers from RISE VRF (no fees!) uint256 requestId = coordinator.requestRandomNumbers( 3, uint256(keccak256(abi.encode(msg.sender, block.timestamp, block.number))) ); requestToPlayer[requestId] = msg.sender; emit SpinRequested(requestId, msg.sender); return requestId; } function rawFulfillRandomNumbers( uint256 requestId, uint256[] memory randomNumbers ) external override onlyCoordinator { require(randomNumbers.length == 3, "Invalid random numbers"); require(requestToPlayer[requestId] != address(0), "Invalid request"); address player = requestToPlayer[requestId]; // Map to 0-9 range (10 possible values) uint8[3] memory result = [ uint8(randomNumbers[0] % 10), uint8(randomNumbers[1] % 10), uint8(randomNumbers[2] % 10) ]; // Map to symbol IDs uint8[3] memory symbolIds = [ getSymbolId(result[0]), getSymbolId(result[1]), getSymbolId(result[2]) ]; // Check if all three SYMBOLS match bool isWin = symbolIds[0] == symbolIds[1] && symbolIds[1] == symbolIds[2]; uint256 payout = 0; if (isWin) { // Determine payout based on which symbol won if (symbolIds[0] == 0) { payout = CHERRY_PAYOUT; } else if (symbolIds[0] == 1) { payout = LEMON_PAYOUT; } else if (symbolIds[0] == 2) { payout = DIAMOND_PAYOUT; } else { payout = LUCKY9_PAYOUT; } rctToken.safeTransfer(player, payout); } emit SpinResult(requestId, result, payout); delete requestToPlayer[requestId]; } } ``` ### Understanding the SlotMachine Contract **Symbol Mapping System**: The contract uses a two-step mapping system: 1. VRF returns numbers → modulo 10 → gives 0-9 2. Numbers map to symbol IDs: * 0-3 → Symbol ID 0 (Cherry) = 40% probability * 4-6 → Symbol ID 1 (Lemon) = 30% probability * 7-8 → Symbol ID 2 (Diamond) = 20% probability * 9 → Symbol ID 3 (Lucky 9) = 10% probability **Why Symbol IDs?** Without symbol IDs, \[0, 1, 2] would be a loss because the numbers don't match. But all three are cherries! The `getSymbolId()` function maps them all to 0, making it a valid win. **Key Functions**: 1. **spin()**: Player initiates a spin * Validates player has 10 RCT balance * Transfers 10 RCT to contract * Requests 3 random numbers from VRF coordinator * Uses unique seed: `keccak256(abi.encode(msg.sender, block.timestamp, block.number))` * Stores request mapping * Emits `SpinRequested` event * Returns `requestId` for tracking 2. **rawFulfillRandomNumbers()**: VRF callback (called by coordinator only) * Receives array of 3 random numbers * Maps each to 0-9 range via modulo * Converts numbers to symbol IDs * Checks if all 3 symbol IDs match * Calculates payout based on winning symbol * Transfers payout to player if win * Emits `SpinResult` event with result array and payout * Cleans up request mapping **Events**: * `SpinRequested(requestId, player)`: Emitted when spin is initiated * `SpinResult(requestId, result, payout)`: Emitted when VRF delivers result ### Compile the Contracts ```bash forge build ``` This generates ABIs in: * `out/RCT.sol/RCT.json` * `out/SlotMachine.sol/SlotMachine.json` ### Deploy to RISE Testnet Create deployment script `script/Deploy.s.sol`: ```solidity // SPDX-License-Identifier: MIT pragma solidity ^0.8.30; import "forge-std/Script.sol"; import "../src/RCT.sol"; import "../src/SlotMachine.sol"; contract DeployScript is Script { function run() external { uint256 deployerPrivateKey = vm.envUint("PRIVATE_KEY"); vm.startBroadcast(deployerPrivateKey); // RISE Testnet VRF Coordinator address coordinator = 0xc0d49A572cF25aC3e9ae21B939e8B619b39291Ea; // Deploy SlotMachine first to get its address SlotMachine slotMachine = new SlotMachine(coordinator, address(0)); // Deploy RCT with SlotMachine address RCT rct = new RCT(address(slotMachine)); // Set RCT token address in SlotMachine slotMachine.setRCTToken(address(rct)); console.log("RCT deployed at:", address(rct)); console.log("SlotMachine deployed at:", address(slotMachine)); vm.stopBroadcast(); } } ``` Deploy using your private key: ```bash forge script script/Deploy.s.sol:DeployScript \ --rpc-url https://testnet.riselabs.xyz \ --private-key 0xYOUR_PRIVATE_KEY_HERE \ --broadcast ``` Alternatively, use a keystore for better security: ```bash forge script script/Deploy.s.sol:DeployScript \ --rpc-url https://testnet.riselabs.xyz \ --account \ --broadcast ``` Learn how to create a keystore: [Foundry Keystore Guide](https://book.getfoundry.sh/reference/cast/cast-wallet-import) Save both deployed contract addresses! ### Extract Contract ABIs Copy the ABIs to your frontend: ```bash # From foundry-app directory cat out/SlotMachine.sol/SlotMachine.json | jq '.abi' > ../src/constants/slotMachineAbi.json cat out/RCT.sol/RCT.json | jq '.abi' > ../src/constants/rctAbi.json ``` ### Update Constants Update `src/constants/index.ts` with your deployed addresses: ```typescript import SLOT_MACHINE_ABI from './slotMachineAbi.json' import RCT_ABI from './rctAbi.json' export const SLOT_MACHINE_ADDRESS = "0x6d30dE27786Fd46F468Ea16C34243386d2b11153" as const export const RCT_TOKEN_ADDRESS = "0xA42a61FB25323923999e747c73dDCCb2C3547B0B" as const export { SLOT_MACHINE_ABI, RCT_ABI } ``` Replace with your actual deployed addresses. ## Key Concepts ### Request Seed The seed ensures each VRF request is unique: ```solidity uint256(keccak256(abi.encode(msg.sender, block.timestamp, block.number))) ``` This combines player address, timestamp, and block number for uniqueness. ### Symbol vs Number Matching **Wrong approach (matches numbers)**: ```solidity bool isWin = result[0] == result[1] && result[1] == result[2]; ``` This would fail for \[0, 1, 2] even though they're all cherries! **Correct approach (matches symbols)**: ```solidity uint8[3] memory symbolIds = [getSymbolId(result[0]), getSymbolId(result[1]), getSymbolId(result[2])]; bool isWin = symbolIds[0] == symbolIds[1] && symbolIds[1] == symbolIds[2]; ``` This correctly identifies \[0, 1, 2] as triple cherries. ### Payout Calculations ```solidity if (symbolIds[0] == 0) payout = CHERRY_PAYOUT; // 15 RCT else if (symbolIds[0] == 1) payout = LEMON_PAYOUT; // 30 RCT else if (symbolIds[0] == 2) payout = DIAMOND_PAYOUT; // 100 RCT else payout = LUCKY9_PAYOUT; // 500 RCT ``` Expected value for 10 RCT spin: * Cherry win (0.4 × 0.4 × 0.4 = 6.4%): 15 RCT → 0.96 RCT expected * Lemon win (0.3 × 0.3 × 0.3 = 2.7%): 30 RCT → 0.81 RCT expected * Diamond win (0.2 × 0.2 × 0.2 = 0.8%): 100 RCT → 0.80 RCT expected * Lucky 9 win (0.1 × 0.1 × 0.1 = 0.1%): 500 RCT → 0.50 RCT expected Total expected return: \~31% (69% house edge) ### Auto-Approve Pattern ```solidity _approve(msg.sender, slotMachine, type(uint256).max); ``` When users call `mintInitial()`, they automatically approve the SlotMachine for unlimited RCT spending. This means: * No separate approval transaction needed * Users can spin immediately after claiming * Seamless UX with no extra popups ## Next Steps Your smart contracts are deployed! Next, we'll implement session keys to enable completely gasless, popup-free gameplay. # RISE Wallet Demo (/docs/cookbook/rise-wallet-quickstart) import { Cards, Card } from 'fumadocs-ui/components/card'; ## Introduction In this tutorial, you'll build a complete application that demonstrates two powerful transaction sending patterns with RISE Wallet: * **Passkey Flow**: Direct transaction signing where users approve each transaction via a popup/dialog * **Session Key Flow**: Background signing using locally-generated keys with pre-authorized permissions for seamless UX By the end, you'll have a working Next.js app that interacts with smart contracts on RISE Testnet, allowing users to mint tokens, transfer assets, and increment counters. All gas sponsored via RISE Wallet. ### What You'll Build A wallet-integrated app with: * Wallet connection UI with address display * Realtime contract state reading (token balances, counter values) * Two signing patterns: passkey-based and session key-based * Transaction status polling and confirmation * Permission management for session keys RISE Wallet Demo Landing Page ### What You'll Learn * How to integrate RISE Wallet with wagmi and viem * Building passkey-based transaction flows * Implementing session keys for popup-free transactions * Managing wallet permissions and security * Polling transaction status on RISE ### Prerequisites Before starting, make sure you have: * Node.js 18+ installed * Basic knowledge of React and Next.js * Basic understanding of crypto wallets * Some testnet ETH (get from [RISE Faucet](https://faucet.testnet.riselabs.xyz)) ### Source Code The complete source code for this project is available on GitHub: [awesamarth/rise-cookbook-wallet](https://github.com/awesamarth/rise-cookbook-wallet) ## Quick Links # Passkey Flow (/docs/cookbook/rise-wallet-quickstart/passkey-flow) ## Implementing Passkey Flow The passkey flow demonstrates transaction signing where users approve each transaction via a wallet popup. ### Create the Passkey Page ```typescript title="src/app/passkey/page.tsx" "use client"; import { useEffect, useState } from "react"; import { useChainId, useConnection, useReadContract } from "wagmi"; import { createWalletClient, custom, encodeFunctionData, parseEther } from "viem"; import { Navbar } from "@/components/Navbar"; import { SIMPLE_TOKEN_ADDRESS, SIMPLE_TOKEN_ABI, COUNTER_ADDRESS, COUNTER_ABI, } from "@/constants"; export default function PasskeyPage() { const [mounted, setMounted] = useState(false); const [txHash, setTxHash] = useState(); const [pendingAction, setPendingAction] = useState(); const { address, connector } = useConnection(); const chainId = useChainId(); // Read token balance const { data: balance, refetch: refetchBalance } = useReadContract({ address: SIMPLE_TOKEN_ADDRESS, abi: SIMPLE_TOKEN_ABI, functionName: "balanceOf", args: address ? [address] : undefined, query: { enabled: !!address }, }); // Read counter value const { data: count, refetch: refetchCount } = useReadContract({ address: COUNTER_ADDRESS, abi: COUNTER_ABI, functionName: "count", query: { enabled: !!address }, }); useEffect(() => { setMounted(true); }, []); const executeTransaction = async ( action: string, contractAddress: string, data: string ) => { if (!connector?.provider || !address) return; try { setPendingAction(action); setTxHash(undefined); const walletClient = createWalletClient({ account: address, chain: { id: chainId } as any, transport: custom(connector.provider), }); const hash = await walletClient.sendCallsSync({ account: address, calls: [{ to: contractAddress as `0x${string}`, data: data as `0x${string}` }], }); setTxHash(hash); // Refresh contract state refetchBalance(); refetchCount(); } catch (error) { console.error(`${action} failed:`, error); } finally { setPendingAction(undefined); } }; const mintTokens = async () => { if (!address) return; const data = encodeFunctionData({ abi: SIMPLE_TOKEN_ABI, functionName: "mint", args: [address, parseEther("1000")], }); await executeTransaction("Minting", SIMPLE_TOKEN_ADDRESS, data); }; const spendTokens = async () => { if (!address) return; const data = encodeFunctionData({ abi: SIMPLE_TOKEN_ABI, functionName: "transfer", args: ["0x0000000000000000000000000000000000000000", parseEther("5")], }); await executeTransaction("Spending", SIMPLE_TOKEN_ADDRESS, data); }; const incrementCounter = async () => { const data = encodeFunctionData({ abi: COUNTER_ABI, functionName: "increment", }); await executeTransaction("Incrementing", COUNTER_ADDRESS, data); }; if (!mounted) return null; if (!address) { return (

Connect your wallet to use passkey flow

); } return (

Passkey Flow

Each transaction requires wallet approval via popup

STK Balance

{balance ? (Number(balance) / 1e18).toLocaleString() : "0"}

Counter Value

{count?.toString() || "0"}

{txHash && (

Transaction Hash:

{txHash}
)}
); } ``` ## How It Works **Transaction Flow:** 1. User clicks an action button (Mint, Spend, Increment) 2. `encodeFunctionData()` creates the contract call data 3. `walletClient.sendCallsSync()` triggers the wallet popup 4. User approves the transaction in the popup 5. Wallet broadcasts the transaction and polls for confirmation 6. Transaction hash is displayed with explorer link 7. Contract state is refreshed automatically When a user triggers a transaction, they'll see the RISE Wallet popup: RISE Wallet Passkey Approval Now move on to the [Session Key Flow](/docs/cookbook/rise-wallet-quickstart/session-key-flow) to implement background signing without popups. # Session Key Flow (/docs/cookbook/rise-wallet-quickstart/session-key-flow) import { Callout } from 'fumadocs-ui/components/callout'; ## Implementing Session Key Flow The session key flow enables background signing without popups by using pre-authorized permissions. ### Create the Session Key Page ```typescript title="src/app/session/page.tsx" "use client"; import { useEffect, useState } from "react"; import { useChainId, useConnection, useReadContract } from "wagmi"; import { createWalletClient, custom, encodeFunctionData, parseEther } from "viem"; import { P256, PublicKey, Signature } from "ox"; import { Hooks } from "rise-wallet/wagmi"; import { Navbar } from "@/components/Navbar"; import { SIMPLE_TOKEN_ADDRESS, SIMPLE_TOKEN_ABI, COUNTER_ADDRESS, COUNTER_ABI, } from "@/constants"; const SESSION_KEY_STORAGE = "rise-session-key"; export default function SessionKeyPage() { const [mounted, setMounted] = useState(false); const [sessionKey, setSessionKey] = useState(); const [txHash, setTxHash] = useState(); const [pendingAction, setPendingAction] = useState(); const { address, connector } = useConnection(); const chainId = useChainId(); // Read token balance const { data: balance, refetch: refetchBalance } = useReadContract({ address: SIMPLE_TOKEN_ADDRESS, abi: SIMPLE_TOKEN_ABI, functionName: "balanceOf", args: address ? [address] : undefined, query: { enabled: !!address }, }); // Read counter value const { data: count, refetch: refetchCount } = useReadContract({ address: COUNTER_ADDRESS, abi: COUNTER_ABI, functionName: "count", query: { enabled: !!address }, }); // Check for existing permissions const { data: permissions } = Hooks.usePermissions({ query: { enabled: !!address }, }); // Grant permissions mutation const { mutateAsync: grantPermissions } = Hooks.useGrantPermissions(); // Revoke permissions mutation const { mutateAsync: revokePermissions } = Hooks.useRevokePermissions(); useEffect(() => { setMounted(true); const stored = localStorage.getItem(SESSION_KEY_STORAGE); if (stored) setSessionKey(stored); }, []); const createSessionKey = async () => { if (!address) return; try { // Generate P256 keypair const privateKey = P256.randomPrivateKey(); const publicKey = P256.getPublicKey({ privateKey }); const publicKeyHex = PublicKey.toHex(publicKey); // Grant permissions await grantPermissions({ account: address, expiry: Date.now() + 24 * 60 * 60 * 1000, // 1 day permissions: [ { type: "native-token-recurring-allowance", data: { allowance: parseEther("1"), start: Date.now(), period: 60 * 1000, // 1 minute }, }, { type: "allowed-contract-selector", data: { contract: SIMPLE_TOKEN_ADDRESS, selector: "0x40c10f19", // mint(address,uint256) }, }, { type: "allowed-contract-selector", data: { contract: SIMPLE_TOKEN_ADDRESS, selector: "0xa9059cbb", // transfer(address,uint256) }, }, { type: "allowed-contract-selector", data: { contract: COUNTER_ADDRESS, selector: "0xd09de08a", // increment() }, }, ], signer: { type: "key", data: { id: publicKeyHex, }, }, }); // Store private key localStorage.setItem(SESSION_KEY_STORAGE, privateKey); setSessionKey(privateKey); } catch (error) { console.error("Failed to create session key:", error); } }; const revokeSessionKey = async () => { if (!permissions?.[0]?.id) return; try { await revokePermissions({ id: permissions[0].id }); localStorage.removeItem(SESSION_KEY_STORAGE); setSessionKey(undefined); } catch (error) { console.error("Failed to revoke session key:", error); } }; const sendWithSessionKey = async ( action: string, contractAddress: string, data: string ) => { if (!connector?.provider || !address || !sessionKey) return; try { setPendingAction(action); setTxHash(undefined); const walletClient = createWalletClient({ account: address, chain: { id: chainId } as any, transport: custom(connector.provider), }); // Prepare calls const prepareResult = await walletClient.request({ method: "wallet_prepareCalls", params: [ { chainId: `0x${chainId.toString(16)}`, from: address, calls: [ { to: contractAddress, data, }, ], }, ], }); // Sign with session key const signature = P256.sign({ payload: prepareResult.prepareCallsDigest, privateKey: sessionKey as `0x${string}`, }); // Send prepared calls const bundleId = await walletClient.request({ method: "wallet_sendPreparedCalls", params: [ { context: prepareResult.context, signature: Signature.toHex(signature), }, ], }); // Poll for status let status; do { await new Promise((resolve) => setTimeout(resolve, 500)); status = await walletClient.request({ method: "wallet_getCallsStatus", params: [bundleId], }); } while (status.status === 100); // 100 = Pending if (status.status === 200 && status.receipts?.[0]?.transactionHash) { setTxHash(status.receipts[0].transactionHash); } // Refresh contract state refetchBalance(); refetchCount(); } catch (error) { console.error(`${action} failed:`, error); } finally { setPendingAction(undefined); } }; const mintTokens = async () => { if (!address) return; const data = encodeFunctionData({ abi: SIMPLE_TOKEN_ABI, functionName: "mint", args: [address, parseEther("1000")], }); await sendWithSessionKey("Minting", SIMPLE_TOKEN_ADDRESS, data); }; const spendTokens = async () => { if (!address) return; const data = encodeFunctionData({ abi: SIMPLE_TOKEN_ABI, functionName: "transfer", args: ["0x0000000000000000000000000000000000000000", parseEther("5")], }); await sendWithSessionKey("Spending", SIMPLE_TOKEN_ADDRESS, data); }; const incrementCounter = async () => { const data = encodeFunctionData({ abi: COUNTER_ABI, functionName: "increment", }); await sendWithSessionKey("Incrementing", COUNTER_ADDRESS, data); }; if (!mounted) return null; if (!address) { return (

Connect your wallet to use session key flow

); } if (!sessionKey || !permissions?.[0]) { return (

Session Key Flow

🔑

Create a Session Key

Generate a local keypair and grant on-chain permissions for seamless transactions without popups

); } const publicKey = P256.getPublicKey({ privateKey: sessionKey as `0x${string}` }); return (

Session Key Flow

Session Public Key:

{PublicKey.toHex(publicKey)}

Transactions are signed locally without popups

STK Balance

{balance ? (Number(balance) / 1e18).toLocaleString() : "0"}

Counter Value

{count?.toString() || "0"}

{txHash && (

Transaction Hash:

{txHash}
)}
); } ``` Once the session key is created, the page displays the active session: Session Key Active Page ## How It Works **Session Key Creation:** 1. User clicks "Create Session Key" 2. Generate P256 keypair locally with `P256.randomPrivateKey()` 3. Call `grantPermissions()` with scoped permissions: * Allowed contract functions (mint, transfer, increment) * Spending limits (1 ETH per minute) * Expiry (1 day) 4. Store private key in localStorage, display public key When creating a session key, the user approves permissions in the wallet: RISE Wallet Session Key Permission **Transaction Flow:** 1. User clicks action button (no popup appears!) 2. Call `wallet_prepareCalls` to get digest 3. Sign digest locally with `P256.sign()` 4. Send via `wallet_sendPreparedCalls` 5. Poll `wallet_getCallsStatus` until confirmed 6. Display transaction hash **Revocation:** * User can "Revoke Session" anytime to remove on-chain permissions * Private key is removed from localStorage * User must create new session key to transact again ## Security Considerations ### Permission Scoping Always scope session key permissions tightly: ```typescript permissions: [ { type: "allowed-contract-selector", data: { contract: YOUR_CONTRACT_ADDRESS, selector: "0x12345678", // Specific function only }, }, { type: "native-token-recurring-allowance", data: { allowance: parseEther("0.1"), // Low limit period: 60 * 1000, // Short period }, }, ] ``` **Best practices:** * Grant minimal permissions needed for the use case * Implement spending limits appropriate for your app * Allow users to revoke permissions easily ## Next Steps Congratulations! You've successfully implemented both passkey and session key flows. You now understand how to build secure, user-friendly wallet-integrated applications. ### Related Tutorials * [Shred Ninja](/docs/cookbook/shred-ninja) - Realtime blockchain events * [Reaction Time Game](/docs/cookbook/reaction-time-game) - 3ms confirmations showcase * [RISEx Telegram Bot](/docs/cookbook/risex-telegram-bot) - AI-powered trading bot ### Resources * [GitHub Repository](https://github.com/awesamarth/rise-cookbook-wallet) - Complete source code * [RISE Wallet Documentation](/docs/rise-wallet) - Complete wallet integration guide * [Wagmi Documentation](https://wagmi.sh) - React hooks for Ethereum * [Viem Documentation](https://viem.sh) - Low-level Ethereum library * [RISE Testnet Faucet](https://faucet.testnet.riselabs.xyz) - Get testnet ETH # Setup (/docs/cookbook/rise-wallet-quickstart/setup) import { Tabs, Tab } from 'fumadocs-ui/components/tabs'; import { Callout } from 'fumadocs-ui/components/callout'; ## Project Setup ### Create a New Next.js Project First, create a new Next.js application with TypeScript: ```bash npx create-next-app@latest rise-wallet-app ``` ```bash yarn create next-app rise-wallet-app ``` ```bash pnpm create next-app rise-wallet-app ``` ```bash bun create next-app rise-wallet-app ``` When prompted, select these options: * Use recommended Next.js defaults: **No, customize settings** * TypeScript: **Yes** * Linter: **None** * React Compiler: **Yes** * Tailwind CSS: **Yes** * `src/` directory: **Yes** * App Router: **Yes** * Customize import alias: **No** If you've completed another tutorial, you can select **No, reuse previous settings** to skip configuration. Navigate into your project: ```bash cd rise-wallet-app ``` ### Install Dependencies Install the required packages for wallet integration: ```bash npm install rise-wallet wagmi viem @tanstack/react-query ``` ```bash yarn add rise-wallet wagmi viem @tanstack/react-query ``` ```bash pnpm add rise-wallet wagmi viem @tanstack/react-query ``` ```bash bun add rise-wallet wagmi viem @tanstack/react-query ``` **Package breakdown:** * `rise-wallet` - RISE Wallet SDK with wagmi connector * `wagmi` - React hooks for Ethereum wallet connections * `viem` - Low-level library for transactions and contract interactions * `@tanstack/react-query` - Server state management for async operations *** ## Configuration ### Set Up Wagmi Config Create a wagmi configuration file to connect to RISE Testnet: ```typescript title="src/config/wagmi.ts" import { Chains, RiseWallet, riseWallet } from "rise-wallet"; import { createConfig, http } from "wagmi"; export const config = createConfig({ chains: [Chains.riseTestnet], connectors: [riseWallet(RiseWallet.defaultConfig)], transports: { [Chains.riseTestnet.id]: http("https://testnet.riselabs.xyz"), }, }); declare module "wagmi" { interface Register { config: typeof config; } } ``` This configuration: * Targets RISE Testnet as the only chain * Uses the RISE Wallet connector * Sets up HTTP RPC transport for testnet ### Create Provider Component Create a provider to wrap your app with wagmi and React Query: ```typescript title="src/app/provider.tsx" "use client"; import { QueryClient, QueryClientProvider } from "@tanstack/react-query"; import { type ReactNode, useState } from "react"; import { WagmiProvider } from "wagmi"; import { config } from "@/config/wagmi"; export function Provider(props: { children: ReactNode }) { const [queryClient] = useState(() => new QueryClient()); return ( {props.children} ); } ``` ### Update Root Layout Wrap your application with the provider in the root layout: ```typescript title="src/app/layout.tsx" {3,10-12} import type { Metadata } from "next"; import "./globals.css"; import { Provider } from "./provider"; export const metadata: Metadata = { title: "RISE Wallet Quickstart", description: "Learn how to integrate RISE Wallet with passkey and session key flows", }; export default function RootLayout({ children }: { children: React.ReactNode }) { return ( {children} ); } ``` ### Define Contract Constants Create a constants file with contract addresses and ABIs: ```typescript title="src/constants/index.ts" export const SIMPLE_TOKEN_ADDRESS = "0x2Fe6B2b6e895fc0Ad192A249C3240685Ecbb177C"; export const COUNTER_ADDRESS = "0xD38794596a78A0E446a8A61d9d04466118b30809"; export const SIMPLE_TOKEN_ABI = [ { type: "function", name: "mint", inputs: [ { name: "to", type: "address" }, { name: "amount", type: "uint256" }, ], outputs: [], stateMutability: "nonpayable", }, { type: "function", name: "transfer", inputs: [ { name: "to", type: "address" }, { name: "amount", type: "uint256" }, ], outputs: [{ name: "", type: "bool" }], stateMutability: "nonpayable", }, { type: "function", name: "balanceOf", inputs: [{ name: "account", type: "address" }], outputs: [{ name: "", type: "uint256" }], stateMutability: "view", }, ] as const; export const COUNTER_ABI = [ { type: "function", name: "increment", inputs: [], outputs: [], stateMutability: "nonpayable", }, { type: "function", name: "count", inputs: [], outputs: [{ name: "", type: "uint256" }], stateMutability: "view", }, ] as const; ``` These contracts are already deployed on RISE Testnet for testing purposes. Feel free to deploy your own, using the previous two tutorials! *** ## Building the UI Components ### Create a Wallet Button Build a reusable button component for connecting/disconnecting the wallet: ```typescript title="src/components/WalletButton.tsx" "use client"; import { useEffect, useState } from "react"; import { useConnect, useConnection, useDisconnect } from "wagmi"; export function WalletButton() { const [mounted, setMounted] = useState(false); const [copied, setCopied] = useState(false); const { address, connector } = useConnection(); const { connect, connectors } = useConnect(); const { disconnect } = useDisconnect(); useEffect(() => { setMounted(true); }, []); const handleCopy = async () => { if (address) { await navigator.clipboard.writeText(address); setCopied(true); setTimeout(() => setCopied(false), 2000); } }; if (!mounted) return null; if (address && connector) { return (
); } return ( ); } ``` **Key features:** * Shows truncated address when connected * Copy address to clipboard functionality * Disconnect button * Hydration-safe rendering (prevents SSR mismatches) ### Create a Navigation Bar Build a navbar to navigate between flows: ```typescript title="src/components/Navbar.tsx" "use client"; import Link from "next/link"; import { usePathname } from "next/navigation"; import { WalletButton } from "./WalletButton"; export function Navbar() { const pathname = usePathname(); return ( ); } ``` ### Create a Home Page Build a landing page with flow selection cards: ```typescript title="src/app/page.tsx" "use client"; import Link from "next/link"; import { Navbar } from "@/components/Navbar"; import { useConnection } from "wagmi"; import { useEffect, useState } from "react"; export default function Home() { const [mounted, setMounted] = useState(false); const { address } = useConnection(); useEffect(() => { setMounted(true); }, []); if (!mounted) return null; return (

RISE Wallet Quickstart

Choose a transaction signing pattern to get started

{address ? (
🔐

Passkey Flow

Direct transaction signing with wallet approval popups for each action

⏱️

Session Key Flow

Background signing with pre-authorized permissions for seamless UX

) : (

Connect your wallet to explore transaction flows

)}
); } ``` Now you have all the basic setup complete. In the next sections, you'll implement the passkey and session key flows. # Backend Implementation (/docs/cookbook/risex-telegram-bot/backend) import { Callout } from 'fumadocs-ui/components/callout'; ## Building the Backend The backend consists of four main parts: encryption service, storage services, RISEx API integration, and the Telegram bot with LLM routing. The complete implementation can be found in the [GitHub repository](https://github.com/awesamarth/risex-tg-bot). ### Encryption Service Implement AES-256-GCM encryption for secure key storage: ```typescript title="apps/tg-bot/src/services/encryption.ts" import { createCipheriv, createDecipheriv, randomBytes, createHash } from 'crypto'; const ALGORITHM = 'aes-256-gcm'; const IV_LENGTH = 16; const AUTH_TAG_LENGTH = 16; const SALT_LENGTH = 32; function deriveKey(secret: string, salt: Buffer): Buffer { return createHash('sha256') .update(secret + salt.toString('hex')) .digest(); } export function encrypt(text: string, secret: string): string { const salt = randomBytes(SALT_LENGTH); const key = deriveKey(secret, salt); const iv = randomBytes(IV_LENGTH); const cipher = createCipheriv(ALGORITHM, key, iv); let encrypted = cipher.update(text, 'utf8', 'hex'); encrypted += cipher.final('hex'); const authTag = cipher.getAuthTag(); // Combine salt + iv + authTag + encrypted return Buffer.concat([ salt, iv, authTag, Buffer.from(encrypted, 'hex') ]).toString('hex'); } export function decrypt(encryptedHex: string, secret: string): string { const buffer = Buffer.from(encryptedHex, 'hex'); const salt = buffer.subarray(0, SALT_LENGTH); const iv = buffer.subarray(SALT_LENGTH, SALT_LENGTH + IV_LENGTH); const authTag = buffer.subarray( SALT_LENGTH + IV_LENGTH, SALT_LENGTH + IV_LENGTH + AUTH_TAG_LENGTH ); const encrypted = buffer.subarray(SALT_LENGTH + IV_LENGTH + AUTH_TAG_LENGTH); const key = deriveKey(secret, salt); const decipher = createDecipheriv(ALGORITHM, key, iv); decipher.setAuthTag(authTag); let decrypted = decipher.update(encrypted); decrypted = Buffer.concat([decrypted, decipher.final()]); return decrypted.toString('utf8'); } ``` This implements authenticated encryption to prevent tampering with stored keys. *** ### Storage Services **Signer Storage:** ```typescript title="apps/tg-bot/src/services/signersStore.ts" import fs from 'fs'; import path from 'path'; import { encrypt, decrypt } from './encryption'; const SIGNERS_FILE = path.join(__dirname, '../data/signers.json'); const SECRET = process.env.ENCRYPTION_SECRET!; interface SignersData { [walletAddress: string]: string; // encrypted private key } function readSigners(): SignersData { if (!fs.existsSync(SIGNERS_FILE)) { return {}; } return JSON.parse(fs.readFileSync(SIGNERS_FILE, 'utf8')); } function writeSigners(data: SignersData): void { fs.writeFileSync(SIGNERS_FILE, JSON.stringify(data, null, 2)); } export function storeSigner(walletAddress: string, privateKey: string): void { const signers = readSigners(); signers[walletAddress.toLowerCase()] = encrypt(privateKey, SECRET); writeSigners(signers); } export function getSigner(walletAddress: string): string | null { const signers = readSigners(); const encrypted = signers[walletAddress.toLowerCase()]; if (!encrypted) return null; return decrypt(encrypted, SECRET); } export function hasSigner(walletAddress: string): boolean { const signers = readSigners(); return !!signers[walletAddress.toLowerCase()]; } ``` **Telegram Link Storage:** ```typescript title="apps/tg-bot/src/services/verifiedLinksStore.ts" import fs from 'fs'; import path from 'path'; const LINKS_FILE = path.join(__dirname, '../data/verified-links.json'); interface VerifiedLinks { [telegramId: string]: string; // wallet address } function readLinks(): VerifiedLinks { if (!fs.existsSync(LINKS_FILE)) { return {}; } return JSON.parse(fs.readFileSync(LINKS_FILE, 'utf8')); } function writeLinks(data: VerifiedLinks): void { fs.writeFileSync(LINKS_FILE, JSON.stringify(data, null, 2)); } export function linkTelegramToWallet(telegramId: string, walletAddress: string): void { const links = readLinks(); links[telegramId] = walletAddress.toLowerCase(); writeLinks(links); } export function getWalletForTelegram(telegramId: string): string | null { const links = readLinks(); return links[telegramId] || null; } export function hasLink(telegramId: string): boolean { const links = readLinks(); return !!links[telegramId]; } ``` *** ## RISEx Service Create the RISEx API integration with EIP-712 signing: ```typescript title="apps/tg-bot/src/services/risexService.ts" import axios from 'axios'; import { privateKeyToAccount } from 'viem/accounts'; import { formatUnits, parseUnits } from 'viem'; const RISEX_API = process.env.RISEX_API_URL!; // EIP-712 domain for RISEx const domain = { name: 'RISEx', version: '1', chainId: 8008135, verifyingContract: '0x3d47aa78fe75e8616dbadfbdce4ede1e73b35b27' as `0x${string}`, }; // EIP-712 types for order placement const types = { VerifySignature: [ { name: 'signer', type: 'address' }, { name: 'data', type: 'bytes' }, ], }; export async function placeOrder( signerPrivateKey: string, walletAddress: string, market: 'BTC' | 'ETH', side: 'long' | 'short', size: string, price: string, orderType: 'market' | 'limit' ) { const account = privateKeyToAccount(signerPrivateKey as `0x${string}`); // Prepare order payload const orderPayload = { account: walletAddress, market_id: market === 'BTC' ? 'BTC-PERP' : 'ETH-PERP', side: side === 'long' ? 0 : 1, size: parseUnits(size, 18).toString(), price: parseUnits(price, 18).toString(), order_type: orderType === 'market' ? 0 : 1, expiry: Math.floor(Date.now() / 1000) + 300, // 5 minutes }; // Encode data for signing const data = JSON.stringify(orderPayload); // Sign EIP-712 message const signature = await account.signTypedData({ domain, types, primaryType: 'VerifySignature', message: { signer: account.address, data: `0x${Buffer.from(data).toString('hex')}`, }, }); // Call RISEx API const response = await axios.post(`${RISEX_API}/v1/orders/place`, { ...orderPayload, signature, signer: account.address, }); return response.data; } export async function getBalance(walletAddress: string) { const response = await axios.get(`${RISEX_API}/v1/account/balance`, { params: { account: walletAddress, token: '0x6bf6e258b3c5650b448cb1112835048ba5619dc1', // USDC }, }); const balance = response.data?.data?.balance || '0'; return formatUnits(BigInt(balance), 18); } export async function getPositions(walletAddress: string) { const response = await axios.get(`${RISEX_API}/v1/positions`, { params: { account: walletAddress }, }); return response.data?.data?.positions || []; } export async function depositUSDC( signerPrivateKey: string, walletAddress: string, amount: string ) { const account = privateKeyToAccount(signerPrivateKey as `0x${string}`); const depositPayload = { account: walletAddress, amount: parseUnits(amount, 18).toString(), }; const data = JSON.stringify(depositPayload); const signature = await account.signTypedData({ domain: { ...domain, verifyingContract: '0x8e6c7d87fc4c35ab519127629c56bca07006cfca' as `0x${string}`, }, types, primaryType: 'VerifySignature', message: { signer: account.address, data: `0x${Buffer.from(data).toString('hex')}`, }, }); const response = await axios.post(`${RISEX_API}/v1/account/deposit`, { ...depositPayload, signature, signer: account.address, }); return response.data; } ``` For additional functions like `getOpenOrders()`, see the [complete implementation on GitHub](https://github.com/awesamarth/risex-tg-bot/blob/main/apps/tg-bot/src/services/risexService.ts). *** ## LLM Router Implement natural language processing with GPT-4o-mini: ```typescript title="apps/tg-bot/src/llm/router.ts" import OpenAI from 'openai'; import * as risex from '../services/risexService'; import { getWalletForTelegram } from '../services/verifiedLinksStore'; import { getSigner } from '../services/signersStore'; const openai = new OpenAI({ baseURL: 'https://openrouter.ai/api/v1', apiKey: process.env.OPENROUTER_API_KEY, }); // Define tool schemas const tools = [ { type: 'function', function: { name: 'get_balance', description: 'Get the USDC balance for the user account', parameters: { type: 'object', properties: {} }, }, }, { type: 'function', function: { name: 'place_order', description: 'Place a perpetual futures order (market or limit)', parameters: { type: 'object', properties: { market: { type: 'string', enum: ['BTC', 'ETH'] }, side: { type: 'string', enum: ['long', 'short'] }, size: { type: 'string', description: 'Contract size (e.g., "0.02")' }, price: { type: 'string', description: 'Limit price or "market"' }, orderType: { type: 'string', enum: ['market', 'limit'] }, }, required: ['market', 'side', 'size', 'orderType'], }, }, }, { type: 'function', function: { name: 'get_positions', description: 'Get all open perpetual positions', parameters: { type: 'object', properties: {} }, }, }, { type: 'function', function: { name: 'deposit', description: 'Deposit testnet USDC to trading account', parameters: { type: 'object', properties: { amount: { type: 'string', description: 'Amount of USDC (default: 1000)' }, }, }, }, }, ]; export async function handleMessage(telegramId: string, message: string): Promise { // Get wallet and signer const walletAddress = getWalletForTelegram(telegramId); if (!walletAddress) { return '❌ No wallet linked. Use /link to get started.'; } const signerKey = getSigner(walletAddress); if (!signerKey) { return '❌ No trading signer registered. Please complete registration.'; } // Call GPT-4o-mini const response = await openai.chat.completions.create({ model: 'openai/gpt-4o-mini', messages: [ { role: 'system', content: 'You are a trading assistant for RISEx perpetual futures. Parse user requests and call the appropriate tools.', }, { role: 'user', content: message }, ], tools: tools as any, tool_choice: 'auto', }); const toolCall = response.choices[0]?.message?.tool_calls?.[0]; if (!toolCall) { return response.choices[0]?.message?.content || '❓ Could not understand request.'; } const functionName = toolCall.function.name; const args = JSON.parse(toolCall.function.arguments); // Execute tool try { switch (functionName) { case 'get_balance': const balance = await risex.getBalance(walletAddress); return `💰 Balance: ${balance} USDC`; case 'place_order': const orderResult = await risex.placeOrder( signerKey, walletAddress, args.market, args.side, args.size, args.price || '0', args.orderType ); return `✅ Order placed!\nMarket: ${args.market}-PERP\nSide: ${args.side.toUpperCase()}\nSize: ${args.size}\nTx: ${orderResult.data?.tx_hash || 'N/A'}`; case 'get_positions': const positions = await risex.getPositions(walletAddress); if (positions.length === 0) { return '📊 No open positions.'; } return positions.map((p: any) => `${p.market_id} ${p.side === 0 ? 'LONG' : 'SHORT'} ${formatUnits(BigInt(p.size), 18)}` ).join('\n'); case 'deposit': const depositAmount = args.amount || '1000'; await risex.depositUSDC(signerKey, walletAddress, depositAmount); return `✅ Deposited ${depositAmount} USDC to your account!`; default: return '❓ Unknown command.'; } } catch (error: any) { console.error('Tool execution error:', error); return `❌ Error: ${error.message}`; } } ``` *** ## Main Bot Implementation Create the Telegram bot entry point: ```typescript title="apps/tg-bot/src/index.ts" import { Telegraf } from 'telegraf'; import express from 'express'; import cors from 'cors'; import dotenv from 'dotenv'; import { handleMessage } from './llm/router'; import * as risex from './services/risexService'; import { getWalletForTelegram, linkTelegramToWallet, hasLink } from './services/verifiedLinksStore'; import { getSigner, storeSigner, hasSigner } from './services/signersStore'; dotenv.config(); const bot = new Telegraf(process.env.TELEGRAM_BOT_TOKEN!); const app = express(); app.use(cors({ origin: process.env.FRONTEND_URL })); app.use(express.json()); // Slash commands bot.command('start', (ctx) => { ctx.reply( `👋 Welcome to RISEx Trading Bot!\n\n` + `Use /link to connect your wallet, then:\n` + `• Natural language: "buy 0.02 BTC"\n` + `• /balance - Check USDC balance\n` + `• /deposit - Get testnet USDC\n` + `• /positions - View open positions` ); }); bot.command('link', (ctx) => { const telegramId = ctx.from.id.toString(); ctx.reply( `🔗 Your Telegram ID: \`${telegramId}\`\n\n` + `Visit: ${process.env.FRONTEND_URL}\n` + `Enter this ID and complete registration.`, { parse_mode: 'Markdown' } ); }); bot.command('debug', (ctx) => { const telegramId = ctx.from.id.toString(); const wallet = getWalletForTelegram(telegramId); ctx.reply( `🐛 Debug Info:\n` + `Telegram ID: ${telegramId}\n` + `Wallet: ${wallet || 'Not linked'}\n` + `Signer: ${wallet && hasSigner(wallet) ? 'Registered' : 'Not registered'}` ); }); bot.command('balance', async (ctx) => { const telegramId = ctx.from.id.toString(); const wallet = getWalletForTelegram(telegramId); if (!wallet) { return ctx.reply('❌ No wallet linked. Use /link first.'); } const balance = await risex.getBalance(wallet); ctx.reply(`💰 Balance: ${balance} USDC`); }); bot.command('deposit', async (ctx) => { const telegramId = ctx.from.id.toString(); const wallet = getWalletForTelegram(telegramId); if (!wallet) { return ctx.reply('❌ No wallet linked. Use /link first.'); } const signerKey = getSigner(wallet); if (!signerKey) { return ctx.reply('❌ No signer registered. Complete registration first.'); } const amount = ctx.message.text.split(' ')[1] || '1000'; await risex.depositUSDC(signerKey, wallet, amount); ctx.reply(`✅ Deposited ${amount} USDC!`); }); // Natural language messages bot.on('text', async (ctx) => { const text = ctx.message.text; // Skip commands if (text.startsWith('/')) return; const telegramId = ctx.from.id.toString(); const response = await handleMessage(telegramId, text); ctx.reply(response); }); // API routes for frontend app.post('/api/link-telegram', (req, res) => { const { telegramId, walletAddress } = req.body; linkTelegramToWallet(telegramId, walletAddress); res.json({ success: true }); }); app.post('/api/store-signer', (req, res) => { const { walletAddress, privateKey } = req.body; storeSigner(walletAddress, privateKey); res.json({ success: true }); }); app.get('/api/check-signer/:address', (req, res) => { const exists = hasSigner(req.params.address); res.json({ exists }); }); // Start server const PORT = process.env.PORT || 8008; app.listen(PORT, () => { console.log(`✅ API server running on port ${PORT}`); }); // Start bot bot.launch(); console.log('✅ Telegram bot started'); // Graceful shutdown process.once('SIGINT', () => bot.stop('SIGINT')); process.once('SIGTERM', () => bot.stop('SIGTERM')); ``` For additional slash commands like `/positions` and `/orders`, see the [GitHub repository](https://github.com/awesamarth/risex-tg-bot). Next, we'll build the [frontend registration UI](/docs/cookbook/risex-telegram-bot/frontend). # Frontend Implementation (/docs/cookbook/risex-telegram-bot/frontend) ## Building the Frontend The frontend is a single-page app that handles wallet connection and session key registration. ### Configure Wagmi Create the wagmi config: ```typescript title="apps/frontend/src/config/wagmi.ts" import { Chains, RiseWallet, riseWallet } from 'rise-wallet'; import { createConfig, http } from 'wagmi'; export const config = createConfig({ chains: [Chains.riseTestnet], connectors: [riseWallet(RiseWallet.defaultConfig)], transports: { [Chains.riseTestnet.id]: http('https://testnet.riselabs.xyz'), }, }); declare module 'wagmi' { interface Register { config: typeof config; } } ``` *** ### Create RISEx Constants ```typescript title="apps/frontend/src/lib/risex.ts" export const AUTH_CONTRACT = '0x3f12C76bbeB8df0e7616fBE097fA760A23929c7c'; export const domain = { name: 'RISEx', version: '1', chainId: 8008135, verifyingContract: AUTH_CONTRACT as `0x${string}`, }; export const types = { RegisterSigner: [ { name: 'trader', type: 'address' }, { name: 'signer', type: 'address' }, { name: 'expiry', type: 'uint256' }, ], }; ``` *** ### Create Signature Helper This is critical. RISE Wallet returns wrapped signatures that must be unwrapped: ```typescript title="apps/frontend/src/lib/signature-helper.ts" import { Signature as OxSignature } from 'ox'; import { SignatureErc8010 } from 'ox/erc8010'; export function formatSignature(sig: string): string { // Unwrap ERC-8010 if needed if (SignatureErc8010.validate(sig)) { const { signature } = SignatureErc8010.unwrap(sig); sig = signature; } // Parse signature const { r, s, yParity } = OxSignature.from(sig); // Normalize v value let v = yParity === 0 ? 27 : 28; // Format as 0x + r + s + v return `0x${r.slice(2)}${s.slice(2)}${v.toString(16).padStart(2, '0')}`; } ``` *** ## Registration Page Build the main registration UI: ```typescript title="apps/frontend/src/app/page.tsx" "use client"; import { useState } from 'react'; import { useConnection, useSignTypedData } from 'wagmi'; import { useConnect, useDisconnect } from 'wagmi'; import { P256, PublicKey } from 'ox'; import { parseAbi } from 'viem'; import { writeContract, waitForTransactionReceipt } from 'wagmi/actions'; import { config } from '@/config/wagmi'; import { AUTH_CONTRACT, domain, types } from '@/lib/risex'; import { formatSignature } from '@/lib/signature-helper'; const AUTH_ABI = parseAbi([ 'function registerSigner(address trader, address signer, uint256 expiry, bytes memory signature) external', ]); export default function Home() { const [telegramId, setTelegramId] = useState(''); const [status, setStatus] = useState(''); const [sessionKey, setSessionKey] = useState(''); const { address } = useConnection(); const { connect, connectors } = useConnect(); const { disconnect } = useDisconnect(); const { signTypedDataAsync } = useSignTypedData(); const handleRegister = async () => { if (!address || !telegramId) { setStatus('❌ Connect wallet and enter Telegram ID'); return; } try { setStatus('Generating session key...'); // Generate P256 session key const privateKey = P256.randomPrivateKey(); const publicKey = P256.getPublicKey({ privateKey }); const signerAddress = PublicKey.toAddress(publicKey); setSessionKey(PublicKey.toHex(publicKey)); // Prepare typed data const expiry = BigInt(Math.floor(Date.now() / 1000) + 30 * 24 * 60 * 60); // 30 days setStatus('Sign permission in wallet...'); // Sign with RISE Wallet let signature = await signTypedDataAsync({ domain, types, primaryType: 'RegisterSigner', message: { trader: address, signer: signerAddress, expiry, }, }); // Format signature (unwrap and normalize) signature = formatSignature(signature); setStatus('Registering on-chain...'); // Call contract const hash = await writeContract(config, { address: AUTH_CONTRACT, abi: AUTH_ABI, functionName: 'registerSigner', args: [address, signerAddress, expiry, signature as `0x${string}`], }); setStatus('Waiting for confirmation...'); await waitForTransactionReceipt(config, { hash }); setStatus('Storing signer...'); // Store encrypted signer in backend await fetch(`${process.env.NEXT_PUBLIC_API_URL}/api/store-signer`, { method: 'POST', headers: { 'Content-Type': 'application/json' }, body: JSON.stringify({ walletAddress: address, privateKey, }), }); // Link Telegram ID await fetch(`${process.env.NEXT_PUBLIC_API_URL}/api/link-telegram`, { method: 'POST', headers: { 'Content-Type': 'application/json' }, body: JSON.stringify({ telegramId, walletAddress: address, }), }); setStatus('✅ Registration complete! Open your Telegram bot.'); } catch (error: any) { console.error('Registration error:', error); setStatus(`❌ Error: ${error.message}`); } }; return (

RISEx Trading Bot

Register to start trading via Telegram

{!address ? ( ) : (

Connected:

{address.slice(0, 6)}...{address.slice(-4)}

setTelegramId(e.target.value)} placeholder="123456789" className="w-full px-4 py-2 bg-gray-900 border border-gray-700 rounded-lg focus:border-purple-500 outline-none" />
{status && (

{status}

{sessionKey && (

Session Key: {sessionKey}

)}
)}
)}
); } ``` After connecting and registering, the page should look like this: RISEx Bot Registration Frontend *** ### Add Provider Wrapper ```typescript title="apps/frontend/src/app/provider.tsx" "use client"; import { QueryClient, QueryClientProvider } from '@tanstack/react-query'; import { type ReactNode, useState } from 'react'; import { WagmiProvider } from 'wagmi'; import { config } from '@/config/wagmi'; export function Provider(props: { children: ReactNode }) { const [queryClient] = useState(() => new QueryClient()); return ( {props.children} ); } ``` Update layout: ```typescript title="apps/frontend/src/app/layout.tsx" import type { Metadata } from 'next'; import './globals.css'; import { Provider } from './provider'; export const metadata: Metadata = { title: 'RISEx Trading Bot', description: 'Register for AI-powered Telegram trading', }; export default function RootLayout({ children }: { children: React.ReactNode }) { return ( {children} ); } ``` Your frontend is complete! Next, we'll [test everything](/docs/cookbook/risex-telegram-bot/testing). # RISEx Telegram Bot (/docs/cookbook/risex-telegram-bot) import { Cards, Card } from 'fumadocs-ui/components/card'; import { Callout } from 'fumadocs-ui/components/callout'; ## Introduction Trading perpetual futures usually means navigating complex UIs with order books, charts, and confusing terminology. What if you could just text "buy 0.02 BTC" to a bot and have it execute the trade instantly? That's exactly what this tutorial builds: an AI-powered Telegram bot that trades on RISEx, RISE's perpetual futures exchange. The bot combines RISE Wallet's session keys for secure delegation, GPT-4o-mini for natural language understanding, and RISEx's REST API for trading. Users never expose their private keys. Instead, they grant limited permissions to a P256 session key that the bot uses for trading. ### What You'll Build A complete trading bot with two parts: **Telegram Bot Backend:** * Natural language command processing ("buy 0.02 BTC", "check my balance") * Slash commands for quick actions (`/balance`, `/deposit`, `/positions`) * EIP-712 signature generation for authenticated API calls * Encrypted signer key storage * Integration with RISEx REST API **Registration Frontend:** * RISE Wallet connection UI * One-click session key registration * Telegram account linking * Permission grant interface ### What You'll Learn * Building Telegram bots with Telegraf framework * Integrating GPT-4o-mini for natural language processing * Using RISE Wallet's P256 session keys for delegation * EIP-712 typed data signing for API authentication * Trading perpetual futures programmatically * Secure key management with AES-256-GCM encryption * Account abstraction patterns for web3 apps ### Prerequisites * Node.js 18+ installed * A Telegram account (to create and test the bot) * Basic understanding of React and Next.js * Familiarity with TypeScript * An OpenRouter API key (for GPT access - get one at [openrouter.ai/keys](https://openrouter.ai/keys)) This tutorial uses RISE Testnet and testnet USDC. The bot includes a `/deposit` command that gives you free testnet funds instantly! ### Source Code The complete source code for this project is available on GitHub: [awesamarth/risex-tg-bot](https://github.com/awesamarth/risex-tg-bot) *** ## Architecture Overview Before diving into code, let's understand how the system works. ### Component Diagram ### How It Works **Setup Phase (One-Time):** 1. User opens the registration frontend and connects RISE Wallet 2. User enters their Telegram ID 3. User signs an EIP-712 message granting trading permissions to a P256 session key 4. The session key is encrypted and stored securely on the backend 5. The Telegram ID is linked to the wallet address **Trading Phase (Ongoing):** 1. User sends a message to the Telegram bot ("buy 0.02 BTC") 2. Bot verifies the user has a registered signer 3. Bot sends message to GPT-4o-mini to parse intent 4. GPT returns structured tool call (`place_order` with params) 5. Bot decrypts the user's session key 6. Bot signs an EIP-712 `VerifySignature` message 7. Bot calls RISEx API with the signature 8. RISEx verifies signature and executes the trade 9. Bot replies with order confirmation and transaction hash This architecture ensures users never expose their main private keys while still enabling automated trading. ## Quick Links # Setup (/docs/cookbook/risex-telegram-bot/setup) import { Tabs, Tab } from 'fumadocs-ui/components/tabs'; import { Steps, Step } from 'fumadocs-ui/components/steps'; import { Callout } from 'fumadocs-ui/components/callout'; ## Project Setup ### Create Project Structure This project uses a monorepo structure with two apps: ```bash mkdir risex-tg-bot cd risex-tg-bot npm init -y ``` Create the following folder structure: ``` risex-tg-bot/ ├── apps/ │ ├── tg-bot/ # Telegram bot backend │ └── frontend/ # Registration UI ├── package.json └── .gitignore ``` Update your root `package.json`: ```json title="package.json" { "name": "risex-tg-bot", "version": "1.0.0", "scripts": { "dev:tg-bot": "cd apps/tg-bot && npm run dev", "dev:frontend": "cd apps/frontend && npm run dev", "dev": "concurrently \"npm run dev:tg-bot\" \"npm run dev:frontend\"", "build": "npm run build:tg-bot && npm run build:frontend", "build:tg-bot": "cd apps/tg-bot && npm run build", "build:frontend": "cd apps/frontend && npm run build" }, "devDependencies": { "concurrently": "^9.1.0" } } ``` Install the root dependency: ```bash npm install ``` ```bash yarn install ``` ```bash pnpm install ``` ```bash bun install ``` *** ## Set Up the Telegram Bot First, create a Telegram bot through BotFather: ### Create the Bot 1. Open Telegram and search for `@BotFather` 2. Send `/newbot` and follow the prompts 3. Choose a name (e.g., "RISEx Trader") 4. Choose a username (must end in "bot", e.g., "risex\_trader\_bot") 5. Copy the bot token as you'll need it later RISEx Telegram Bot Profile *** ## Initialize the Backend ### Create the Backend App Create the Telegram bot app: ```bash cd apps mkdir tg-bot cd tg-bot npm init -y ``` ### Install Dependencies ```bash npm install telegraf axios openai viem zod express cors dotenv npm install -D typescript @types/node tsx ``` ```bash yarn add telegraf axios openai viem zod express cors dotenv yarn add -D typescript @types/node tsx ``` ```bash pnpm add telegraf axios openai viem zod express cors dotenv pnpm add -D typescript @types/node tsx ``` ```bash bun add telegraf axios openai viem zod express cors dotenv bun add -D typescript @types/node tsx ``` **Key packages:** * `telegraf` - Telegram bot framework * `axios` - HTTP client for RISEx API calls * `openai` - OpenRouter/OpenAI SDK for GPT integration * `viem` - EIP-712 signing and cryptography * `zod` - Runtime type validation * `express` - HTTP server for frontend API routes ### Configure TypeScript Create `tsconfig.json`: ```json title="apps/tg-bot/tsconfig.json" { "compilerOptions": { "target": "ES2021", "module": "commonjs", "lib": ["ES2021"], "outDir": "./dist", "rootDir": "./src", "strict": true, "esModuleInterop": true, "skipLibCheck": true, "forceConsistentCasingInFileNames": true, "resolveJsonModule": true }, "include": ["src/**/*"], "exclude": ["node_modules"] } ``` Update `package.json` scripts: ```json title="apps/tg-bot/package.json" { "scripts": { "dev": "tsx watch src/index.ts", "build": "tsc", "start": "node dist/index.js" } } ``` ### Create Data Storage Create a `data` directory for JSON storage: ```bash mkdir -p src/data ``` Create empty JSON files: ```json title="apps/tg-bot/src/data/signers.json" {} ``` ```json title="apps/tg-bot/src/data/verified-links.json" {} ``` These files will store encrypted signer keys and Telegram-to-wallet mappings. *** ## Initialize the Frontend Navigate back to apps directory and create the frontend: ```bash cd .. npx create-next-app@latest frontend ``` Select these options: * Use recommended Next.js defaults: **No, customize settings** * TypeScript: **Yes** * Linter: **None** * React Compiler: **Yes** * Tailwind CSS: **Yes** * `src/` directory: **Yes** * App Router: **Yes** * Customize import alias: **No** If you've completed another tutorial, you can select **No, reuse previous settings** to skip configuration. ### Install Frontend Dependencies ```bash cd frontend ``` ```bash npm install rise-wallet wagmi viem ox @tanstack/react-query ``` ```bash yarn add rise-wallet wagmi viem ox @tanstack/react-query ``` ```bash pnpm add rise-wallet wagmi viem ox @tanstack/react-query ``` ```bash bun add rise-wallet wagmi viem ox @tanstack/react-query ``` *** ## Environment Variables Create environment files for both apps. ### Backend Environment Create `apps/tg-bot/.env`: ```bash title="apps/tg-bot/.env" # Telegram TELEGRAM_BOT_TOKEN=your_bot_token_from_botfather # RISEx RISEX_API_URL=https://api.testnet.rise.trade # Security ENCRYPTION_SECRET=generate_with_node_command_below # Server PORT=8008 FRONTEND_URL=http://localhost:3000 # LLM OPENROUTER_API_KEY=sk-or-v1-your_key_from_openrouter ``` Generate encryption secret: ```bash node -e "console.log(require('crypto').randomBytes(32).toString('hex'))" ``` ### Frontend Environment Create `apps/frontend/.env.local`: ```bash title="apps/frontend/.env.local" NEXT_PUBLIC_TELEGRAM_BOT_NAME=your_bot_username NEXT_PUBLIC_API_URL=http://localhost:8008 ``` *** Your project structure is now ready! In the [next section](/docs/cookbook/risex-telegram-bot/backend), we'll build the backend services. # Testing & Production (/docs/cookbook/risex-telegram-bot/testing) import { Steps, Step } from 'fumadocs-ui/components/steps'; import { Tabs, Tab } from 'fumadocs-ui/components/tabs'; ## Running and Testing ### Start Both Apps From the root directory: ```bash npm run dev ``` ```bash yarn dev ``` ```bash pnpm dev ``` ```bash bun run dev ``` This starts: * Telegram bot on `http://localhost:8008` * Frontend on `http://localhost:3000` *** ### Complete Registration ### Get Telegram ID Open your Telegram bot and send `/debug`. Copy your Telegram ID from the response. ### Register Signer 1. Open `http://localhost:3000` in your browser 2. Click "Connect RISE Wallet" and approve 3. Paste your Telegram ID 4. Click "Register Trading Signer" 5. Sign the permission in RISE Wallet popup 6. Wait for confirmation (\~5-10 seconds) ### Test the Bot Go back to Telegram and try: * `/balance` - Should show 0 USDC * `/deposit` - Should credit 1000 testnet USDC * `/balance` - Should now show 1000 USDC ### Place Your First Trade Send: `buy 0.02 BTC` The bot should respond with order confirmation and transaction hash. A successful trade message should look like this: RISEx Bot Trade Response *** ### Testing Natural Language Try these examples: ``` ✅ "check my balance" → Shows USDC balance ✅ "show positions" → Lists open perp positions ✅ "buy 0.02 BTC" → Places market long order ✅ "short 0.01 ETH at 3400" → Places limit short order ✅ "deposit 500" → Adds 500 USDC to account ✅ "go long with 1000 USDC" → Calculates size from USDC amount ``` The LLM will parse these into structured tool calls and execute them via the RISEx API. *** ## Understanding the Flow Let's trace what happens when you send "buy 0.02 BTC": 1. **Message Received**: Telegram bot receives your text message 2. **Verification**: Bot checks if your Telegram ID is linked to a wallet and has a registered signer 3. **LLM Processing**: Message is sent to GPT-4o-mini with system prompt and tool definitions 4. **Intent Parsing**: LLM returns: ```json { "tool": "place_order", "params": { "market": "BTC", "side": "long", "size": "0.02", "orderType": "market" } } ``` 5. **Key Retrieval**: Backend loads your encrypted signer key and decrypts it 6. **Signature Generation**: Backend signs an EIP-712 `VerifySignature` message using the signer key 7. **API Call**: Backend calls `POST /v1/orders/place` with the signature 8. **On-Chain Verification**: RISEx smart contract verifies the signature matches the registered signer 9. **Order Execution**: RISEx executes the perpetual futures trade 10. **Confirmation**: Bot replies with order ID and transaction hash This entire flow completes in under 5 seconds, providing near-instant trading from natural language commands. *** ## Next Steps You've built a fully functional AI-powered trading bot! Here are some ideas to extend it: * **Advanced Orders**: Add stop-loss, take-profit, and trailing stops * **Portfolio Analytics**: Track PnL over time with charts * **Price Alerts**: Notify users when markets hit target prices * **Multi-User Support**: Allow multiple users per bot instance * **Risk Management**: Add position sizing calculators and risk limits * **Market Data**: Integrate realtime price feeds and order book data ### Related Tutorials * [RISE Wallet Demo](/docs/cookbook/rise-wallet-quickstart) - Learn more about session keys * [Shred Ninja](/docs/cookbook/shred-ninja) - Realtime event monitoring * [Reaction Time Game](/docs/cookbook/reaction-time-game) - 3ms transaction confirmations ### Resources * [GitHub Repository](https://github.com/awesamarth/risex-tg-bot) - Complete source code * [RISEx Documentation](/docs/risex) - Complete trading platform guide * [RISEx API Reference](/docs/risex/api) - REST API endpoints * [Telegraf Documentation](https://telegraf.js.org) - Telegram bot framework * [OpenRouter Documentation](https://openrouter.ai/docs) - LLM integration guide * [Viem Documentation](https://viem.sh) - Ethereum library reference Now go build something amazing with RISEx on RISE! 🚀 # Implementation (/docs/cookbook/shred-ninja/implementation) import { Steps, Step } from 'fumadocs-ui/components/steps'; import { Tabs, Tab } from 'fumadocs-ui/components/tabs'; ## Game Implementation The complete Shred Ninja implementation can be found in the [GitHub repository](https://github.com/awesamarth/shred-ninja). We'll cover the key concepts here. ### Key Implementation Concepts **Shreds Subscription:** ```typescript const client = createPublicClient({ chain: riseTestnet, transport: webSocket('wss://testnet.riselabs.xyz/ws'), }).extend(shredActions) const unwatch = client.watchShreds({ includeStateChanges: false, onShred: (shred) => { // Process realtime events }, }) ``` **Event Filtering:** * Filter logs by Transfer event signature * Match against USDC and USDT contract addresses * Extract and process only relevant transfers * Deduplicate using transaction hash + log index **Progressive Difficulty:** ```typescript // Show fewer events at low scores if (currentScore < 25) { shouldSpawn = eventCounter % 3 === 0; // Every 3rd event } else if (currentScore < 50) { shouldSpawn = eventCounter % 2 === 0; // Every 2nd event } else { shouldSpawn = true; // Every event } ``` **Audio Synthesis:** ```typescript const playTone = (frequency: number, duration: number) => { const audioContext = new AudioContext(); const oscillator = audioContext.createOscillator(); oscillator.frequency.value = frequency; oscillator.type = "sine"; oscillator.start(); oscillator.stop(audioContext.currentTime + duration); }; sounds.tap = () => { playTone(523, 0.1); // C5 playTone(659, 0.1, 0.05); // E5 }; ``` **Framer Motion Animation:** ```typescript handleTap(token)} > {token.type === "USDC" ? "C" : "T"} ``` ### Complete Source Code For the full implementation including: * Complete Shreds subscription setup * Game state management * Audio synthesis functions * Progressive difficulty system * Token animation and collision detection Visit: [https://github.com/awesamarth/shred-ninja](https://github.com/awesamarth/shred-ninja) *** ## Running and Testing ### Start the Development Server ### Run the App ```bash npm run dev ``` ```bash yarn dev ``` ```bash pnpm dev ``` ```bash bun run dev ``` Open `http://localhost:3000` in your browser. ### How to Play * Green tokens (USDC transfers) = **TAP THEM** * Red tokens (USDT transfers) = **AVOID THEM** * Miss 10 green tokens = Game over * Tap a red token = Game over * Difficulty increases with your score ### Understanding What You See Every token represents a real blockchain transfer happening on RISE Testnet at that moment. The 3-5ms latency makes it feel like a traditional web app, not blockchain! When running, the game should look like this: Shred Ninja Gameplay *** ## How It Works ### Event Flow Timeline 1. **Tx execution**: 0ms 2. **Shred delivered**: 3-5ms 3. **Token spawns**: 5-10ms (including React render) 4. **Player sees token**: 10-15ms after blockchain event This demonstrates RISE's capability: events arrive fast enough for interactive gaming! ### Deduplication Strategy ```typescript const processedTokens = new Set(); // Create unique ID const tokenId = `${tx.hash}-${log.logIndex}`; if (processedTokens.has(tokenId)) return; processedTokens.add(tokenId); ``` Prevents the same transfer from spawning multiple tokens if delivered in multiple shreds. ### Miss Detection ```typescript // Set timeout when token spawns const missTimeout = setTimeout(() => { if (tokenType === "USDC") { setMisses((m) => { const newMisses = m + 1; if (newMisses >= 10) { sounds.gameOver(); setStatus("gameOver"); } return newMisses; }); } setTokens((prev) => prev.filter((t) => t.id !== tokenId)); }, 4500); // Match animation duration ``` Tapping clears the timeout; reaching bottom increments miss counter. *** ## Customization Ideas ### Adjust Difficulty Modify the difficulty thresholds: ```typescript if (currentScore < 10) { shouldSpawn = eventCounter % 4 === 0; // Easier } else if (currentScore < 30) { shouldSpawn = eventCounter % 2 === 0; } else { shouldSpawn = true; // Harder } ``` ### Add More Token Types Monitor additional ERC20 contracts: ```typescript const USDC_ADDRESS = "0x..."; const USDT_ADDRESS = "0x..."; const DAI_ADDRESS = "0x..."; // New token // In onShred callback const tokenType = log.address.toLowerCase() === USDC_ADDRESS ? "USDC" : log.address.toLowerCase() === USDT_ADDRESS ? "USDT" : log.address.toLowerCase() === DAI_ADDRESS ? "DAI" : null; ``` ### Change Animation Speed Adjust the falling speed: ```typescript ``` Remember to match the timeout duration! *** ## Next Steps Congratulations! You've built a realtime blockchain game. You now understand how to: * Establish WebSocket connections to RISE Testnet * Subscribe to blockchain events with `watchShreds` * Filter and process ERC20 transfer events * Handle event deduplication * Build realtime UIs powered by blockchain data ### Ideas to Extend 1. **Leaderboards**: Record high scores with player addresses 2. **Multiplayer**: Show other players' scores in realtime 3. **NFT Rewards**: Mint achievement NFTs for milestones 4. **Custom Tokens**: Let users choose which tokens to monitor 5. **Sound Effects**: Add unique sounds for different token types ### Related Tutorials * [Reaction Time Game](/docs/cookbook/reaction-time-game) - 3ms transaction confirmations * [RISE Wallet Demo](/docs/cookbook/rise-wallet-quickstart) - Wallet integration patterns * [RISEx Telegram Bot](/docs/cookbook/risex-telegram-bot) - AI trading bot ### Resources * [GitHub Repository](https://github.com/awesamarth/shred-ninja) - Complete source code * [Shreds Documentation](/docs/builders/shreds) - Complete API reference * [Shreds Quickstart](/docs/builders/shreds/quickstart) - Quick intro * [Viem Documentation](https://viem.sh) - Ethereum library * [Framer Motion Docs](https://www.framer.com/motion/) - Animation library * [RISE Testnet Details](/docs/builders/testnet-details) - Network info # Shred Ninja (/docs/cookbook/shred-ninja) import { Cards, Card } from 'fumadocs-ui/components/card'; import { Callout } from 'fumadocs-ui/components/callout'; ## Introduction Imagine building a game where every on-screen element represents a real blockchain transaction happening right now. Not 12 seconds ago, not in the next block, but right now, in realtime. This is exactly what Shred Ninja demonstrates: a Fruit Ninja-style arcade game where players tap incoming USDC transfer events while avoiding USDT transfers, all powered by live blockchain data streaming at millisecond speeds. Traditional blockchains can't support this kind of realtime interactivity because they require waiting for block confirmations that take seconds or even minutes. RISE changes the game entirely with its shreds technology, delivering transaction events to your application in just 3-5 milliseconds. This tutorial will show you how to harness that power to build a genuinely interactive blockchain experience. ### What You'll Build A fully functional arcade game with: * Realtime event monitoring that converts blockchain transfers into game elements * Progressive difficulty that scales with your score * Sound effects and smooth animations * Green USDC tokens to tap, red USDT tokens to avoid * Game ends after 10 misses or tapping a red token ### What You'll Learn * WebSocket connections to RISE Testnet for realtime event streaming * Using the `watchShreds` method to subscribe to blockchain events * Filtering ERC20 transfer events from raw blockchain logs * Event deduplication to prevent duplicate processing * Progressive difficulty systems that adapt to user performance * React state management for realtime data * Framer Motion animations and Web Audio API synthesis ### The Shreds Advantage Traditional blockchain applications poll for events every few seconds or wait for block confirmations before updating their UI. This creates a sluggish, disconnected user experience where actions feel delayed and unnatural. RISE's shreds technology fundamentally changes this paradigm. With shreds, your application receives transaction events through a persistent WebSocket connection the moment they're executed, which is typically within 3-5 milliseconds. This is fast enough to build games, realtime trading interfaces, live auction platforms, and any other application where immediate feedback matters. This tutorial demonstrates that capability by building something that simply couldn't exist on traditional blockchain infrastructure: a genuinely realtime game powered by live on-chain data. ### Prerequisites * Node.js 18+ installed * Comfortable with React and Next.js basics (`useState`, `useEffect`) * Basic TypeScript understanding * Familiarity with blockchain concepts (transactions, events) This tutorial uses RISE Testnet to stream live transfer events from real ERC20 tokens. You don't need any testnet funds or wallet setup. The app monitors the network passively without sending transactions. ### Source Code The complete source code for this project is available on GitHub: [awesamarth/shred-ninja](https://github.com/awesamarth/shred-ninja) ## Quick Links # Setup (/docs/cookbook/shred-ninja/setup) import { Tabs, Tab } from 'fumadocs-ui/components/tabs'; ## Project Setup ### Create a New Next.js Project Let's start by creating a fresh Next.js application: ```bash npx create-next-app@latest shred-ninja ``` ```bash yarn create next-app shred-ninja ``` ```bash pnpm create next-app shred-ninja ``` ```bash bun create next-app shred-ninja ``` When prompted, select these options: * Use recommended Next.js defaults: **No, customize settings** * TypeScript: **Yes** * Linter: **None** * React Compiler: **Yes** * Tailwind CSS: **Yes** * `src/` directory: **Yes** * App Router: **Yes** * Customize import alias: **No** If you've completed another tutorial, you can select **No, reuse previous settings** to skip configuration. Navigate into your project: ```bash cd shred-ninja ``` ### Install Dependencies Add the packages needed for blockchain integration and animations: ```bash npm install viem shreds ws framer-motion npm install --save-dev @types/ws ``` ```bash yarn add viem shreds ws framer-motion yarn add --dev @types/ws ``` ```bash pnpm add viem shreds ws framer-motion pnpm add -D @types/ws ``` ```bash bun add viem shreds ws framer-motion bun add -D @types/ws ``` **Package breakdown:** * `viem` - Lightweight Ethereum library for blockchain interactions * `shreds` - RISE's package for realtime event streaming via `watchShreds` * `ws` - WebSocket client for persistent connections * `framer-motion` - Smooth animations for flying tokens * `@types/ws` - TypeScript definitions for WebSocket ### Add Background Music (Optional) To enhance the arcade experience, you can add background music. Just add a music file of your choice in `/public`. This is entirely optional and the game works fine without it. *** ## Understanding Shreds and Event Streaming Before coding, let's understand how RISE's shreds differ from traditional event monitoring. ### Traditional Event Monitoring **Polling**: Your app repeatedly asks "are there new events?" every few seconds. This wastes resources and creates artificial delays. If an event happens right after your last poll, you won't know until the next one. ### RISE's Shreds Approach RISE uses a WebSocket connection to stream events as they happen. Transactions are bundled into "shreds" and pushed to your app within milliseconds. This is what makes Shred Ninja possible: every token on screen represents a real blockchain transfer happening at that moment, with latency so low it feels like a traditional web app. *** ## Configuration ### Configure the Root Layout Set up your application's root layout: ```typescript title="src/app/layout.tsx" import type { Metadata } from "next"; import { Geist, Geist_Mono } from "next/font/google"; import "./globals.css"; const geistSans = Geist({ variable: "--font-geist-sans", subsets: ["latin"], }); const geistMono = Geist_Mono({ variable: "--font-geist-mono", subsets: ["latin"], }); export const metadata: Metadata = { title: "Shred Ninja - RISE", description: "Realtime blockchain game powered by RISE Shreds", }; export default function RootLayout({ children, }: Readonly<{ children: React.ReactNode; }>) { return ( {children} ); } ``` This sets up Google's Geist fonts and a dark theme perfect for our arcade-style game. Now you're ready to build the game in the [next section](/docs/cookbook/shred-ninja/implementation). # Backend API (/docs/cookbook/vrf-rock-paper-scissors/backend) import { Steps, Step } from 'fumadocs-ui/components/steps'; import { Callout } from 'fumadocs-ui/components/callout'; ## Backend Architecture The backend serves as the game orchestrator. It: 1. Receives player moves from the frontend 2. Calls the smart contract's `request()` function (as the sponsor) 3. Watches for VRF fulfillment events with 5ms polling 4. Determines the winner 5. Sends ETH rewards to winners 6. Returns game results to the frontend **Why a backend?** This pattern lets us focus on VRF, event watching and automated reward distribution. ## API Implementation ### Create API Route Create `src/app/api/route.ts`: ```typescript import { NextRequest, NextResponse } from 'next/server' import { createWalletClient, http, createPublicClient, parseAbiItem, decodeEventLog } from 'viem' import { privateKeyToAccount } from 'viem/accounts' import { riseTestnet } from 'viem/chains' import { RPS_ADDRESS, ABI } from '@/constants' const sponsor = privateKeyToAccount(process.env.DEV_PRIVATE_KEY! as `0x${string}`) const walletClient = createWalletClient({ chain: riseTestnet, transport: http(), account: sponsor }) const publicClient = createPublicClient({ chain: riseTestnet, transport: http() }) export async function POST(request: NextRequest) { try { const body = await request.json() const { address, choice } = body // Validate inputs if (!address) { return NextResponse.json( { error: 'Player address is required' }, { status: 400 } ) } if (!choice) { return NextResponse.json( { error: 'No choice given' }, { status: 400 } ) } console.log('Game started - Player:', address, 'Choice:', choice) // Call request function console.log('Requesting VRF...') const hash = await walletClient.writeContract({ address: RPS_ADDRESS as `0x${string}`, abi: ABI, functionName: 'request', args: [address as `0x${string}`] }) console.log('Request transaction sent:', hash) // Wait for transaction receipt const receipt = await publicClient.waitForTransactionReceipt({ hash }) if (receipt.status === 'reverted') { console.error('Request transaction reverted') return NextResponse.json( { error: 'Transaction reverted - player may not have tickets' }, { status: 400 } ) } console.log('Request transaction confirmed') // Parse ChoiceRequested event to get request ID const choiceRequestedEvent = receipt.logs.find(log => { try { const decoded = decodeEventLog({ abi: ABI, data: log.data, topics: log.topics }) return decoded.eventName === 'ChoiceRequested' } catch { return false } }) if (!choiceRequestedEvent) { console.error('ChoiceRequested event not found in transaction logs') throw new Error('ChoiceRequested event not found') } const decodedChoiceRequested = decodeEventLog({ abi: ABI, data: choiceRequestedEvent.data, topics: choiceRequestedEvent.topics }) //@ts-ignore const requestId = decodedChoiceRequested!.args!.requestId console.log('VRF Request ID:', requestId.toString()) console.log('Waiting for VRF result...') // Watch for ChoiceResult event with matching request ID const result = await new Promise((resolve, reject) => { const timeout = setTimeout(() => { unwatch() console.error('Timeout waiting for VRF result') reject(new Error('Timeout waiting for VRF result (30s)')) }, 30000) // 30 second timeout const unwatch = publicClient.watchEvent({ address: RPS_ADDRESS as `0x${string}`, event: parseAbiItem('event ChoiceResult(uint256 indexed requestId, uint256 result)'), pollingInterval: 5, onLogs: (logs) => { logs.forEach(log => { if (log.args.requestId === requestId) { console.log('VRF Result received:', log.args.result) clearTimeout(timeout) unwatch() resolve(Number(log.args.result)) } }) } }) }) const aiChoiceMap = ["rock", "paper", "scissors"] console.log('AI chose:', aiChoiceMap[result]) // Determine if player won and send reward const playerWon = determineWin(choice, result) if (playerWon) { console.log('Player won! Sending reward...') try { const rewardHash = await walletClient.sendTransaction({ to: address as `0x${string}`, value: BigInt(2000000000000000) // 0.002 ETH }) const rewardReceipt = await publicClient.waitForTransactionReceipt({ hash: rewardHash }) if (rewardReceipt.status === 'reverted') { console.error('Reward transaction reverted') return NextResponse.json( { error: 'Failed to send reward - transaction reverted' }, { status: 500 } ) } console.log('Reward sent:', rewardHash) } catch (rewardError) { console.error('Failed to send reward:', rewardError) return NextResponse.json( { error: 'Game completed but reward failed to send' }, { status: 500 } ) } } else { console.log('Player lost or tied') } return NextResponse.json({ result, requestId: Number(requestId), playerChoice: choice, success: true }) } catch (error) { console.error('API Error:', error) // More specific error messages if (error instanceof Error) { if (error.message.includes('Timeout')) { return NextResponse.json( { error: 'VRF request timed out - please try again' }, { status: 408 } ) } if (error.message.includes('reverted')) { return NextResponse.json( { error: 'Transaction failed - check if you have tickets' }, { status: 400 } ) } } return NextResponse.json( { error: 'Internal server error - check console logs' }, { status: 500 } ) } } function determineWin(playerChoice: string, aiResult: number): boolean { const aiChoiceMap = ["rock", "paper", "scissors"] const aiChoice = aiChoiceMap[aiResult] if (playerChoice === aiChoice) return false // tie const winConditions = { rock: "scissors", paper: "rock", scissors: "paper" } return winConditions[playerChoice as keyof typeof winConditions] === aiChoice } ``` ### Understanding the Flow **1. Request Initiation**: ```typescript const hash = await walletClient.writeContract({ address: RPS_ADDRESS, abi: ABI, functionName: 'request', args: [address] }) ``` The sponsor wallet calls the contract's `request()` function on behalf of the player. **2. Parse Request ID**: ```typescript const choiceRequestedEvent = receipt.logs.find(log => { const decoded = decodeEventLog({ abi: ABI, data: log.data, topics: log.topics }) return decoded.eventName === 'ChoiceRequested' }) ``` Extract the `requestId` from the `ChoiceRequested` event emitted by the contract. **3. Watch for VRF Result**: ```typescript const unwatch = publicClient.watchEvent({ address: RPS_ADDRESS, event: parseAbiItem('event ChoiceResult(uint256 indexed requestId, uint256 result)'), pollingInterval: 5, // Poll every 5ms for fast feedback onLogs: (logs) => { // Find matching requestId and resolve } }) ``` This uses viem's `watchEvent` to poll for the `ChoiceResult` event. The 5ms polling interval ensures we catch the VRF result as soon as it's available. **4. Game Logic**: ```typescript function determineWin(playerChoice: string, aiResult: number): boolean { const aiChoiceMap = ["rock", "paper", "scissors"] const aiChoice = aiChoiceMap[aiResult] if (playerChoice === aiChoice) return false // tie const winConditions = { rock: "scissors", paper: "rock", scissors: "paper" } return winConditions[playerChoice as keyof typeof winConditions] === aiChoice } ``` Standard rock-paper-scissors logic: rock beats scissors, paper beats rock, scissors beats paper. **5. Reward Distribution**: ```typescript if (playerWon) { const rewardHash = await walletClient.sendTransaction({ to: address, value: BigInt(2000000000000000) // 0.002 ETH }) } ``` Winners automatically receive 0.002 ETH (double their 0.001 ETH ticket cost). ### Key Concepts **Polling Interval**: ```typescript pollingInterval: 5 ``` This is in **milliseconds**. We use 5ms for extremely fast feedback. Standard is 1000ms (1 second). RISE's fast confirmations make aggressive polling viable. **Event Filtering**: ```typescript if (log.args.requestId === requestId) { resolve(Number(log.args.result)) } ``` Multiple VRF requests may be in flight. We filter by `requestId` to match this specific game. **Timeout Handling**: ```typescript const timeout = setTimeout(() => { unwatch() reject(new Error('Timeout waiting for VRF result (30s)')) }, 30000) ``` VRF should respond in 3-5ms, but we allow 30 seconds as a safety net for network issues. ## Error Handling The API handles several error cases: **No Tickets**: ```json { "error": "Transaction reverted - player may not have tickets", "status": 400 } ``` **VRF Timeout**: ```json { "error": "VRF request timed out - please try again", "status": 408 } ``` **Reward Failed**: ```json { "error": "Game completed but reward failed to send", "status": 500 } ``` ## Performance Optimization **Why 5ms polling?** RISE's shreds deliver confirmations in 3ms. With 5ms polling, we're guaranteed to catch the event in the first poll cycle after VRF fulfillment. This creates a nearly instant game experience. ## Next Steps The backend is complete! Next, we'll build the frontend UI that connects the wallet, displays the game, and calls this API. Make sure your sponsor wallet has enough testnet ETH to pay for VRF requests and rewards. # Frontend (/docs/cookbook/vrf-rock-paper-scissors/frontend) import { Steps, Step } from 'fumadocs-ui/components/steps'; import { Callout } from 'fumadocs-ui/components/callout'; import { Tabs, Tab } from 'fumadocs-ui/components/tabs'; ## Frontend Architecture The frontend provides: * Wallet connection with RISE Wallet passkeys * Ticket balance display and purchase * Game state machine (start → countdown → choice → result) * Animated transitions between states * API calls to backend for VRF requests * Winner determination and display ## Building the UI Components ### UI Components The Button and Dropdown Menu components were already installed via shadcn/ui in the setup step. They're ready to use from `@/components/ui`. ### Create Navbar Component Create `src/components/Navbar.tsx`: ```typescript "use client" import { useAccount, useBalance, useDisconnect, useReadContract } from 'wagmi' import { Button } from './ui/button' import { RPS_ADDRESS, ABI } from '@/constants' import { useState } from 'react' import { BuyTicketsModal } from './BuyTicketsModal' export function Navbar() { const { address, isConnected } = useAccount() const { disconnect } = useDisconnect() const [showBuyModal, setShowBuyModal] = useState(false) const { data: balance } = useBalance({ address: address, }) const { data: tickets, refetch: refetchTickets } = useReadContract({ address: RPS_ADDRESS, abi: ABI, functionName: 'ticketBalance', args: address ? [address] : undefined, }) if (!isConnected) return null return ( <> setShowBuyModal(false)} onSuccess={refetchTickets} /> ) } ``` ### Create Ticket Purchase Modal Create `src/components/BuyTicketsModal.tsx`: ```typescript "use client" import { useState } from 'react' import { useWriteContract, useWaitForTransactionReceipt } from 'wagmi' import { RPS_ADDRESS, ABI } from '@/constants' import { Button } from './ui/button' import { parseEther } from 'viem' interface BuyTicketsModalProps { open: boolean onClose: () => void onSuccess: () => void } export function BuyTicketsModal({ open, onClose, onSuccess }: BuyTicketsModalProps) { const [numTickets, setNumTickets] = useState(1) const { writeContract, data: hash } = useWriteContract() const { isLoading: isConfirming, isSuccess } = useWaitForTransactionReceipt({ hash, }) const handleBuy = async () => { try { writeContract({ address: RPS_ADDRESS, abi: ABI, functionName: 'buyTickets', args: [BigInt(numTickets)], value: parseEther((0.001 * numTickets).toString()), }) } catch (error) { console.error('Error buying tickets:', error) alert('Failed to buy tickets') } } if (isSuccess) { onSuccess() onClose() } if (!open) return null return (

Buy Tickets

setNumTickets(parseInt(e.target.value))} className="w-full border rounded px-3 py-2" />
Total: {(0.001 * numTickets).toFixed(3)} ETH
) } ```
### Create Main Game Page Create `src/app/page.tsx`: ```typescript "use client" import { useState, useEffect } from 'react' import { useAccount, useConnect, useReadContract } from 'wagmi' import { Button } from '@/components/ui/button' import { Navbar } from '@/components/Navbar' import { RPS_ADDRESS, ABI } from '@/constants' type GameState = "start" | "countdown" | "choice" | "ai-choosing" | "result" type Choice = "rock" | "paper" | "scissors" | null export default function Home() { const { address, isConnected } = useAccount() const { connect, connectors } = useConnect() const [gameState, setGameState] = useState("start") const [playerChoice, setPlayerChoice] = useState(null) const [aiChoice, setAiChoice] = useState(null) const [countdown, setCountdown] = useState(0) const [gameResult, setGameResult] = useState<"win" | "lose" | "tie" | null>(null) const { data: tickets, refetch: refetchBalance } = useReadContract({ address: RPS_ADDRESS, abi: ABI, functionName: 'ticketBalance', args: address ? [address] : undefined, }) // Countdown timer useEffect(() => { if (gameState === 'countdown' && countdown > 0) { const timer = setTimeout(() => setCountdown(countdown - 1), 1000) return () => clearTimeout(timer) } else if (gameState === 'countdown' && countdown === 0) { setGameState('choice') } }, [gameState, countdown]) const startGame = () => { setGameState('countdown') setCountdown(3) setPlayerChoice(null) setAiChoice(null) setWinner(null) } const makeChoice = async (choice: Choice) => { setPlayerChoice(choice) setGameState('ai-choosing') try { const response = await fetch('/api', { method: 'POST', headers: { 'Content-Type': 'application/json' }, body: JSON.stringify({ address, choice }), }) const data = await response.json() if (!response.ok) { alert(data.error || 'Failed to play game') setGameState('start') return } // Convert result to choice: 0=rock, 1=paper, 2=scissors const aiChoiceMap: Choice[] = ["rock", "paper", "scissors"] const aiResult = aiChoiceMap[data.result] setAiChoice(aiResult) // Determine win/lose/tie const result = determineWinner(choice, aiResult) setGameResult(result) setGameState("result") refetchBalance() } catch (error) { console.error('Error:', error) alert('Failed to play game') setGameState('start') } } const determineWinner = (player: Choice, ai: Choice): "win" | "lose" | "tie" => { if (player === ai) return "tie" const winConditions = { rock: "scissors", paper: "rock", scissors: "paper" } return winConditions[player as keyof typeof winConditions] === ai ? "win" : "lose" } if (!isConnected) { return (

VRF Rock Paper Scissors

Connect with RISE Wallet to play

) } return ( <>
{/* Start State */} {gameState === 'start' && (

Rock Paper Scissors

Play against AI powered by RISE VRF

Tickets: {tickets?.toString() || '0'}

)} {/* Countdown State */} {gameState === 'countdown' && (

{countdown === 3 ? '🪨' : countdown === 2 ? '📄' : '✂️'}

Get ready...

)} {/* Choice State */} {gameState === 'choice' && (

Make your choice!

)} {/* AI Choosing State */} {gameState === 'ai-choosing' && (

AI is choosing...

🤖
)} {/* Result State */} {gameState === 'result' && (

{winner === 'player' ? '🎉 You Win!' : winner === 'ai' ? '😢 You Lose!' : '🤝 Tie!'}

You

{playerChoice === 'rock' ? '🪨' : playerChoice === 'paper' ? '📄' : '✂️'}
VS

AI

{aiChoice === 0 ? '🪨' : aiChoice === 1 ? '📄' : '✂️'}
{winner === 'player' && (

You won 0.002 ETH!

)}
)}
) } ```
## Understanding the Game Flow ### State Machine The game follows this state progression: ``` start → countdown → choice → ai-choosing → result → start ``` **start**: Initial state, shows "Start Game" button **countdown**: Rock-Paper-Scissors animation with emoji transitions (🪨 → 📄 → ✂️) **choice**: Player selects rock, paper, or scissors **ai-choosing**: Loading state while backend calls VRF API **result**: Shows winner, both choices, and reward info ### API Integration ```typescript const response = await fetch('/api', { method: 'POST', headers: { 'Content-Type': 'application/json' }, body: JSON.stringify({ address, choice }), }) const data = await response.json() setAiChoice(data.result) // 0=rock, 1=paper, 2=scissors ``` The frontend calls the backend API we built earlier. The backend handles all VRF logic and returns the result. ### Ticket Balance ```typescript const { data: tickets, refetch: refetchBalance } = useReadContract({ address: RPS_ADDRESS, abi: ABI, functionName: 'ticketBalance', args: address ? [address] : undefined, }) ``` We use wagmi's `useReadContract` to read the player's ticket balance from the smart contract. After each game, we refetch to show updated balance. ### Winner Logic ```typescript const determineWinner = (player: Choice, ai: Choice): "win" | "lose" | "tie" => { if (player === ai) return "tie" const winConditions = { rock: "scissors", paper: "rock", scissors: "paper" } return winConditions[player as keyof typeof winConditions] === ai ? "win" : "lose" } ``` Standard RPS logic: rock beats scissors, paper beats rock, scissors beats paper. Implemented on frontend for immediate UI feedback. ## Styling Update `src/app/globals.css`: ```css @tailwind base; @tailwind components; @tailwind utilities; @layer base { :root { --background: 0 0% 100%; --foreground: 0 0% 3.9%; --primary: 0 0% 9%; --primary-foreground: 0 0% 98%; } .dark { --background: 0 0% 3.9%; --foreground: 0 0% 98%; --primary: 0 0% 98%; --primary-foreground: 0 0% 9%; } } @layer base { * { @apply border-border; } body { @apply bg-background text-foreground; } } ``` ## Testing the Complete App ### Start Development Server ```bash npm run dev ``` ```bash yarn dev ``` ```bash pnpm dev ``` ```bash bun dev ``` Visit `http://localhost:3000` VRF Rock-Paper-Scissors Landing Page ### Test Flow 1. Click "Connect with Passkey" 2. Authenticate with your passkey (FaceID/TouchID) 3. Click "Buy Tickets" 4. Purchase 1-10 tickets (0.001 ETH each) 5. Click "Start Game" 6. Watch the Rock-Paper-Scissors countdown (🪨 → 📄 → ✂️) 7. Choose your move 8. See VRF result quickly 9. If you win, receive 0.002 ETH automatically Active Gameplay - Choose Your Move ### Game Result After making your choice, the VRF result appears within milliseconds showing the AI's choice and whether you won, lost, or tied. Game Result Screen ### Verify Everything Works Check that: * Wallet connects smoothly * Ticket balance updates after purchase * Game plays without errors * VRF result arrives quickly * Winner is displayed correctly * Rewards arrive for wins * Can play multiple games in a row ## Next Steps Congratulations! You've built a complete VRF-powered game. Here are some ideas to extend it: * Add leaderboard with top players * Implement streak tracking * Add multiplayer mode (PvP instead of PvE) * Create NFT rewards for winning streaks * Add sound effects and animations * Implement session keys for popup-free gameplay ## Common Issues **"Transaction reverted"**: Player has no tickets. Buy tickets first. **"VRF request timed out"**: Network issue or VRF coordinator down. Retry. **Tickets not updating**: Call `refetchBalance()` after purchases/games. **Wallet won't connect**: Make sure you're on RISE Testnet and using a compatible browser (Chrome/Brave). Need help? Check the [complete source code](https://github.com/rise-cookbook/vrf-rps) or ask in the [RISE Discord](https://discord.gg/risechain). # VRF Rock-Paper-Scissors (/docs/cookbook/vrf-rock-paper-scissors) import { Cards, Card } from 'fumadocs-ui/components/card'; import { Callout } from 'fumadocs-ui/components/callout'; ## Introduction In this tutorial, you'll build a fully onchain rock-paper-scissors game that uses RISE's Fast VRF (Verifiable Random Function) for instant, provably fair randomness. ### What You'll Build A complete web3 game with: * Smart contract with VRF integration for random AI opponent * Ticket-based game economy (0.001 ETH per game) * Backend API orchestrating VRF requests and rewards * Realtime event watching with 5ms polling **Note on Architecture**: This tutorial uses a backend API to demonstrate VRF request/fulfillment patterns and event watching. For simpler games, you could skip the backend entirely and use **RISE Wallet session keys** to let users submit transactions directly from the frontend without popups. We're using the backend here specifically to showcase VRF integration patterns. {/* ![VRF Rock-Paper-Scissors Game](/vrf-rps-demo.png) */} ### What You'll Learn * How to integrate RISE VRF in Solidity contracts * Building VRF consumer contracts with proper callbacks * Handling VRF request/fulfillment flow * Event watching with viem * RISE Wallet integration ### Game Flow 1. **Player buys tickets** (0.001 ETH each) via RISE Wallet 2. **Player makes choice** (rock/paper/scissors) 3. **Backend requests VRF** from smart contract 4. **VRF returns random number** in 3-5ms 5. **Contract emits result** (0=rock, 1=paper, 2=scissors) 6. **Backend watches event**, determines winner 7. **Winner gets reward** (0.002 ETH) automatically ### Prerequisites Before starting, make sure you have: * Node.js 18+ installed * Basic knowledge of Solidity and React * Foundry installed ([getfoundry.sh](https://getfoundry.sh)) * A burner wallet private key for the backend sponsor * Some testnet ETH (get from [RISE Faucet](https://faucet.testnet.riselabs.xyz)) This tutorial uses a **backend sponsor wallet** to pay for VRF requests on behalf of users. The private key is stored in `.env.local` (gitignored). Never use real funds with exposed keys! ### Source Code The complete source code for this project is available on GitHub: [awesamarth/vrf-rps](https://github.com/awesamarth/vrf-rps) ## Quick Links # Setup (/docs/cookbook/vrf-rock-paper-scissors/setup) import { Tabs, Tab } from 'fumadocs-ui/components/tabs'; import { Steps, Step } from 'fumadocs-ui/components/steps'; import { Callout } from 'fumadocs-ui/components/callout'; ## Project Setup We'll build this as a monorepo with two main parts: a Foundry smart contract project and a Next.js frontend/backend. ### Create Project Structure ```bash mkdir vrf-rps && cd vrf-rps ``` ### Initialize Foundry Project ```bash forge init foundry-project cd foundry-project ``` This creates a Foundry project with the standard layout: * `src/` for contracts * `test/` for tests * `script/` for deployment scripts * `foundry.toml` for configuration ### Initialize Next.js Project Return to the root directory and create the Next.js app: ```bash cd .. bunx create-next-app@latest . --typescript --tailwind --app --no-src-dir ``` Select the following options: * Use recommended Next.js defaults: **No, customize settings** * TypeScript: **Yes** * Linter: **None** * React Compiler: **Yes** * Tailwind CSS: **Yes** * `src/` directory: **No** * App Router: **Yes** * Customize import alias: **No** If you've completed another tutorial, you can select **No, reuse previous settings** to skip configuration. ### Install Dependencies Install the required packages for blockchain interaction and wallet integration: ```bash bun add viem wagmi rise-wallet @tanstack/react-query ``` Package breakdown: * `viem`: Ethereum library for contract interaction * `wagmi`: React hooks for Ethereum * `rise-wallet`: RISE Wallet connector for gasless transactions * `@tanstack/react-query`: Async state management (required by wagmi) ### Install shadcn/ui Initialize shadcn/ui in your project: ```bash npx shadcn@latest init ``` ```bash yarn dlx shadcn@latest init ``` ```bash pnpm dlx shadcn@latest init ``` ```bash bun x shadcn@latest init ``` When prompted, select these options: * Style: **New York** * Base color: **Neutral** * CSS variables: **Yes** Then add the required components: ```bash npx shadcn@latest add button dropdown-menu ``` ```bash yarn dlx shadcn@latest add button dropdown-menu ``` ```bash pnpm dlx shadcn@latest add button dropdown-menu ``` ```bash bun x shadcn@latest add button dropdown-menu ``` This installs the Button and Dropdown Menu components with all necessary dependencies. ### Environment Configuration Create a `.env.local` file in the root directory: ```bash touch .env.local ``` Add your sponsor wallet private key (this account pays for VRF requests): ```bash DEV_PRIVATE_KEY=0x...your_private_key_here ``` **Security**: Never commit `.env.local` to git. Make sure it's in your `.gitignore`. This should be a burner wallet with only testnet funds. ### Update .gitignore Ensure your `.gitignore` includes: ```bash # Environment .env.local # Foundry foundry-project/out foundry-project/cache foundry-project/broadcast ``` ### Project Structure Your project should now look like this: ``` vrf-rps/ ├── foundry-project/ │ ├── src/ │ ├── test/ │ ├── script/ │ └── foundry.toml ├── src/ │ └── app/ │ ├── page.tsx │ ├── layout.tsx │ └── api/ │ └── route.ts (we'll create this) ├── .env.local ├── package.json └── next.config.ts ``` ## Configuration Files ### Wagmi Configuration Create `src/config/wagmi.ts`: ```typescript import { http, createConfig } from 'wagmi' import { Chains, RiseWallet } from "rise-wallet" import { riseWallet } from "rise-wallet/wagmi" // RISE Wallet connector with default config export const rwConnector = riseWallet(RiseWallet.defaultConfig) // Wagmi configuration for RISE Testnet export const config = createConfig({ chains: [Chains.riseTestnet], connectors: [rwConnector], transports: { [Chains.riseTestnet.id]: http("https://testnet.riselabs.xyz") } }) ``` ### Provider Setup Create `src/context/index.tsx`: ```typescript "use client" import { QueryClient, QueryClientProvider } from '@tanstack/react-query' import { WagmiProvider } from 'wagmi' import { config } from '@/config/wagmi' import { ReactNode, useState } from 'react' export function Providers({ children }: { children: ReactNode }) { const [queryClient] = useState(() => new QueryClient()) return ( {children} ) } ``` ### Update Root Layout Modify `src/app/layout.tsx`: ```typescript import type { Metadata } from "next" import { Providers } from "@/context" import "./globals.css" export const metadata: Metadata = { title: "VRF Rock Paper Scissors", description: "Onchain RPS with RISE VRF", } export default function RootLayout({ children, }: { children: React.ReactNode }) { return ( {children} ) } ``` ## Constants Setup Create `src/constants/index.ts` (we'll populate this after deploying the contract): ```typescript // Contract address (update after deployment) export const RPS_ADDRESS = "0x..." as const // Contract ABI (update after compilation) export const ABI = [] as const ``` ## Next Steps Your development environment is ready! Next, we'll write and deploy the smart contract with VRF integration. Make sure you have some testnet ETH in your sponsor wallet address. Get free testnet ETH from [RISE Faucet](https://faucet.testnet.riselabs.xyz). # Smart Contract (/docs/cookbook/vrf-rock-paper-scissors/smart-contract) import { Steps, Step } from 'fumadocs-ui/components/steps'; import { Callout } from 'fumadocs-ui/components/callout'; ## Contract Architecture Our smart contract will: * Accept ticket purchases from players (0.001 ETH per ticket) * Request random numbers from RISE VRF Coordinator * Receive VRF fulfillment with random AI choice * Emit events for the backend to watch * Manage ticket balances and request mappings ## VRF Integration Overview RISE VRF uses a standard consumer pattern: 1. Your contract implements `IVRFConsumer` interface 2. Call `coordinator.requestRandomNumbers()` to request randomness 3. Coordinator calls back your `rawFulfillRandomNumbers()` with results 4. Process the random numbers and emit events ## Writing the Contract ### Create Contract File Navigate to your Foundry project and create the contract: ```bash cd foundry-project ``` Create `src/RockPaperScissors.sol`: ```solidity // SPDX-License-Identifier: MIT pragma solidity ^0.8.30; // RISE VRF Interfaces interface IVRFCoordinator { function requestRandomNumbers( uint32 numNumbers, uint256 seed ) external returns (uint256 requestId); } interface IVRFConsumer { function rawFulfillRandomNumbers( uint256 requestId, uint256[] memory randomNumbers ) external; } contract RockPaperScissors is IVRFConsumer { error NotEnoughEtherSent(); error OnlyCoordinator(); event ChoiceRequested(uint256 indexed requestId, address indexed player); event ChoiceResult(uint256 indexed requestId, uint256 result); uint constant COST_PER_GAME = 0.001 ether; address payable public sponsor; IVRFCoordinator public coordinator; mapping(address => uint256) public ticketBalance; mapping(uint256 => address) public requestToPlayer; modifier onlySponsor() { require(msg.sender == sponsor, "not sponsor"); _; } modifier onlyCoordinator() { if (msg.sender != address(coordinator)) revert OnlyCoordinator(); _; } constructor(address _coordinator, address payable _sponsor) { coordinator = IVRFCoordinator(_coordinator); sponsor = _sponsor; } function buyTickets(uint _numTickets) external payable { if (msg.value < _numTickets * COST_PER_GAME) { revert NotEnoughEtherSent(); } (bool sent, ) = sponsor.call{value: msg.value}(""); require(sent, "failed"); ticketBalance[msg.sender] += _numTickets; } function request(address _player) external onlySponsor { require(ticketBalance[_player] > 0, "No tickets"); // Request random number from RISE VRF (no fees!) uint256 requestId = coordinator.requestRandomNumbers( 1, uint256(keccak256(abi.encode(_player, block.timestamp, block.number))) ); ticketBalance[_player] -= 1; requestToPlayer[requestId] = _player; emit ChoiceRequested(requestId, _player); } function rawFulfillRandomNumbers( uint256 requestId, uint256[] memory randomNumbers ) external override onlyCoordinator { require(randomNumbers.length > 0, "No random numbers"); require(requestToPlayer[requestId] != address(0), "Invalid request"); uint256 result = randomNumbers[0] % 3; // 0=rock, 1=paper, 2=scissors emit ChoiceResult(requestId, result); delete requestToPlayer[requestId]; } receive() external payable {} fallback() external payable {} } ``` ### Understanding the Contract **Constructor Parameters**: * `_coordinator`: RISE VRF Coordinator address (`0x9d57aB4517ba97349551C876a01a7580B1338909` on testnet) * `_sponsor`: Backend wallet that pays for VRF requests **Key Functions**: 1. `buyTickets()`: Players purchase game tickets * Forwards ETH to sponsor (who pays for VRF) * Increments player's ticket balance 2. `request()`: Sponsor initiates VRF request for a player * Only callable by sponsor (backend) * Requests 1 random number from coordinator * Uses unique seed per request * Decrements ticket, stores request mapping * Emits `ChoiceRequested` event 3. `rawFulfillRandomNumbers()`: VRF callback * Only callable by coordinator * Receives random number array * Calculates AI choice: `randomNumbers[0] % 3` * Emits `ChoiceResult` event with 0=rock, 1=paper, 2=scissors * Cleans up request mapping **Events**: * `ChoiceRequested`: Emitted when VRF request is made * `ChoiceResult`: Emitted when VRF delivers random choice ### Compile the Contract ```bash forge build ``` This generates the ABI in `out/RockPaperScissors.sol/RockPaperScissors.json`. ### Deploy to RISE Testnet Create deployment script `script/Deploy.s.sol`: ```solidity // SPDX-License-Identifier: MIT pragma solidity ^0.8.13; import "forge-std/Script.sol"; import "../src/RockPaperScissors.sol"; contract DeployScript is Script { function run() external { uint256 deployerPrivateKey = vm.envUint("PRIVATE_KEY"); address payable sponsor = payable(vm.envAddress("SPONSOR_ADDRESS")); vm.startBroadcast(deployerPrivateKey); // RISE Testnet VRF Coordinator address coordinator = 0x9d57aB4517ba97349551C876a01a7580B1338909; RockPaperScissors rps = new RockPaperScissors(coordinator, sponsor); console.log("RockPaperScissors deployed to:", address(rps)); vm.stopBroadcast(); } } ``` Create `.env` in foundry-project directory: ```bash PRIVATE_KEY=0x...your_deployer_private_key SPONSOR_ADDRESS=0x...your_sponsor_wallet_address ``` Deploy using your private key: ```bash forge script script/Deploy.s.sol:DeployScript \ --rpc-url https://testnet.riselabs.xyz \ --private-key $PRIVATE_KEY \ --broadcast ``` Alternatively, use a keystore for better security: ```bash forge script script/Deploy.s.sol:DeployScript \ --rpc-url https://testnet.riselabs.xyz \ --account \ --broadcast ``` Learn how to create a keystore: [Foundry Keystore Guide](https://book.getfoundry.sh/reference/cast/cast-wallet-import) Save the deployed contract address! ### Extract Contract ABI Copy the ABI from the compiled output: ```bash cat out/RockPaperScissors.sol/RockPaperScissors.json | jq '.abi' > ../src/constants/abi.json ``` Or manually copy the ABI array from `out/RockPaperScissors.sol/RockPaperScissors.json`. ### Update Constants Update `src/constants/index.ts` with your deployed contract address and ABI: ```typescript export const RPS_ADDRESS = "0x5723cA8d0E664D8BFE301aA8b0c7DbBaa43E5806" as const export const ABI = [ { "type": "constructor", "inputs": [ { "name": "_coordinator", "type": "address", "internalType": "address" }, { "name": "_sponsor", "type": "address", "internalType": "address payable" } ], "stateMutability": "nonpayable" }, { "type": "function", "name": "buyTickets", "inputs": [{ "name": "_numTickets", "type": "uint256", "internalType": "uint256" }], "outputs": [], "stateMutability": "payable" }, { "type": "function", "name": "request", "inputs": [{ "name": "_player", "type": "address", "internalType": "address" }], "outputs": [], "stateMutability": "nonpayable" }, { "type": "function", "name": "ticketBalance", "inputs": [{ "name": "", "type": "address", "internalType": "address" }], "outputs": [{ "name": "", "type": "uint256", "internalType": "uint256" }], "stateMutability": "view" }, { "type": "event", "name": "ChoiceRequested", "inputs": [ { "name": "requestId", "type": "uint256", "indexed": true, "internalType": "uint256" }, { "name": "player", "type": "address", "indexed": true, "internalType": "address" } ], "anonymous": false }, { "type": "event", "name": "ChoiceResult", "inputs": [ { "name": "requestId", "type": "uint256", "indexed": true, "internalType": "uint256" }, { "name": "result", "type": "uint256", "indexed": false, "internalType": "uint256" } ], "anonymous": false }, { "type": "error", "name": "NotEnoughEtherSent", "inputs": [] }, { "type": "error", "name": "OnlyCoordinator", "inputs": [] } ] as const ``` Replace with your actual ABI from the compilation output. ## Key VRF Concepts ### Request Seed The seed ensures each VRF request is unique: ```solidity uint256(keccak256(abi.encode(_player, block.timestamp, block.number))) ``` This combines player address, timestamp, and block number for uniqueness. ### Random Number Range VRF returns a `uint256` random number. We mod it to get our choice: ```solidity uint256 result = randomNumbers[0] % 3; // 0, 1, or 2 ``` This maps to rock (0), paper (1), scissors (2). ## Next Steps Your smart contract is deployed and ready! Next, we'll build the backend API that orchestrates VRF requests and watches for events. # Creating Permit Params (/docs/risex/api/creating-permit-params) # Creating Permit Params After registering a signer, you need to create permit params for each API call. Permit params include a signature from your signer that authorizes the transaction. ## Step 1: Encode Contract Data First, encode the contract data according to your operation. There are **3 different encoding methods** depending on the API endpoint: ### Method 1: Place Order Encoding (using `encodePacked`) For **place order** operations, use packed encoding with a specific binary layout (47 bytes total): ```typescript import { encodePacked, type Hex } from 'viem'; // Enum values enum OrderSide { Long = 0, Short = 1, } enum STPMode { ExpireMaker = 0, ExpireTaker = 1, ExpireBoth = 2, } enum OrderType { Market = 0, Limit = 1, } enum TimeInForce { GoodTillCancelled = 0, GoodTillTime = 1, FillOrKill = 2, ImmediateOrCancel = 3, } interface EncodePlaceOrderParams { marketId: string; size: bigint; // uint128 price: bigint; // uint128 side: OrderSide; // 0 = Long/Buy, 1 = Short/Sell stpMode: STPMode; // 0-3 orderType: OrderType; // 0 = Market, 1 = Limit postOnly: boolean; reduceOnly: boolean; timeInForce?: TimeInForce; // Default: GoodTillCancelled (0) expiry: number; // uint32, Unix timestamp } const encodePlaceOrderData = ({ marketId, size, price, side, stpMode, orderType, postOnly, reduceOnly, timeInForce = TimeInForce.GoodTillCancelled, expiry, }: EncodePlaceOrderParams): Hex => { // Pack flags into a single uint8 byte: // bit 0: side (0 = Long/Buy, 1 = Short/Sell) // bit 1: postOnly // bit 2: reduceOnly // bits 3-4: stpMode (2 bits) // bits 5-7: unused let flags = 0; if (side === OrderSide.Short) flags |= 0x01; // bit 0 if (postOnly) flags |= 0x02; // bit 1 if (reduceOnly) flags |= 0x04; // bit 2 flags |= stpMode << 3; // bits 3-4 // Binary layout (47 bytes total): // bytes[0:8] - marketId (uint64, 8 bytes) // bytes[8:24] - size (uint128, 16 bytes) // bytes[24:40] - price (uint128, 16 bytes) // bytes[40] - flags (uint8, 1 byte) // bytes[41] - orderType (uint8, 1 byte) // bytes[42] - timeInForce (uint8, 1 byte) // bytes[43:47] - expiry (uint32, 4 bytes) return encodePacked( ['uint64', 'uint128', 'uint128', 'uint8', 'uint8', 'uint8', 'uint32'], [BigInt(marketId), size, price, flags, orderType, timeInForce, expiry], ); }; // Example usage: const encodedData = encodePlaceOrderData({ marketId: '1', size: BigInt('1000000000000000000'), // 1 token with 18 decimals price: BigInt('2000000000000000000000'), // 2000 with 18 decimals side: OrderSide.Long, stpMode: STPMode.ExpireMaker, orderType: OrderType.Limit, postOnly: false, reduceOnly: false, timeInForce: TimeInForce.GoodTillCancelled, expiry: Math.floor(Date.now() / 1000) + 86400, // 24 hours from now }); ``` ### Method 2: Cancel Order Encoding (using `encodePacked` with manual concatenation) For **cancel order** operations, use packed encoding with manual concatenation for uint192 (since viem doesn't support uint192 directly): ```typescript import { encodePacked, type Hex } from 'viem'; interface EncodeCancelOrderParams { marketId: string; // uint64 orderId: bigint; // uint192 (24 bytes) } const encodeCancelOrderData = ({ marketId, orderId }: EncodeCancelOrderParams): Hex => { // Binary layout (32 bytes total): // bytes[0:8] - marketId (uint64, 8 bytes) // bytes[8:32] - orderId (uint192, 24 bytes) // Encode marketId as uint64 const marketIdBytes = encodePacked(['uint64'], [BigInt(marketId)]); // Convert orderId to 24-byte hex string (uint192) // 24 bytes = 48 hex characters const orderIdHex = orderId.toString(16).padStart(48, '0'); // Concatenate: marketId (8 bytes) + orderId (24 bytes) = 32 bytes // Remove 0x prefix from marketIdBytes and prepend 0x to the final result return `0x${marketIdBytes.slice(2)}${orderIdHex}` as Hex; }; // Example usage: const encodedData = encodeCancelOrderData({ marketId: '1', orderId: BigInt('123456789012345678901234567890123456789012345678'), }); ``` ### Method 3: Other APIs Encoding (using `encodeAbiParameters`) For **all other APIs** (update leverage, update margin mode, update isolated margin, etc.), use ABI encoding which matches Solidity's `abi.encode`: ```typescript import { encodeAbiParameters, type Hex } from 'viem'; // Example 1: Update Leverage interface EncodeUpdateLeverageParams { marketId: string; // uint256 leverage: bigint; // uint128, leverage in wei } const encodeUpdateLeverageData = ({ marketId, leverage }: EncodeUpdateLeverageParams): Hex => { return encodeAbiParameters( [ { name: 'marketId', type: 'uint256' }, { name: 'leverage', type: 'uint128' }, ], [BigInt(marketId), leverage], ); }; // Example 2: Update Margin Mode interface EncodeUpdateMarginModeParams { marketId: string; // uint256 marginMode: number; // uint8 (0 = Cross, 1 = Isolated) } const encodeUpdateMarginModeData = ({ marketId, marginMode }: EncodeUpdateMarginModeParams): Hex => { return encodeAbiParameters( [ { name: 'marketId', type: 'uint256' }, { name: 'marginMode', type: 'uint8' }, ], [BigInt(marketId), marginMode], ); }; // Example 3: Update Isolated Position Margin Balance interface EncodeUpdateIsolatedPositionMarginBalanceParams { marketId: string; // uint256 amount: bigint; // int256 (positive for add, negative for remove) } const encodeUpdateIsolatedPositionMarginBalanceData = ({ marketId, amount, }: EncodeUpdateIsolatedPositionMarginBalanceParams): Hex => { return encodeAbiParameters( [ { name: 'marketId', type: 'uint256' }, { name: 'amount', type: 'int256' }, ], [BigInt(marketId), amount], ); }; // Example usage: const leverageEncoded = encodeUpdateLeverageData({ marketId: '1', leverage: BigInt('10') * BigInt(10**18) }); const marginModeEncoded = encodeUpdateMarginModeData({ marketId: '1', marginMode: 1, // Isolated margin mode }); const isolatedMarginEncoded = encodeUpdateIsolatedPositionMarginBalanceData({ marketId: '1', amount: BigInt('1000000000000000000'), // Add 1 token (positive) // amount: BigInt('-1000000000000000000'), // Remove 1 token (negative) }); ``` ### Summary * **Place Order**: Use `encodePacked` with specific 47-byte layout * **Cancel Order**: Use `encodePacked` with manual concatenation for uint192 * **All Other APIs**: Use `encodeAbiParameters` matching Solidity's `abi.encode(params)` ## Step 2: Sign Encoded Data and Create Permit Params The permit system uses `VerifyWitness` EIP-712 typed data with a bitmap-based nonce for replay protection. ```typescript const createPermitParams = async ( encodedData: Hex, signingKey: `0x${string}`, // The signing key from registerSigner account: `0x${string}`, signerAddress: `0x${string}`, // The signer address from registerSigner authContractAddress: `0x${string}`, nonceAnchor: bigint, // uint48 nonce epoch anchor nonceBitmap: number, // uint8 bit index within nonce bitmap permission: number = 1, // Permission enum: 0=None, 1=All, 2=Perps, 3=Spot, 4=MoveFund ) => { const signerAccount = privateKeyToAccount(signingKey); // Hash the encoded data before signing const messageHash = keccak256(encodedData); // Set deadline (typically 7 days from now, in seconds) const deadline = dayjs().add(7, 'day').unix(); // Sign the hash with signer's private key using EIP-712 const domain = getRISExDomain(authContractAddress); const signature = await signerAccount.signTypedData({ domain: domain as any, types: { VerifyWitness: [ { name: 'account', type: 'address' }, { name: 'hash', type: 'bytes32' }, { name: 'nonceAnchor', type: 'uint48' }, { name: 'nonceBitmap', type: 'uint8' }, { name: 'deadline', type: 'uint32' }, { name: 'permission', type: 'uint8' }, ], }, message: { account, hash: messageHash, nonceAnchor, nonceBitmap, deadline, permission, }, primaryType: 'VerifyWitness', }); return { account: account, signer: signerAddress, deadline: deadline.toString(), signature: signature, nonceAnchor: nonceAnchor.toString(), nonceBitmap: nonceBitmap, }; }; ``` ## Step 3: Use Permit Params in API Calls ```typescript // Example: Place order with permit params const placeOrderWithPermit = async ( orderParams: { market_id: string; size: string; price: string; side: string; stp_mode: string; order_type: string; post_only: boolean; reduce_only: boolean; tif: string; expiry: number; }, signingKey: `0x${string}`, signerAddress: `0x${string}`, account: `0x${string}`, ) => { try { // Step 1: Get contract addresses from system config or check "Contract Address" section const configResponse = await apiClient.get('/v1/system/config'); const perpContractAddress = configResponse.data.addresses_config.perp; const authContractAddress = configResponse.data.addresses_config.auth; // Step 2: Encode order data (implementation depends on your contract ABI) // const encodedData = encodePlaceOrderData(orderParams); // Step 3: Create permit params // const permitParams = await createPermitParams( // encodedData, // signingKey, // account, // signerAddress, // perpContractAddress, // authContractAddress, // ); // Step 4: Make API call with permit params const response = await apiClient.post('/v1/orders/place', { order_params: orderParams, permit_params: { account: account, signer: signerAddress, deadline: dayjs().add(7, 'day').unix().toString(), signature: '0x...', // From createPermitParams nonce: '1234567890', // From createPermitParams }, }); return response.data; } catch (error) { if (axios.isAxiosError(error)) { console.error('Order failed:', error.response?.data?.message || error.message); } else { console.error('Order failed:', error); } throw error; } }; ``` ## Important Notes * **Required for all authenticated calls**: Every API call that modifies state needs permit params * **Unique nonce**: Each permit param must have a unique nonce (use `createClientNonce`) * **Deadline**: Typically set to 7 days from now * **Signature**: Must sign the encoded contract data hash with the signer's private key # Important Notes (/docs/risex/api/important-notes) # Important Notes ## Signer Registration * **One-time setup**: Register signer once per account * **Store securely**: Keep the `signingKey` private and secure - it authorizes all transactions * **Expiration**: Signers expire after the expiration time (typically 7 days) * **Re-registration**: You may need to re-register if the signer expires ## Permit Params * **Required for all authenticated calls**: Every API call that modifies state needs permit params * **Bitmap-based nonces**: Uses `nonceAnchor` (uint48 epoch) and `nonceBitmap` (uint8 bit index) for replay protection, allowing up to 256 concurrent valid nonces per epoch * **Deadline**: Typically set to 7 days from now * **Signature**: Must sign the `VerifyWitness` EIP-712 typed data with the signer's private key * **Permissions**: Signers can have granular permissions (All, Perps, Spot, MoveFund) ## General * All amounts should be in wei format (18 decimals) for blockchain transactions * Timestamps should be Unix timestamps (seconds) * Signature generation follows EIP-712 standard * Deadline should be set appropriately (typically 7 days from now) ## Security Best Practices * Never expose your `signingKey` in client-side code or public repositories * Store signing keys securely (use environment variables or secure storage) * Rotate signing keys periodically * Monitor for unauthorized transactions # Overview (/docs/risex/api) # RISE API Usage Examples This page gets you trading on RISEx in a few lines of TypeScript using the community `risex-client` SDK. For complete API documentation, refer to the [Full API Documentation](https://developer.rise.trade/reference/general-information). ## Base URL ``` https://developer.rise.trade/reference/general-information ``` ## Quickstart The fastest way to get started is with [`risex-client`](https://www.npmjs.com/package/risex-client), a community-maintained TypeScript SDK that handles EIP-712 signing, bitmap nonces, and rate limiting for you. > **Note:** `risex-client` is an **unofficial** community SDK. It is not maintained or endorsed by the RISEx team. For production use, consider integrating against the [Full API](https://developer.rise.trade/reference/general-information) directly. ### Install ```bash npm install risex-client ``` Requires Node.js 18+. ### Get an API signer key 1. Open the [RISEx web app](https://rise.trade) and go to **API** in the header 2. Create a new API Wallet and store the private key 3. Set environment variables: ```bash ACCOUNT_ADDRESS=0x... # your wallet address SIGNER_PRIVATE_KEY=0x... # the API signer private key ``` ### Read-only: fetch markets and orderbook `InfoClient` exposes all public read endpoints — no keys required. ```typescript import { InfoClient } from 'risex-client'; const info = new InfoClient(); const markets = await info.getMarkets(); for (const m of markets) { console.log(`${m.display_name}: ${m.last_price}`); } const book = await info.getOrderbook(1); // BTC-PERP console.log('Best bid:', book.bids[0]?.price); console.log('Best ask:', book.asks[0]?.price); ``` ### Trading: place and close a position `ExchangeClient` is the authenticated client. Always call `await client.init()` before any authenticated method — it fetches the EIP-712 domain and contract addresses from the API. ```typescript import { ExchangeClient } from 'risex-client'; const client = new ExchangeClient({ account: process.env.ACCOUNT_ADDRESS, signerKey: process.env.SIGNER_PRIVATE_KEY, }); await client.init(); // Market buy on ETH-PERP (market_id=2), 1 step = 0.001 ETH const order = await client.marketBuy(2, 1); console.log('Filled:', order.order_id, 'tx:', order.tx_hash); // Inspect the resulting position const pos = await client.info.getPosition(2, client.account); if (pos) { console.log('Position:', pos.size, pos.side === 0 ? 'Long' : 'Short'); } // Close it await client.closePosition(2); ``` Sizes use integer **steps** and prices use integer **ticks** — see `market.config.step_size` and `market.config.step_price` for the conversion factors. ### Streaming: subscribe to orderbook updates ```typescript import { WebSocketClient } from 'risex-client'; const ws = new WebSocketClient(); ws.onChannel('orderbook', (msg) => { const data = msg.data as { bids?: Array<{ price: string; quantity: string }>; asks?: Array<{ price: string; quantity: string }>; }; if (data.bids?.[0]) console.log('Top bid:', data.bids[0].price); if (data.asks?.[0]) console.log('Top ask:', data.asks[0].price); }); await ws.connect(); ws.subscribe({ channel: 'orderbook', market_ids: [1] }); // BTC-PERP ``` Available channels: `orderbook`, `trades`, `orders`, `positions`, `oracle`, `ticker`. ## Full API Documentation For complete API documentation including: * All request/response schemas * Authentication requirements * Rate limits * WebSocket endpoints * Error codes * Link to Full API - [https://developer.rise.trade/reference/general-information](https://developer.rise.trade/reference/general-information) * Link to TS SDK - [https://www.npmjs.com/package/risex-client](https://www.npmjs.com/package/risex-client) # Order Rate Limits (/docs/risex/api/order-rate-limits) To keep the orderbook healthy and prevent spam, every address has a transaction quota that controls how many orders it can place over its lifetime. The system is designed so that real traders almost never hit the limit, while spammy clients get throttled quickly. ## The Basics Every address has two numbers: * **Earned TX** — how many transactions you're allowed to use, total. * **Used TX** — how many you've spent so far. Your remaining headroom is simply `Earned − Used`. As long as headroom is above zero, your orders go through normally. ## How You Earn TX * **Starting buffer**: every new address starts with **10,000 TX** for free. * **Volume unlock**: every **$5 of lifetime traded volume** earns you **+1 TX**, forever. Volume keeps adding to your quota — it's never reset. So a brand-new account can immediately place 10,000 orders. After that, real trading activity continuously expands the limit. ## What Costs TX, and What's Free | Action | Cost | | ----------------- | ---- | | Place order | 1 TX | | Place TP/SL order | 1 TX | | Cancel order | Free | Cancels are intentionally free so traders are never discouraged from cleaning up resting orders. ## Hitting Zero Headroom If `Used ≥ Earned`, you enter a penalty window: only **1 order request per 10 seconds** is allowed until your trading volume earns more headroom. This is a soft throttle, not a ban — you can keep trading, just at a slow pace. The error returned in this state is: ``` tx quota exceeded: rate limited to 1 request per 10 seconds. Trading volume will increase your quota. ``` ## Tracking Your Quota Every successful order response includes two headers so clients can display remaining quota in real time: | Header | Meaning | | --------------------------- | ---------------------------- | | `X-Address-Quota-Earned` | Your current total earned TX | | `X-Address-Quota-Remaining` | How much headroom is left | # Register Signer (/docs/risex/api/register-signer) # Authentication: Register Signer Before making any authenticated API calls, you need to register a signer. The signer is a private key that will be used to sign transactions on behalf of your account. ## Step 1: Generate Signer Key ```typescript // Generate a new private key for the signer const signingKey = generatePrivateKey(); const signerAccount = privateKeyToAccount(signingKey); const signerAddress = signerAccount.address; // This is your signer address ``` ## Step 2: Create Account Signature (User Wallet Signature) The account owner signs a `RegisterSigner` EIP-712 message authorizing the signer. The nonce system uses a bitmap-based approach with `nonceAnchor` (epoch) and `nonceBitmap` (bit index) for replay protection. ```typescript const createAccountSignature = async ( signerAddress: `0x${string}`, nonceAnchor: bigint, // uint48 nonce epoch anchor nonceBitmap: number, // uint8 bit index within nonce bitmap authContractAddress: `0x${string}`, // You'll need a wallet provider (like wagmi, ethers, etc.) signTypedDataAsync: (data: any) => Promise, ) => { const expiration = dayjs().add(7, 'day').unix(); // 7 days from now const registerMessage = { signer: signerAddress, message: 'Please sign in with your wallet to access RISEx.', expiration, nonceAnchor, nonceBitmap, }; const domain = getRISExDomain(authContractAddress); // User signs with their wallet const accountSignature = await signTypedDataAsync({ types: REGISTER_TYPES, message: { signer: registerMessage.signer, message: registerMessage.message, expiration: registerMessage.expiration, nonceAnchor: registerMessage.nonceAnchor, nonceBitmap: registerMessage.nonceBitmap, }, primaryType: 'RegisterSigner', domain: domain as any, }); return { accountSignature, registerMessage, }; }; ``` ## Step 3: Register Signer via API ```typescript const registerSigner = async ( account: `0x${string}`, authContractAddress: `0x${string}`, nonceAnchor: bigint, nonceBitmap: number, signTypedDataAsync: (data: any) => Promise, ) => { try { // Step 1: Generate signer key const signingKey = generatePrivateKey(); const signerAccount = privateKeyToAccount(signingKey); const signerAddress = signerAccount.address; // Step 2: Get user wallet signature const { accountSignature, registerMessage } = await createAccountSignature( signerAddress as `0x${string}`, nonceAnchor, nonceBitmap, authContractAddress, signTypedDataAsync, ); // Step 3: Register via API const response = await apiClient.post('/v1/auth/register-signer', { account: account, signer: registerMessage.signer, message: registerMessage.message, nonce_anchor: nonceAnchor.toString(), nonce_bitmap: nonceBitmap, expiration: registerMessage.expiration.toString(), account_signature: accountSignature, }); if (response.data) { console.log('Signer registered successfully:', { account, signer: signerAddress, signingKey, // Store this securely! expiration: registerMessage.expiration, }); // IMPORTANT: Store signingKey securely for future API calls return { signer: signerAddress, signingKey, // Keep this secret! }; } } catch (error) { if (axios.isAxiosError(error)) { console.error('Failed to register signer:', error.response?.data?.message || error.message); } else { console.error('Failed to register signer:', error); } throw error; } }; ``` ## Important Notes * **One-time setup**: Register signer once per account * **Store securely**: Keep the `signingKey` private and secure - it authorizes all transactions * **Expiration**: Signers expire after the expiration time (typically 7 days) * **Re-registration**: You may need to re-register if the signer expires * **No signer signature required**: Only the account owner's signature is needed to register a signer * **Permissions**: Signers are granted `Permission.All` by default. Use `enablePermission`/`disablePermission` on the authorization contract to manage granular permissions (Perps, Spot, MoveFund) # Deployments (/docs/risex/contracts/deployments) # Mainnet Deployments Contract addresses for RISEx on RISE Mainnet (Chain ID `4153`). | Contract | Address | | -------------------- | ------------------------------------------------------------------------------------------------------------------------------------------------------------------------------------------------------------------------------------------------------- | | AccessManager | [`0x1BEe39C01907E3018b7ec2021Cf73F70541b36cC`](https://explorer.risechain.com/address/0x1BEe39C01907E3018b7ec2021Cf73F70541b36cC) | | AccountRegistry | [`0x1238991Cac4E65902C08213e79909A9c813Eebc3`](https://explorer.risechain.com/address/0x1238991Cac4E65902C08213e79909A9c813Eebc3) | | RISExAuthorization | [`0x0D919DAA3f12AE715744Eb648c00066c5DBd66f0`](https://explorer.risechain.com/address/0x0D919DAA3f12AE715744Eb648c00066c5DBd66f0) | | RISExUniversalRouter | [`0xaaDDE0CeA454F2bcB26F46ED54C5709B7Bb34a7E`](https://explorer.risechain.com/address/0xaaDDE0CeA454F2bcB26F46ED54C5709B7Bb34a7E) | | OrdersManager | [`0xE03C1D5081eb2d0E6bFd62A949C5b12eFa44F2cD`](https://explorer.risechain.com/address/0xE03C1D5081eb2d0E6bFd62A949C5b12eFa44F2cD) | | PerpsManager | [`0x53f10fAcFC8965750494E6965F5d6dA39B41d852`](https://explorer.risechain.com/address/0x53f10fAcFC8965750494E6965F5d6dA39B41d852) | | SpotManager | [`0x1F92be734731e28F52C20AB0BAA73Db7cBf521F8`](https://explorer.risechain.com/address/0x1F92be734731e28F52C20AB0BAA73Db7cBf521F8) | | CollateralManager | [`0x2C03C7d7e2974C6599b6B108879109281ef3F818`](https://explorer.risechain.com/address/0x2C03C7d7e2974C6599b6B108879109281ef3F818) | | TokenManager | [`0x07DCE641354bBbc93C785f86971ad9f78f676Bd5`](https://explorer.risechain.com/address/0x07DCE641354bBbc93C785f86971ad9f78f676Bd5) | | FeeManager | [`0x11541dc387b9C307043ea732127DF92b80bab52b`](https://explorer.risechain.com/address/0x11541dc387b9C307043ea732127DF92b80bab52b) | | FundingRate | [`0x069eDF2C2A3c93b54640Ae142B9f5375fe4A207a`](https://explorer.risechain.com/address/0x069eDF2C2A3c93b54640Ae142B9f5375fe4A207a) | | RISExOracle | [`0x8fC4D0Cf74cdF595254cB763d4C05D38Df0e9503`](https://explorer.risechain.com/address/0x8fC4D0Cf74cdF595254cB763d4C05D38Df0e9503) | | RISExStork | [`0x76A559C716c5B93b9d743e08D9E9f23f96a4f975`](https://explorer.risechain.com/address/0x76A559C716c5B93b9d743e08D9E9f23f96a4f975) | | OperatorHub | [`0xf665AbA90b6ac7515D50b12FCB4f350136726734`](https://explorer.risechain.com/address/0xf665AbA90b6ac7515D50b12FCB4f350136726734) | # Testnet Deployments Contract addresses for RISEx on RISE Testnet. | Contract | Address | | ------------ | -------------------------------------------------------------------------------------------------------------------------------------------------------------------------------------------------------------------------------------------------------------- | | PerpsManager | [`0x68cAcD54a8c93A3186BF50bE6b78B761F728E1b4`](https://explorer.testnet.riselabs.xyz/address/0x68cAcD54a8c93A3186BF50bE6b78B761F728E1b4) | | Auth | [`0x8d8708f9D87ef522c1f99DD579BF6A051e34C28E`](https://explorer.testnet.riselabs.xyz/address/0x8d8708f9D87ef522c1f99DD579BF6A051e34C28E) | | USDC | [`0x8d17fC7Db6b4FCf40AFB296354883DEC95a12f58`](https://explorer.testnet.riselabs.xyz/address/0x8d17fC7Db6b4FCf40AFB296354883DEC95a12f58) | | Oracle | [`0x0C7Be7DfAbBA609A5A215a716aDc4dF089EC3952`](https://explorer.testnet.riselabs.xyz/address/0x0C7Be7DfAbBA609A5A215a716aDc4dF089EC3952) | | Deposit | [`0x5BC20A936EfEE0d758A3c168d2f017c83805B986`](https://explorer.testnet.riselabs.xyz/address/0x5BC20A936EfEE0d758A3c168d2f017c83805B986) | | Multicall3 | [`0xca11bde05977b3631167028862be2a173976ca11`](https://explorer.testnet.riselabs.xyz/address/0xca11bde05977b3631167028862be2a173976ca11) | | Fee Manager | [`0xC96dF9c9CDc9A03A5c69BF291035f8299145c6EC`](https://explorer.testnet.riselabs.xyz/address/0xC96dF9c9CDc9A03A5c69BF291035f8299145c6EC) | # Technical Architecture (/docs/risex/about/Architecture) RISEx is a **fully onchain** perpetuals DEX built on RISE, an optimized L2 which delivers near-instant transactions with 1ms latency, all secured by Ethereum. Compared to other perpetual DEXs that have all their critical functions sitting in a centralized sequencer, RISEx has brought all of this onchain where users can verify all transactions that run through the following on RISEx: * **Clearinghouse** — Manages the health check of every user on the exchange, coordinating the leverage a user can take to when a user gets liquidated * **Orderbook** — Manages the market for the perpetual pair. The orderbook updates \~1ms to ensure the most up-to-date state is always reflected, so traders can run their strategies optimally on RISEx * **Oracle** — Pushed to the exchange every 500ms to reflect the most up-to-date pricing RISEx has built a transparent system where all transactions can be verified onchain while also maintaining the speed needed to operate a high-frequency orderbook-based perpetual trading exchange. *** ## Performance * Orderbook updates states every 1ms * E2E order latency is \~3ms *** ## Security RISEx leverages ETH L1's security. Since all core components of RISEx are fully onchain every match can be verified and secured by the L1. # Overview (/docs/risex/about/overview) RISEx is the unified exchange where the orderbook, margin, yield, and DeFi all exist within a single system. Traders can earn yield while using the same capital as margin, execute multi-step perp strategies atomically, and arbitrage across markets instantly. This creates unique strategies that are impossible on other exchanges. Today, that means institutional-grade crypto perps with flexible collateral and programmable trading accounts. Tomorrow, that means equities, forex, commodities, and any asset with a price feed. *** ## What makes RISEx different? Before RISEx Orderbook DEXs took two approaches, the offchain matching or dual-core execution. Both of these approaches introduce fragmentation between the exchange and the rest of DeFi. RISEx makes no such tradeoff. The orderbook lives onchain and shares state with all of DeFi. Same block. Same transaction. Full atomicity. When you trade on RISEx, your order, your collateral, and every DeFi protocol on RISE exist in a single execution environment with unified liquidity. This isn't just a better exchange. It's programmable market infrastructure. Use any ERC20 as collateral. Build modular sub-accounts that automate strategies or create new order types. Compose across lending markets, vaults, and the orderbook in one transaction. The design space that opens up when execution and liquidity are truly unified. That's what we're building for. We call this Unified Exchange. Leverage anything, trade everything. *** ## Key Features **For users** * **Permissionless Portfolio Margin**: Leverage everything. Use any supported collateral, LP positions, lending deposits, yield-bearing assets—as margin for your trades, with risk calculated across your entire portfolio. * **AutoYield**: Put your idle collateral to work. Earn yield on your collateral while you trade, powered by onchain yield. **For builders** * **Unmatched Performance**: 1ms execution with a target of 50k TPS, powered by RISE's continuous execution pipeline and sub-50ms block times. * **Synchronous Composability**: Orderbooks share state with AMMs, lending markets, and vaults in the same block, unlocking a design space impossible on fragmented venues. * **Modular Sub-accounts**: Programmable trading accounts that anyone can build on. Automate strategies, delegate execution, or create entirely new trading primitives—all permissionlessly. *** ## Core Contributors The RISE/x team has extensive experience in trading and in building high-performing, low-latency systems, which is why the team was able to develop both the execution layer (RISE L2) and the onchain application (RISEx). * **Sam** (CEO and Co-Founder) — Founded RoboVault (50M TVL) and Arkiver (10K users) * **Hai Nguyen** (CTO and Co-Founder) — Founded MELD ($45M raised), where he led 25+ engineers. * **Sasha** (CGO and Co-Founder) — Former head of growth at KyberSwap Other members of the team have worked across JUMP, FalconX, and Coinbase, and also include several math olympiad medalists. *** ## Investors RISE is backed by industry leaders and investors, including Galaxy Digital, Finality Capital, DACM, Vitalik Buterin and more. # Vision (/docs/risex/about/vision) DeFi proved a simple thesis: give developers composable primitives in a shared environment and they'll build a new financial system faster than anyone expects. AMMs, money markets, stablecoins. Each is simple on its own, but combined to create an explosion of innovation. Protocols stacked on protocols. Liquidity flowed permissionlessly. A trillion-dollar ecosystem emerged from a few lines of Solidity. But one primitive has been missing from the stack: **the orderbook**. Orderbooks are how the world trades. They're the foundation of every major exchange, from the NYSE to Binance. Yet on Ethereum, they've remained isolated applications. High-performance but siloed, unable to participate in the composable ecosystem that defines DeFi. **Until now.** *** ## The first real-time EVM perps exchange RISEx is a fully onchain perpetuals exchange where orders, matching, margin, and settlement execute synchronously within the EVM, atomic with the rest of DeFi. No offchain matching engines. No asynchronous bridges. No trust assumptions. This isn't just a faster perp DEX. It's orderbook liquidity as a native primitive on Ethereum. When the orderbook shares state with lending protocols, yield vaults, and structured products, new capabilities become possible: * **Tokenized perpetual positions** as collateral * **Permissionless portfolio margin** with any ERC-20 * **Auto-yield** on idle margin * **Composable hedging strategies** that execute in a single transaction *** ## Built on RISE RISEx is built on RISE, a high-performance Ethereum L2 purpose-built for the demands of real orderbooks. 1ms execution latency. 50K TPS. EigenDA for data availability at 100 MB/s. Settlement secured by Ethereum. RISE brings the orderbook into the EVM as a first-class primitive. Any Solidity contract can read the book, place orders, and settle in the same transaction. The deep liquidity on RISEx is not a walled garden. It's a shared infrastructure that any application on RISE can build on. The same composable environment that made DeFi possible now has the performance to support real markets. That's what RISE was built for. # Bridge (/docs/risex/core/bridge) ## LayerZero Powered Bridge RISEx uses a LayerZero-based mint/burn bridge for cross-chain asset transfers. This enables fast, secure movement of assets from major networks. *** ## Supported Networks * Ethereum * Arbitrum * Base # Oracle (/docs/risex/core/oracle) ## Stork Oracle RISEx uses [Stork](https://stork.network) for price feeds. Stork is a high-frequency oracle network designed for DeFi applications requiring realtime pricing. *** ## Update Frequency Prices are updated **onchain once per second**. This frequency ensures: * Accurate mark prices for margin calculations * Fair liquidation triggers * Reliable funding rate computations *** ## How It Works Stork aggregates prices from multiple sources and publishes them onchain with cryptographic attestations. The oracle network is designed for low-latency delivery, matching the performance requirements of realtime trading. # Overview (/docs/risex/core/overview) ## Powered by RISE Chain RISEx is a fully onchain, EVM-based perpetual futures exchange. Every order, match, and settlement executes within the EVM, no off-chain components. This is possible because RISEx runs on **RISE Chain**, a high-performance EVM Layer 2 purpose-built for realtime applications. *** ## RISE Chain RISE Chain is an optimistic rollup built on the OP Stack with performance optimizations that enable realtime trading: | Specification | Value | | --------------------- | ---------------------------------- | | **Execution** | \~1ms block execution | | **Throughput** | 100,000+ TPS | | **Data Availability** | EigenDA | | **Settlement** | Ethereum L1 | | **Proving** | OP Succinct Lite (ZK fraud proofs) | RISE Chain maintains full EVM compatibility while delivering the performance needed for orderbook trading. Any Ethereum smart contract deploys without modification. *** ## Why This Matters Traditional onchain orderbooks are limited by block times and throughput. By the time your order confirms, the market has moved. RISE Chain eliminates this constraint. Sub-millisecond execution means orders fill at the price you see. High throughput means the orderbook can handle institutional-grade volume. The result: a fully decentralized exchange with CEX-grade performance. *** ## Learn More For detailed technical documentation on RISE Chain architecture, see the [RISE EVM documentation](/docs/rise-evm). # AutoYield (/docs/risex/features/autoyield) import { Callout } from 'fumadocs-ui/components/callout'; **Status:** Coming soon ## How AutoYield Works Your collateral should work for you, even when you're not trading. Most exchanges treat your margin as dead capital. It sits there backing your position, doing nothing. At RISEx, idle collateral is automatically deployed to low-risk DeFi strategies, earning yield while still available for trading. *** ## Key Features ### Automatic No action required. Yield accrues by default. ### No Lock-up Your collateral remains fully available for trading or withdrawal. ### Risk-Managed Only low-risk, battle-tested strategies are used. *** ## How It's Possible AutoYield only works because RISEx is synchronously composable with DeFi. Your collateral can simultaneously: * Back your trading positions * Earn yield in lending protocols * Be withdrawn instantly This is impossible on isolated exchanges. It's native to RISEx. # Permissionless Portfolio Margin (PPM) (/docs/risex/features/portfolio-margin) import { Callout } from 'fumadocs-ui/components/callout'; **Status:** Coming soon ## What is Permissionless Portfolio Margin? Portfolio margin lets you use assets like ETH, wstETH, or any supported ERC20 token as collateral for perps trading. Your spot holdings and perp positions are unified into a single account with one health ratio. Portfolio Margin *** ## Technical Details Portfolio margin is built on [RIP-1: Modular Sub-accounts](/docs/risex/rips/rip-1) and integrates with Morpho Lite for permissionless lending markets. For the full technical specification including architecture, health calculations, and liquidation mechanics, see [RIP-2: Permissionless Portfolio Margin](/docs/risex/rips/rip-2). PPM Architecture *** ## Key Features ### Leverage Any ERC-20 Use any token as collateral for perps trading. As long as there's a Morpho market for it on RISE, you can leverage it. ### Permissionless Collateral Listing New collateral types can be added without governance approval or whitelisting. Anyone can create a Morpho market, and once it meets liquidity thresholds, it becomes available for portfolio margin. The market decides what's valuable collateral. ### Secure by Design Risk is isolated between RISEx and Morpho through composability. The portfolio margin system coordinates between protocols without modifying either one; each maintains its own security model and liquidation logic. # RLP Vault (/docs/risex/features/rlp-vault) import { Callout } from 'fumadocs-ui/components/callout'; ## Overview The RLP (RISE Liquidity Provider) Vault is RISEx's protocol-owned market making vault. It allows anyone to deposit and earn yield from professional market making strategies. RLP is an **ERC-4626 vault**, meaning your vault shares are standard tokens that can be used freely across DeFi as collateral, in yield strategies, or anywhere ERC-20s are accepted. *** ## How It Works 1. **Deposit** USDC into the vault 2. **Receive** vault shares (ERC-4626 standard) 3. **Earn** yield as the vault operates 4. **Withdraw** when ready (subject to withdrawal queue) Your vault shares represent your proportional ownership of the vault's assets and earnings. *** ## Revenue Sources The vault generates returns through multiple strategies: | Source | Description | | ----------------- | --------------------------------------------------------- | | **Market Making** | Providing liquidity on the orderbook across trading pairs | | **Liquidations** | First-look access to liquidation opportunities | Returns are variable based on market conditions and vault performance. *** ## DeFi Composability Because RLP uses the ERC-4626 standard, your vault shares are fully composable: * **Use as collateral** in lending protocols * **Loop your RLP position** to boost yield * **Provide liquidity** in DEX pools * **Integrate into yield strategies** and vaults-of-vaults * **Transfer freely** like any ERC-20 token This is impossible with siloed vault systems. On RISEx, your market making position is a liquid, programmable asset. *** ## Withdrawal Queue Withdrawals are processed through a queue to ensure vault stability. This protects against scenarios where sudden mass withdrawals could force the vault to close positions at unfavorable prices. *** ## Risk Disclosure Vault depositors share in market making risk. The vault may experience losses during: * Extreme market volatility * Adverse price movements # Roadmap (/docs/risex/features/roadmap) RISEx is live on testnet with core trading functionality. * V1: Live on day 1 of private mainnet * V1.1: Upgrade planned shortly after private mainnet launch | Feature | Status | Description | | ------------------------------------------- | ------ | ------------------------------------------- | | **Perpetual Trading** | V1 | Fully onchain perps with orderbook matching | | **Cross Margin** | V1 | Share collateral across all positions | | **Isolated Margin** | V1 | Dedicated margin per position | | **Self-Trade Prevention** | V1 | Prevent wash trading | | **Take Profit / Stop Loss** | V1 | Automated exit orders | | **RLP Vault** | V1 | Liquidity vault for passive yield | | **AutoYield** | V1.1 | Earn yield on idle margin | | **Modular Sub-accounts (RIP-1)** | V1.1 | Programmable trading accounts | | **Permissionless Portfolio Margin (RIP-2)** | V1.1 | Any ERC-20 as collateral via Morpho | | **Spot Markets** | V1.1 | Onchain spot orderbook trading | | **Builder Codes** | V1.1 | Earn fees from directed flow | And more to come. # Eligibility Requirements (/docs/risex/misc/eligibility) To participate in the RISEx Testnet Competition, you must meet these requirements at the time of registration and throughout the entire event: * **If you're joining as an individual:** You must be of legal age in your country of residence and have full legal capacity to accept these Competition Terms and Rules, and to be legally bound by them. * **If you're joining on behalf of an organization:** You must have the proper authority to accept these Terms and Rules for that organization. In this case, "you" refers to the organization. * You must not be a citizen of the United States. * You must not be a citizen of Belarus, Bosnia and Herzegovina, Greece, Kosovo, Latvia, Macedonia, Italy, or Portugal. * You must not be a resident, citizen, or representative of, or organized or incorporated in, and must not have a registered office in, Iran, Cuba, North Korea, Syria, Myanmar (Burma), the Crimea, Donetsk, or Luhansk regions, or any other country or territory subject to comprehensive national or regional economic sanctions imposed by the United States (collectively, "Restricted Territories"). * You must not be listed on any restricted or denied parties list (including, but not limited to, lists maintained by the U.S. Department of the Treasury's Office of Foreign Assets Control) or be subject to any U.S. economic or trade sanctions (collectively, "Sanctioned Persons"). * You must not intend to trade with, or facilitate trading for, any Restricted Person or Sanctioned Person. * You must not, and will not use any VPN, proxy, anonymity tool, or other method to bypass or attempt to bypass any restrictions or geographic blocks applicable to the Services. * Your access to and use of the Services must not violate, or enable any violation of, any applicable law, regulation, or government order (including those enforced by any U.S. or foreign authority with jurisdiction over RISEx, you, the website, or the Services), and must not support or facilitate any illegal activity. * Each onchain wallet address will be associated with only one authorized personal X account and counted once throughout all stages of the Competition. * You must satisfy all additional eligibility requirements specified in the applicable Rules. We reserve the right to restrict or exclude you from any Competition at our sole discretion, including if it would violate applicable laws. Should we find any breach of these Competition Terms, the specific Rules, or our Terms of Use, we may suspend your access to the Services and/or withhold, adjust, or revoke any associated benefits or rewards. # Access (/docs/risex/onboarding/access) Currently, RISEx is in gated mainnet. To access RISEx, you will need an access code from a user currently trading on the platform. # Account Setup (/docs/risex/onboarding/account-setup) To get connected to RISEx you can start trading through an existing DeFi wallet that you own or create an account using your email. 1. Navigate to [https://www.rise.trade/](https://www.rise.trade/) and click on the **Trade Now** button 2. Connect via Google or by connecting an EVM wallet to the exchange: * If you connect via Google, ensure that when you create your wallet, you save your seed phrase 3. Enter your invite code and click Enter 4. Enable trading and change your network to "RISE Network". # Deposits (/docs/risex/onboarding/deposits) Two ways to deposit funds: ## Option 1: Deposit via sending crypto to an address 1. Click on the deposit button in the top right section of the exchange. 2. Select "Send Crypto". 3. Select the chain that you want to send funds from. 4. Click on "Continue". 5. Either scan the QR code or copy the deposit address into your wallet. 6. Deposits may take 3-5 mins to appear in your account. ## Option 2: Deposit directly via a wallet 1. Click on the deposit button in the top right section of the exchange 2. Select "Deposit with Wallet". 3. Select the chain that you want to send funds from. 4. Enter the amount you want to deposit. 5. Click on "Continue". This will prompt a transaction in your wallet. 6. Confirm your transaction. 7. Deposits will take 3-5 mins so please be patient # Support (/docs/risex/onboarding/support) If you run into any issues or have questions about RISEx, the fastest way to get help is through the RISE Discord. ## Open a Support Ticket 1. Join the [RISE Discord](https://discord.gg/risechain) 2. Navigate to the **#support-ticket** channel 3. Click **Create ticket** to open a new support ticket Create a ticket in the #support-ticket channel A team member will respond to your ticket as soon as possible. Tickets are private, only you and the RISEx team can see the conversation. # Withdrawals (/docs/risex/onboarding/withdrawals) Navigate to your portfolio page. 1. Click on "Withdraw". 2. Select the chain. 3. Enter the amount. 4. Click on "Withdraw" to complete the transaction. # Referrals & Affiliates (/docs/risex/referralsandaffiliates/Referrals-Affiliates-Program) ## Invite Code Program RISEx has an invite code program that gives referees 10% of the points generated by their invitees. Invite codes are unlocked based on volume thresholds measured over **weekly epochs** that run from Thursday 5:00 UTC to the following Thursday 4:59:59 UTC. The thresholds below are the **current week's targets** — they are reviewed and may change every week. Volume for the epoch is defined as your total volume + **100%** of your invitee volume: * $600k in volume generates 1 code * $1.5M in volume generates 2 codes * $2.4M in volume generates 3 codes * $4.2M in volume generates 4 codes * $6M in volume generates 5 codes Each account can earn a maximum of **5 codes per week**. Codes are distributed in batches every **Thursday at 6:00 UTC**, immediately after the epoch snapshot. *** ## Affiliate Program The affiliate program is a private program that requires a direct invite from the RISEx team. This program is aimed at RISEx community members who are engaged with the exchange and actively use the product. The affiliate program allows RISEx users to earn points, boosts, and a fee rebate. If you would like to join the affiliate program, please reach out to the team directly. # RISE Improvement Proposals (RIPs) (/docs/risex/rips) RISE Improvement Proposals (RIPs) describe standards and protocol changes for RISE Chain and RISEx. RIPs are the primary mechanism for proposing new features, collecting technical specifications, and documenting design decisions. ## Active Proposals | RIP | Title | Status | | ------------------------------- | ------------------------------- | ------ | | [RIP-1](/docs/risex/rips/rip-1) | Modular Sub-accounts | Draft | | [RIP-2](/docs/risex/rips/rip-2) | Permissionless Portfolio Margin | Draft | # RIP-1: Modular Sub-accounts (/docs/risex/rips/rip-1) import { Callout } from 'fumadocs-ui/components/callout'; **Status:** Draft RIP-1 is an open standard for programmable trading accounts on RISEx. It enables permissionless deployment of modular sub-accounts that add capabilities to RISEx. RIP-1 unlocks custom sub-accounts for portfolio margin, liquidation protection, automated strategies and more. Analogous to what browser extensions enable for browsing. Before extensions, you got what Google shipped. After extensions, anyone could add ad blockers, password managers, dev tools. The browser became a platform. RIP-1 does the same for perps. ## Overview RIP-1 introduces two core primitives: **`BaseSubAccount`**: A contract that handles all standard RISEx interactions (order placement, authorization, deposits/withdrawals) with a consistent owner/manager access control model. Builders inherit this contract and override hooks to implement custom logic. **`SubAccountFactory`**: Deploys sub-accounts via minimal proxies and maintains a registry mapping `user → subAccount[]`. Deployments are deterministic for discoverability. BaseSubAccount abstracts away RISEx interaction complexity, letting builders focus on their specific logic (lending integration, rebalancing, liquidation routing, scoped access control) without reimplementing core trading infrastructure. *** ## Specification ### BaseSubAccount The BaseSubAccount contract implements the following core lifecycle: | Function | Description | | ------------ | ------------------------------------------ | | `deposit` | Transfer collateral into the sub-account | | `withdraw` | Transfer collateral out of the sub-account | | `placeOrder` | Submit orders to RISEx orderbook | | `execute` | Arbitrary execution for custom logic | Access control follows an owner/manager model: * **Owner**: Full control, can withdraw funds and update managers * **Manager**: Can execute trading operations but cannot withdraw Sub-accounts inherit BaseSubAccount and override hooks for custom behavior: health checks before/after operations, custom liquidation conditions, integration with external protocols, and automated rebalancing logic. ### SubAccountFactory The factory contract: * Deploys sub-accounts as minimal proxies (EIP-1167) * Maintains an onchain registry of all sub-accounts per user * Enables deterministic addressing for discoverability * Emits events for all deployments for indexing ### Authorization RIP-1 sub-accounts integrate with RISEx's existing authorization system: * Session keys for gasless trading via API * Operator patterns for delegated execution * `registerSigner` for keeper automation Sub-accounts are fully compatible with the RISEx API. All existing flows (`placeOrderWithPermit`, etc.) work without modification. *** ## Example Use Cases | Sub-account Type | Description | | -------------------------- | --------------------------------------------------------------------------------------- | | **Portfolio Margin** | Cross-collateralization with external money markets (Morpho, Spine) via unified account | | **Liquidation Protection** | Keepers perform automated deleveraging before liquidation | | **Basis Trade Vaults** | Single-user automated strategies with keeper rebalancing | | **Broker Accounts** | Scoped access control for managed trading | *** ## Building a Sub-account 1. Inherit `BaseSubAccount` 2. Override hooks for your custom logic 3. Deploy via `SubAccountFactory` 4. Register with RISEx API (if using session keys) No coordination with core team required. No permission required. ```solidity contract MySubAccount is BaseSubAccount { function _beforeOrder(Order memory order) internal override { // Custom pre-trade logic } function _afterOrder(bytes32 orderId) internal override { // Custom post-trade logic } } ``` *** ## Resources * BaseSubAccount Repository: [github.com/risechain/risex-subaccounts](https://github.com/risechain/risex-subaccounts) * RISEx Authorization Docs: [Authorization](/docs/risex/contracts/contract-interface/authorization) * RISEx API Reference: [API](/docs/risex/api) # RIP-2: Permissionless Portfolio Margin (/docs/risex/rips/rip-2) import { Callout } from 'fumadocs-ui/components/callout'; **Status:** Draft RIP-2 defines portfolio margin for RISEx. With a portfolio margin account, a user's spot collateral and perps positions are unified. Users deposit supported collateral assets (ETH, BTC, LSTs), borrow USDC against them, and trade perps—all from a single account with a unified margin ratio. RIP-2 makes portfolio margin permissionless by integrating with Morpho Lite, which allows open deployment of lending markets and new collateral types. Curators and Protocols can create Morpho markets for new collateral types. Once markets meet security criteria, they are made available on the RISEx UI. Want to trade perps using your favorite LST as collateral? If there's a lending market for it on RISE, you can. *** ## How It Works Once available, portfolio margin will work as follows: 1. **Create a Portfolio Margin account:** From the RISEx interface, create a new Portfolio Margin account 2. **Select a market:** Choose which Morpho market to use based on your preferred collateral type (e.g., ETH/USDC, wstETH/USDC) 3. **Deposit collateral:** Deposit your collateral asset 4. **Trade:** Open perp positions. USDC is automatically borrowed against your collateral to meet margin requirements. Your collateral and perp positions are combined into a single portfolio margin ratio. As long as this ratio stays below the liquidation threshold, your positions remain open. *** ## LTV and Borrowing Under portfolio margin, eligible collateral assets have an **LTV (loan-to-value)** ratio between 0 and 1. When placing perp orders with insufficient USDC balance, the system automatically borrows against your collateral up to: ``` max_borrow = collateral_balance * oracle_price * LTV ``` *** ## Portfolio Margin Ratio Portfolio margin is a generalization of cross margin. Instead of margining perp positions in isolation, all collateral and perp positions are collectively margined together within one account. The portfolio margin ratio determines when liquidation occurs: ``` portfolio_margin_ratio = maintenance_requirement / liquidation_value ``` Where: ``` maintenance_requirement = perp_maintenance_margin + total_borrowed_USDC liquidation_value = perp_account_value + (collateral_value * liquidation_threshold) liquidation_threshold = 0.5 + 0.5 * LTV ``` The account becomes liquidatable when `portfolio_margin_ratio > 0.95`. *** ## Liquidations When the portfolio margin ratio exceeds 0.95, liquidation is triggered. The system will close perp positions and repay borrowed USDC until the ratio returns below the safe threshold. Liquidations are partial—only enough positions are closed to restore account health. Remaining collateral is returned to the user. *** ## How Permissionless Collateral Works Morpho Lite enables permissionless market creation: | Step | What Happens | | ---- | ----------------------------------------------------------- | | 1 | Someone deploys a new Morpho market (e.g., NEW\_TOKEN/USDC) | | 2 | LPs supply USDC liquidity to earn yield | | 3 | Market reaches minimum TVL threshold | | 4 | RISEx UI displays NEW\_TOKEN as a collateral option | | 5 | Traders can now use NEW\_TOKEN for perps margin | No RISEx governance required. No whitelisting. The market decides what's valuable collateral. *** ## Architecture RIP-2 is built as a Modular Sub-account ([RIP-1](/docs/risex/rips/rip-1)). The sub-account coordinates between RISEx and Morpho without modifying either protocol. PPM Architecture The Modular Sub-account sits at the top of the stack, coordinating between two isolated risk engines: * **Morpho-lite** (left): Users lend collateral (ETH, LSTs, etc.) and borrow USDC against it. Curators manage market parameters and risk settings. * **RISEx** (right): Borrowed USDC is deposited as margin for perps trading. Each protocol maintains its own independent risk engine. Liquidations can be triggered at the sub-account level, which then coordinates unwinding positions across both systems. Liquidations occur in a single atomic transaction, this is only possible because both protocols share the same execution environment on RISE. ### Risk Engine Isolation RISEx and the Morpho markets remain decoupled; each protocol's security model is unchanged. *** ## Resources * [RIP-1: Modular Sub-accounts](/docs/risex/rips/rip-1) * Morpho Lite: [docs.morpho.org](https://docs.morpho.org) * RISEx Trading: [Trading](/docs/risex/trading) # XLP Vault (/docs/risex/xlpvault/about) import { Callout } from 'fumadocs-ui/components/callout'; RISEx employs an internal market maker. Capital for this market maker is provided through a community vault, the XLP Vault (Exchange Liquidity Protocol). XLP serves two key functions: * **Provide liquidity** to RISEx's orderbooks: XLP is actively quoting across all markets on RISEx and is the primary market maker for the exchange. * **Liquidation backstop**: 5% of the vault is allocated to takeover unhealthy positions on the exchange, this is penultimate stage in the liquidation flow. *** ## Current Status The XLP vault is live and operating as the primary market maker for RISEx. Public deposits and withdrawals are not yet available. Access will open at a later date. *** ## Withdrawals To give the keeper time to unwind perp positions safely, each strategy enforces a per-epoch cap on outflows. ### How it works * Each strategy can release at most **20% of its assets per day** to withdrawals. * The 20% is shared across all withdrawers, **first-come first-served**. If one large LP withdraws 15% of the strategy in an epoch, only 5% remains for everyone else until the next report. ### Where withdrawals come from, in order 1. **Idle USDC** sitting in the vault (no cap). 2. The **MM strategy**, up to its remaining epoch allowance. 3. The **XLP strategy**, up to its remaining epoch allowance. # XLP Vault Deposits and Withdrawals (/docs/risex/xlpvault/purpose-deposits-withdrawals) The XLP vault is a community market-making vault that serves two main purposes on the RISEx orderbooks: * Provide liquidity to RISEx's orderbooks - the XLP vault is actively quoting across all markets on RISEx. * Provide a backstop for liquidated positions. More info on the risk management positions can be found in the liquidations section *** ## Deposits Deposits into XLP are limited by deposit caps. Caps will increase as the exchange continues to scale in both volume and Open Interest. Deposit cap increases will be announced before caps are lifted. To deposit into the vault please follow these steps: 1. Navigate to [vault.rise.trade](http://vault.rise.trade/) 2. Click on Connect Wallet and choose your wallet provider 3. Enter the amount you want to deposit 4. Click 'Continue' and confirm your transaction. *** ## Withdrawals To ensure that the XLP vault can continue to produce liquidity, RISEx XLP has multiple overlapping safety mechanisms in place to prevent fund loss, so if one fails, another protection mechanism takes effect. The three protection mechanisms include: 1. **Epoch based withdrawals** 1. Every epoch is 24 hours 2. During an epoch, only 20% of the pool (starting assets + any new deposits) can be withdrawn 3. Once the 20% limit is reached, no more withdrawals are allowed until the next epoch resets 2. **Withdrawal buffer** 1. Withdrawals are checked against the margin ratio (free margin / total equity) to ensure that they cannot trigger liquidations on the book 2. If the margin ratio falls below a specific buffer threshold, then withdrawals from RISEx are blocked and only idle USDC in the strategy can be withdrawn # Account Types (/docs/risex/trading/account-types) import { Callout } from 'fumadocs-ui/components/callout'; ## Why We Run Latency Bumps When prices move, takers with faster infra race to pick off stale quotes before makers can cancel. Makers eat the loss, widen spreads, books thin out. By delaying takers, makers are able to pull their orders before being adversally selected. This leads to tighter spreads and better execution for retail and a healthier venue. *** ## Latency Bumps A latency bump is an artificial delay injected after an order or cancel is processed. Takers, makers, and cancels each get their own delay, with takers always delayed longest. | Tier | Taker | Maker | Cancel | | ---------------- | -----: | -----: | -----: | | **API Trader** | 100 ms | 10 ms | 10 ms | | **Click Trader** | 300 ms | 200 ms | 200 ms | *** ## Get API Trader Access New accounts default to the Click Trader tier. To request the API Trader tier, [open a support ticket](/docs/risex/onboarding/support) in the RISE Discord. *** ## Fees Fee schedules are identical across the API Trader and Click Trader tiers. See the [fee schedule](/docs/risex/trading/fees) for current rates. # Builder Codes (/docs/risex/trading/builder-codes) import { Callout } from 'fumadocs-ui/components/callout'; **Status:** Coming soon ## Overview Builder codes allow front-end applications and integrators to earn a share of trading fees from the order flow they direct to RISEx. Similar to referral systems, but designed for builders creating trading interfaces, bots, and aggregators. *** ## How It Works 1. **Register**: as a builder on RISEx contracts 2. **Set your fee**: the additional fee charged on trades using your code 3. **Integrate**: add your builder code to orders via the API 4. **Earn**: fees accumulate onchain and can be claimed anytime Builder fees are charged **in addition to** standard RISEx protocol fees, not subtracted from them. *** ## Getting Started Builder code registration and documentation will be available soon. Contact the team if you're interested in early access. # Fees (/docs/risex/trading/fees) Trading on RISEx follows a fee schedule that looks at a user’s rolling 14-day volume ## Fee Schedule | Tier | 14d Volume Threshold | Taker Fee (bps) | Maker Fee (bps) | | ------ | -------------------- | --------------- | --------------- | | Tier 1 | $0 | 3.00 | 1.00 | | Tier 2 | $5,000,000 | 2.50 | 0.75 | | Tier 3 | $25,000,000 | 2.10 | 0.50 | | Tier 4 | $100,000,000 | 1.70 | 0.25 | | Tier 5 | $500,000,000 | 1.55 | 0.00 | | Tier 6 | $1,000,000,000 | 1.50 | 0.00 | *** ## Maker Rebates Market maker rebate program is coming soon. Please reach out to us directly at [support@riselabs.xyz](mailto:support@riselabs.xyz) to apply. # Funding Payments (/docs/risex/trading/funding) The funding rate is the mechanism that keeps the perpetual contract's price anchored to the underlying spot price. Without funding the perp could diverge indefinitely from spot so the funding rate provides a constant economic incentive to keep this gap close. Some key nuances about our funding rate: * Funding is **peer-to-peer** * Paid every hour but is computed on an 8-hour rate * If contract price > spot: longs pay shorts (positive rate) * If contract price \< spot: shorts pay longs (negative rate) * We add an implicit 0.01% per 8 hours borrow rate in to simulate the cost of carry (borrow usdc to long BTC) * Max funding rate per hour is 4% or 32% per 8 hour period * We use the index price, not the mark price when calculating the notional size The formula is computed on an 8-hour basis, then divided by 8 for each hourly payment: **Funding Rate (F) = Average Premium Index (P) + Interest Rate** *** ## Components of the Rate **Interest rates** * Fixed at 0.01% per 8 hours (0.00125%/hr or \~11.6% APR) and represents the cost to borrow * Embeds cost synthetically where longs pay carry cost so always assuming there is more speculation in the market where traders will borrow to be long **Average Premium Index (P)** * Measures how far the perp is trading from spot * Sampled every **5 seconds**, averaged over the hour * Formula: `Premium = impact_price_difference / oracle_price` **Impact price difference** ``` impact_price_difference = max(impact_bid_px - oracle_px, 0) - max(oracle_px - impact_ask_px, 0) ``` * `impact_bid_px` = average fill price to buy `impact_notional_usd` worth of the asset * `impact_ask_px` = average fill price to sell `impact_notional_usd` worth of the asset * It essentially looks at the average price to buy or sell to determine if the book is trading at a premium or discount when compared to the index price *(what are traders signaling by their positions on the book)* **Calculation of the rate:** ``` Funding Payment = position_size x oracle_price x funding_rate ``` *** ## Example **Scenario: BTC perp trading at a premium where you hold a $50,000 notional long** **Step 1 — Calculate premium:** ``` Premium = ($50,100 - $50,000) / $50,000 = 0.2% ``` **Step 2 — Calculate funding rate (no clamp):** ``` F = Premium + Interest Rate = 0.2% + 0.01% = 0.21% ``` **Step 3 — Calculate hourly payment:** ``` Hourly Rate = 0.21% / 8 = 0.0263% Payment = $50,000 x 0.000263 = -$13.13 ``` One difference RISEx brings to the funding rate is the absence of a clamp, making pricing on RISEx a truer representation of the underlying market. # Liquidations (/docs/risex/trading/liquidations) RISEx constantly computes a health factor for all accounts on the exchange to ensure accounts are not at risk for liquidation. To do this, the risk engine is calculating the Cross Health Factor defined below: ``` Cross Health Factor = Cross Margin Balance / Total Cross MM ``` As the Cross Health Factor approaches 1, the risk of liquidation increases. Traders should constantly be monitoring their Health Factor and top-up margin as their Cross Health Factor approaches 1. *** ## Liquidation Waterfall RISEx follows a four-step liquidation waterfall to protect both the trader and the exchange's solvency. Below is the liquidation flow: ### Stage 1: Pre-liquidation mode **Cross initial margin requirement > Account equity ≥ Cross maintenance margin requirement** In this stage, the user can only perform actions that do not increase the maintenance margin or decrease the account equity. The user should reduce leverage or increase collateral to improve equity. Reduce-only orders are the only orders a user can place to reduce leverage. ### Stage 2: Partial liquidation **Account equity ≤ Maintenance margin** Once the account equity of a trader's account drops below their cross maintenance margin, the account enters into the partial liquidation mode. During partial liquidation, the following takes place in order: 1. Cancel all open orders for the user 2. Start liquidating the users' positions directly onto the book 1. These liquidations are done via IoC orders at the zero price 3. Continue liquidating the positions fully until the trader's account goes above the maintenance margin RISEx takes a 1% fee if the liquidations are executed at a price better than the 0 price. This 1% fee is sent to the XLP vault to help build the insurance fund over time. Orders are sent as IoC orders at the zero price to ensure that the positions account equity to maintenance margin ratio stays the same or improves. The formula for Zero Price is as follows: ``` M_i = 1 / maintenanceMarginFactor_i MMR = Σ(|size_j| × markPrice_j × M_j) (positions only, excluding orders) adjustment = |Cross Margin Balance| / (maintenanceMarginFactor_i × MMR) If long: Cross Zero Price = markPrice × (1 - adjustment) If short: Cross Zero Price = markPrice × (1 + adjustment) If account is bankrupt (Cross Margin Balance < 0): Cross Zero Price = 2 × markPrice - Cross Zero Price (flips the adjustment so RLP receives a favorable price) ``` ### Stage 3: Full liquidation **Account equity ≤ Close out maintenance requirement** Once the account equity drops below the CMR (2/3 × Maintenance Margin), the account enters full liquidation mode, in which XLP takes over the positions. The XLP determines how to offload positions based on the threading strategies it is running. The XLP insurance fund follows a specific set of risk rules to ensure that the insurance fund does not take on too much risk within a certain time period and to ensure 1 pair can't compromise the total pool: | Tier | Max Position | Max Loss | | ------------- | ------------ | ---------------- | | **BTC** | 4.0x | 0.30x (i.e. 30%) | | **ETH** | 3.0x | 0.25x | | **Major** | 1.0x | 0.20x | | **Mid-Cap** | 0.3x | 0.15x | | **Small-Cap** | 0.1x | 0.05x | ``` loss_ratio = trailing_24hr_loss / current_equity max_loss_saturation = min(loss_ratio / max_loss, 1.0) effective_max_position = max_position × (1.0 - max_loss_saturation) ``` * `trailing_24hr_loss`: realized losses absorbed by the LV on this market over the last 24 hours, computed as an EMA. * `current_equity`: current LV TVL, total value locked in the vault. * `max_loss`: per-market daily loss cap as a **fraction of equity** (e.g., 0.3 = 30% of LV TVL). * `max_position`: maximum gross notional the LV may hold on a market at any moment, as a **multiple of equity**. * `effective_max_position`: the live, continuously-updated position ceiling for the market. The effective max position formula creates a smooth, continuous throttle to bring down the total amount the liquidation vault can take based on the trailing 24h loss. ### Stage 4: ADL **XLP free collateral \< Notional liquidated** If the insurance fund cannot take on the position, the ADL process is initiated for the bankrupt position. ADL finds the most leveraged and profitable trade on the other side to make the bankrupt position whole. ``` PnL Percent = (mark_price / entry_price) Effective Leverage = (notional_position / account_value) ADL Score = PnL Percent × Effective Leverage ADL Ranking = rank(user.ADLScore) / TotalUserCount ``` # Maintenance (/docs/risex/trading/maintenance) All scheduled maintenance and live status updates for RISEx are announced in the **RISEx Mainnet Status** Telegram group: [https://t.me/risexmainnet](https://t.me/risexmainnet) We recommend joining the channel if you trade on RISEx — it is the canonical place where maintenance windows, incidents, and recovery updates are posted. ## Behavior During Maintenance While maintenance is in progress, the venue enters **post-only mode**: * New limit orders that rest on the book are accepted. * Orders that would take liquidity (market orders, or limit orders that cross the spread) are rejected. * Cancels remain available so you can manage existing resting orders. Normal trading resumes once maintenance completes and an update is posted to the Telegram channel. # Margin (/docs/risex/trading/margin) RISEx is a natively **cross-margined** venue that unifies margin on your spot and perpetual balances. The exchange is set up so that in the future, you will be able to leverage a host of differentiated assets to gain maximum capital efficiency. Currently, USDC is the primary collateral type, and a user's P\&L also contributes to their margin. RISEx supports two main margin types: ## Margin Types | Type | Description | | ----------------------------------------------- | ------------------------------------------------------------------------------------------------------------------------------------------------------------------------------------------------------------------------------------------------------------------------------------------------------------ | | **Cross margin** | Your total account contributes to margin. Position P\&L + all USDC in your account contribute to equity. | | **Isolated margin** | You can enable Isolated Margin mode to protect your total account against a singular position that you want to take. In isolated margin mode, only the margin you deposit and the unrealized PnL of the position contribute to the health of the position. | | **Permissionless portfolio margin** *(Q2 2026)* | Given RISEx is fully composable with all of RISE we are working on enabling portfolio margining where users can interact with the underlying Borrow-Lend markets on RISE to get leverage on select spot assets. This will also enable native yield on your holdings, so you can earn on idle spot positions. | *** ## Account Balances and Account Health The RISEx risk engine recognizes the following when looking at your account: **Account Equity** Total equity including all unrealized PnL (across both cross and isolated positions). This represents the current value of your account and is used to determine when you should be liquidated. ``` Account Equity = Total Token Balance in USD + Σ(Unsettled USDC for all positions) ``` *** **Cross Initial Margin (IM)** Initial margin is the margin required to open a position. It looks at your **free collateral** to determine if you have enough USDC to place into the position. Cross initial margin is the sum of all initial margins across your positions. Cross-initial margin tells you how much capital you have locked up as margin on current positions and unfilled orders. ``` Initial Margin = (size × markPrice) / leverage Total Cross IM = Σ(IM per cross position) + Σ(IM per unfilled cross order) ``` *** **Cross Maintenance Margin (MM)** Maintenance margin is the required margin needed in your account to keep the position healthy. It is (2/3)\*Initial Margin. Cross maintenance margin is the sum of all maintenance margins across your position. You have to keep your account equity above the cross maintenance margin to avoid partial liquidations *(See Liquidations section)*. ``` Maintenance Margin = 2/3 × Initial Margin Total Cross MM = Σ(MM per cross position) + Σ(MM per unfilled cross order) ``` *** **Close-out Margin Ratio (CMR)** Close-out margin ratio is the required margin needed in your account to avoid full liquidations. The close-out margin is an important metric because it is the level at which your account transitions from partial to full liquidation, at which point you lose all the margin. ``` Total CMR = Total Cross MM × (2/3) ``` *** **Free Cross Margin** The total amount of free margin that can be used on positions. Once your free cross margin hits 0, you can no longer take positions, given you have no more collateral left to use. ``` Free Cross Margin = max(Cross Margin Balance - Total Cross IM, 0) ``` *** **Withdrawable Amount** The withdrawable amount is the total amount a user can withdraw from the exchange. The withdrawable amount is the minimum of your cross balance and your free cross margin, ensuring you always have enough margin to cover your positions. > **Note:** RISEx does not allow for withdrawal of uPnL. ``` Cross Balance of Token = Total Token Balance in USD - Total Isolated Margin Usage Withdrawable = max(min(Cross Balance of Token, Free Cross Margin), 0) ``` *** ## Self-Trade Prevention RISEx also implements self-trade prevention to block the matching of two opposite orders from the same trading account. If two orders from the same account are attempted to be matched, then the maker order will be canceled, and the taker order will hit the next Bid/Ask on the book. # Margining (/docs/risex/trading/margining) ## Margin Modes RISEx supports both **isolated margin** and **cross margin** modes, giving you flexibility in how you manage risk across positions. *** ## Cross Margin In cross margin mode, your entire account balance is shared across all open positions. ### How it works * All positions share the same collateral pool * Profits from one position can offset losses in another * Higher capital efficiency for multi-position strategies * Liquidation affects your entire account *** ## Isolated Margin In isolated margin mode, each position has its own dedicated collateral that's separate from your other positions. ### How it works * Each position has its own margin allocation * Losses are limited to the margin assigned to that position * Other positions are unaffected if one gets liquidated * Lower capital efficiency but better risk isolation *** ## Margin Requirements ### Initial Margin The minimum collateral required to open a position. Calculated as: ``` Initial Margin = Position Size × Entry Price × (1 / Leverage) ``` ### Maintenance Margin The minimum collateral required to keep a position open. When your margin balance falls below maintenance margin, liquidation begins. ``` Maintenance Margin = Position Size × Mark Price × Maintenance Margin Rate ``` *** ## Switching Modes You can switch between isolated and cross margin per position. Note that switching modes requires you to close any open position or limit order. # Market Specifications (/docs/risex/trading/markets) RISEx currently supports the following perpetual markets. We will continue to add more markets based on demand. These new markets will range across crypto, equities, indices, FX and commodities. | # | Market | Max Leverage | IMR | MMR | CMR | Step Size | Step Price | Max OI | | - | --------- | ------------ | ----- | ------ | ----- | ------------ | ---------- | ------ | | 1 | BTC/USDC | 25× | 4% | 2.66% | 1.77% | 0.000001 BTC | $0.1 | $50M | | 2 | ETH/USDC | 25× | 4% | 2.66% | 1.77% | 0.001 ETH | $0.01 | $30M | | 3 | BNB/USDC | 20× | 5% | 3.33% | 2.22% | 0.001 BNB | $0.01 | $10M | | 4 | SOL/USDC | 20× | 5% | 3.33% | 2.22% | 0.001 SOL | $0.001 | $10M | | 5 | HYPE/USDC | 20× | 5% | 3.33% | 2.22% | 0.01 HYPE | $0.001 | $10M | | 6 | XRP/USDC | 10× | 10% | 6.66% | 4.44% | 0.1 XRP | $0.00001 | $2M | | 7 | TAO/USDC | 3× | 33.3% | 22.22% | 14.8% | 0.001 TAO | $0.01 | $1M | | 8 | ZEC/USDC | 3× | 33.3% | 22.22% | 14.8% | 0.001 ZEC | $0.01 | $1M | # Oracle Pricing (/docs/risex/trading/oracle-pricing) RISEx works directly with [Stork](https://docs.stork.network/), an independent oracle provider, to pull in its index prices. The following external / calculated prices are used when keeping the exchange functional: * **Index price:** The index price is used in the funding rate and mark price formulas. The index price is pulled directly from Stork and is the median of the spot price across multiple CEX providers * **Mark price:** The mark price is the median of three price calculations *(see calcs below)*. The mark price is used to determine the users uPnL and is also the price used in determining whether a user should be liquidated. *** ## Mark Price Calculation Methodology The mark price is determined by taking the median of three different prices: **Mark = Median(P1, P2, P3)** ### P1 — Index-anchored premium Look at the premium or discount our book is trading at against the index. ``` Impact Notional = 500 USDC / Initial Margin Fraction Impact Bid = avg fill price for market sell of Impact Notional Impact Ask = avg fill price for market buy of Impact Notional Impact Price = (Impact Bid + Impact Ask) / 2 P1 = Index + EMA_8min(clamp(ImpactPrice - Index, -Index/200, +Index/200)) where clamp(x, a, b) = max(a, min(b, x)) ``` ### P2 — Raw book signal Average execution cost across both sides of the book. ``` Impact Notional Amount = 500 USDC / Initial Margin Fraction Impact Bid Price = avg execution price for market sell of impact notional Impact Ask Price = avg execution price for market buy of impact notional P2 = (Impact Bid Price + Impact Ask Price) / 2 ``` ### P3 — External anchor Mark price from an external provider (Stork). ``` P3 = Median(CEX mark prices) ``` All oracle prices are pushed directly and can be verified on RISE chain. # Order Types (/docs/risex/trading/order-types) The two main order types are Maker and Taker: * **Maker orders**: These orders are placed on the book and provide liquidity, indicating that a trader is willing to transact at this price. They provide the "inventory" for the book, allowing other traders to come buy this inventory (Inventory here is the contract to long or short this asset) * **Taker orders**: These are orders that look to remove that inventory from the book. Taker orders signify that the trader wants liquidity now and is more price-insensitive. *** ## Order Types | Order Type | Description | | ---------------- | ------------------------------------------------------------------------------------------------------------------------------------------------------------------------------------------------------------------------------------------------------------------------------- | | **Maker orders** | These orders are placed on the book and provide liquidity meaning there is a trader willing to transact at this price. They provide the "inventory" for the book allowing other traders to come buy this inventory (Inventory here is the contract to long or short this asset) | | **Limit orders** | These are orders that look to remove that inventory off the book. Taker orders signify that the trader wants liquidity now and is more price insensitive. | *** ## Order Conditions | Order Condition | Description | | --------------------------- | ----------------------------------------------------------------------------------------------------------------------------------------------------------------------------------------------------------------------------------------------------------------------------------------------------------------------------------------------------------------------------------------------------------------------------------------------------------------------------------------------------------------------------------------------------------------------------------------------------------------------------------------------------------------------------------------------------------------------------------------------------------------------------------------------------------------------------------------------------------------------------------------------------------------------------------------------------------------------------------------------------------------------------------------------------------------------------------------------------------------------------------------------------------------------------------------- | | **Post only** | Order that is posted to the book and cannot match immediately. If a post-only order crosses the spread than it is cancelled | | **Reduce only** | Order that is sent to reduce a current position. If a reduce only order flips the bias of the trader (long to short) than the order will be rejected | | **Time-in-force** | RISEx supports multiple TIF orders:

**IOC (Immediate or Cancel)**: Any portion of the order that can fill immediately against resting liquidity is executed. Unfilled remainder is cancelled and doesn't rest on the book. This is non-resting and is a one-shot attempt to fill.

**GTC (Good Till Cancelled)**: Order sits on the book indefinitely until it is fully matched or there is a direct cancellation instruction. If the limit order is marketable (can be filled immediately) it will fill as much as it can and the rest remains on the book sitting as inventory.

**GTT (Good Till Time)**: Order sits on the book until user-defined expiry hits. If it doesn't match or if it only partially matches then the order is taken off the book. It is like GTC but with a user defined expiry.

**FOK (Fill or Kill)**: Entire order has to fill immediately in a single execution or the entire order is rejected and partial fills are impossible. If the book doesn't have the depth to fill then the order (at or below the limit price for limit orders, or at any price for market order) is cancelled and does not execute. | | **Take Profit / Stop Loss** | TP/SL is a conditional order triggered when the mark price reaches levels specified by the trader. These orders can be configured to fully or partially exit a position but will never change your bias.

Traders can set partial or full TP/SL positions:

**Full TP/SL**: You can only set this at once at a specific level.

**Partial TP/SL**: You can set multiple partial TP/SL orders. | # Self-Trade Prevention (/docs/risex/trading/self-trade-prevention) ## Overview RISEx implements self-trade prevention (STP) to ensure that a single account cannot match orders with itself. This prevents wash trading and maintains market integrity. *** ## How It Works When you submit an order, the matching engine checks if any resting orders on the opposite side belong to the same account. If a potential self-match is detected, the system prevents the trade from executing. *** # Take Profit / Stop Loss (/docs/risex/trading/tpsl) ## Overview Take Profit (TP) and Stop Loss (SL) orders let you automate position exits at predefined price levels. Set your risk and reward targets when entering a position, then let the system manage exits. *** ## Take Profit (TP) Automatically close your position when price reaches your profit target. ### For Long Positions * Triggers when mark price rises **above** your TP price * Closes position by selling at market ### For Short Positions * Triggers when mark price falls **below** your TP price * Closes position by buying at market *** ## Stop Loss (SL) Automatically close your position to limit losses when price moves against you. ### For Long Positions * Triggers when mark price falls **below** your SL price * Closes position by selling at market ### For Short Positions * Triggers when mark price rises **above** your SL price * Closes position by buying at market *** ## Setting TP/SL You can set TP/SL orders: 1. **When opening a position**: Set TP/SL as part of your entry order 2. **On existing positions**: Add TP/SL to positions you already hold 3. **Modify anytime**: Update TP/SL levels while the position is open *** ## Execution TP/SL orders execute as **market orders** when triggered. This ensures execution but may result in slippage during volatile conditions. *** ## Partial TP/SL You can set TP/SL for a portion of your position: * Take partial profits at multiple levels * Scale out of positions gradually * Keep exposure while locking in gains *** ## Important Considerations ### Trigger Price TP/SL orders trigger based on the **mark price**, not the last traded price. This prevents manipulation via single trades. ### Cancellation TP/SL orders are automatically cancelled when: * The associated position is fully closed * You manually cancel them * The position is liquidated # Get Started with Ethers.js (/docs/builders/frontend/ethers/get-started) Learn how to set up and configure Ethers.js for building on RISE. ## Installation Install Ethers.js v6 using your preferred package manager: ```bash npm install ethers ``` ## Project Setup Create a new project: ```bash mkdir my-rise-ethers-project cd my-rise-ethers-project npm init -y npm install ethers dotenv ``` ## Connect to RISE ### Using JsonRpcProvider Connect to RISE Testnet: ```javascript import { ethers } from 'ethers'; const provider = new ethers.JsonRpcProvider('https://testnet.riselabs.xyz'); // Get network info const network = await provider.getNetwork(); console.log('Connected to:', network.name); console.log('Chain ID:', network.chainId); // Get latest block const blockNumber = await provider.getBlockNumber(); console.log('Latest block:', blockNumber); ``` ### Create a Wallet Create a wallet from a private key: ```javascript import { ethers } from 'ethers'; const provider = new ethers.JsonRpcProvider('https://testnet.riselabs.xyz'); // From private key const wallet = new ethers.Wallet( 'YOUR_PRIVATE_KEY', provider ); console.log('Address:', wallet.address); // Get balance const balance = await provider.getBalance(wallet.address); console.log('Balance:', ethers.formatEther(balance), 'ETH'); ``` ### Generate New Wallet Create a new random wallet: ```javascript // Generate new wallet const newWallet = ethers.Wallet.createRandom(); console.log('Address:', newWallet.address); console.log('Private Key:', newWallet.privateKey); console.log('Mnemonic:', newWallet.mnemonic.phrase); // Connect to provider const connectedWallet = newWallet.connect(provider); ``` ### From Mnemonic Restore wallet from mnemonic phrase: ```javascript const mnemonic = 'your twelve word mnemonic phrase here ...'; const wallet = ethers.Wallet.fromPhrase(mnemonic, provider); console.log('Address:', wallet.address); ``` ## Environment Variables Create a `.env` file: ```bash PRIVATE_KEY=0x... RPC_URL=https://testnet.riselabs.xyz ``` Load and use environment variables: ```javascript import { ethers } from 'ethers'; import { config } from 'dotenv'; config(); const provider = new ethers.JsonRpcProvider(process.env.RPC_URL); const wallet = new ethers.Wallet(process.env.PRIVATE_KEY, provider); console.log('Connected as:', wallet.address); ``` ## Network Configuration Create a config file for RISE network: ```javascript // config.js export const RISE_TESTNET = { chainId: 11155931, name: 'RISE Testnet', rpcUrl: 'https://testnet.riselabs.xyz', explorer: 'https://explorer.testnet.riselabs.xyz', symbol: 'ETH', decimals: 18 }; export function getProvider() { return new ethers.JsonRpcProvider(RISE_TESTNET.rpcUrl); } export function getWallet(privateKey) { const provider = getProvider(); return new ethers.Wallet(privateKey, provider); } ``` Usage: ```javascript import { getProvider, getWallet } from './config.js'; const provider = getProvider(); const wallet = getWallet(process.env.PRIVATE_KEY); ``` ## Basic Operations ### Check Account Balance ```javascript const address = '0x...'; const balance = await provider.getBalance(address); console.log('Balance (wei):', balance.toString()); console.log('Balance (ETH):', ethers.formatEther(balance)); ``` ### Get Transaction Count (Nonce) ```javascript const nonce = await provider.getTransactionCount(wallet.address); console.log('Transaction count:', nonce); ``` ### Get Gas Price ```javascript const feeData = await provider.getFeeData(); console.log('Gas Price:', ethers.formatUnits(feeData.gasPrice, 'gwei'), 'Gwei'); console.log('Max Fee:', ethers.formatUnits(feeData.maxFeePerGas, 'gwei'), 'Gwei'); console.log('Max Priority Fee:', ethers.formatUnits(feeData.maxPriorityFeePerGas, 'gwei'), 'Gwei'); ``` ### Send ETH ```javascript const tx = await wallet.sendTransaction({ to: '0x...', value: ethers.parseEther('0.1') // 0.1 ETH }); console.log('Transaction hash:', tx.hash); // Wait for confirmation const receipt = await tx.wait(); console.log('Transaction confirmed in block:', receipt.blockNumber); ``` ## Example: Complete Setup ```javascript // index.js import { ethers } from 'ethers'; import { config } from 'dotenv'; config(); // Setup const provider = new ethers.JsonRpcProvider('https://testnet.riselabs.xyz'); const wallet = new ethers.Wallet(process.env.PRIVATE_KEY, provider); async function main() { // Network info const network = await provider.getNetwork(); console.log('Network:', network.name); console.log('Chain ID:', network.chainId.toString()); // Account info console.log('\nAccount:', wallet.address); const balance = await provider.getBalance(wallet.address); console.log('Balance:', ethers.formatEther(balance), 'ETH'); const nonce = await provider.getTransactionCount(wallet.address); console.log('Nonce:', nonce); // Block info const blockNumber = await provider.getBlockNumber(); console.log('\nLatest block:', blockNumber); const block = await provider.getBlock('latest'); console.log('Block timestamp:', new Date(block.timestamp * 1000).toISOString()); // Gas info const feeData = await provider.getFeeData(); console.log('\nGas Price:', ethers.formatUnits(feeData.gasPrice, 'gwei'), 'Gwei'); } main().catch(console.error); ``` Run the script: ```bash node index.js ``` ## Next Steps * [Reading from Contracts](/docs/builders/ethers/reading) - Query contract data * [Writing to Contracts](/docs/builders/ethers/writing) - Send transactions and interact with contracts # Ethers.js (/docs/builders/frontend/ethers) Ethers.js is a complete and compact library for interacting with the Ethereum blockchain and its ecosystem. It's widely used and battle-tested. ## Why Ethers.js? * **Complete**: Full-featured library with everything you need * **Well-documented**: Extensive documentation and examples * **Stable**: Mature and battle-tested in production * **Popular**: Large community and ecosystem support * **Easy to learn**: Intuitive API design ## Quick Start ```bash npm install ethers ``` ## Basic Setup ```javascript import { ethers } from 'ethers'; // Connect to RISE Testnet const provider = new ethers.JsonRpcProvider('https://testnet.riselabs.xyz'); // Get the latest block number const blockNumber = await provider.getBlockNumber(); console.log('Current block:', blockNumber); // Create a wallet const wallet = new ethers.Wallet(privateKey, provider); console.log('Wallet address:', wallet.address); // Get balance const balance = await provider.getBalance(wallet.address); console.log('Balance:', ethers.formatEther(balance), 'ETH'); ``` ## Network Configuration ```javascript const RISE_TESTNET = { chainId: 11155931, name: 'RISE Testnet', rpcUrl: 'https://testnet.riselabs.xyz', explorer: 'https://explorer.testnet.riselabs.xyz' }; ``` ## Next Steps } title="Get Started" href="/docs/builders/ethers/get-started" description="Set up your first Ethers.js project" /> } title="Read Contracts" href="/docs/builders/ethers/reading" description="Query blockchain data and contract state" /> } title="Write Contracts" href="/docs/builders/ethers/writing" description="Send transactions and interact with contracts" /> ## Resources * [Official Ethers.js Documentation](https://docs.ethers.org) * [Ethers.js GitHub](https://github.com/ethers-io/ethers.js) * [Migration Guide (v5 to v6)](https://docs.ethers.org/v6/migrating/) # Reading Contract Data (/docs/builders/frontend/ethers/reading) Learn how to read data from smart contracts on RISE using Ethers.js. ## Setup Create a provider and contract instance: ```javascript import { ethers } from 'ethers'; const provider = new ethers.JsonRpcProvider('https://testnet.riselabs.xyz'); const contractAddress = '0x...'; const abi = [ /* contract ABI */ ]; const contract = new ethers.Contract(contractAddress, abi, provider); ``` ## Read Contract Data Call view/pure functions: ```javascript // Simple read const value = await contract.getValue(); console.log('Value:', value.toString()); // Read with arguments const balance = await contract.balanceOf('0x...'); console.log('Balance:', ethers.formatEther(balance)); ``` ## ERC-20 Token Example Read ERC-20 token information: ```javascript const tokenAddress = '0x...'; const abi = [ 'function name() view returns (string)', 'function symbol() view returns (string)', 'function decimals() view returns (uint8)', 'function totalSupply() view returns (uint256)', 'function balanceOf(address) view returns (uint256)' ]; const token = new ethers.Contract(tokenAddress, abi, provider); // Get token info const name = await token.name(); const symbol = await token.symbol(); const decimals = await token.decimals(); const totalSupply = await token.totalSupply(); console.log('Token:', name); console.log('Symbol:', symbol); console.log('Decimals:', decimals); console.log('Total Supply:', ethers.formatUnits(totalSupply, decimals)); // Check balance const userAddress = '0x...'; const balance = await token.balanceOf(userAddress); console.log('Balance:', ethers.formatUnits(balance, decimals), symbol); ``` ## Get Contract Events Query past events: ```javascript // Get Transfer events const filter = contract.filters.Transfer(); const events = await contract.queryFilter(filter, 0, 'latest'); console.log('Transfer events:', events.length); events.forEach(event => { console.log({ from: event.args.from, to: event.args.to, value: ethers.formatEther(event.args.value), blockNumber: event.blockNumber, transactionHash: event.transactionHash }); }); ``` ### Filter Events by Parameters ```javascript // Get transfers TO a specific address const toFilter = contract.filters.Transfer(null, '0x...'); const toEvents = await contract.queryFilter(toFilter); // Get transfers FROM a specific address const fromFilter = contract.filters.Transfer('0x...', null); const fromEvents = await contract.queryFilter(fromFilter); // Get specific block range const recentEvents = await contract.queryFilter( contract.filters.Transfer(), -1000, // 1000 blocks ago 'latest' ); ``` ## Listen to Events Subscribe to realtime events: ```javascript // Listen to Transfer events contract.on('Transfer', (from, to, value, event) => { console.log('Transfer detected:'); console.log('From:', from); console.log('To:', to); console.log('Value:', ethers.formatEther(value)); console.log('Block:', event.log.blockNumber); }); // Listen once contract.once('Transfer', (from, to, value) => { console.log('First transfer:', ethers.formatEther(value)); }); // Stop listening contract.removeAllListeners('Transfer'); ``` ## Get Block Data ```javascript // Get latest block const blockNumber = await provider.getBlockNumber(); console.log('Latest block:', blockNumber); // Get block details const block = await provider.getBlock(blockNumber); console.log('Block:', { number: block.number, hash: block.hash, timestamp: block.timestamp, transactions: block.transactions.length, gasUsed: block.gasUsed.toString() }); // Get block with full transactions const blockWithTxs = await provider.getBlock(blockNumber, true); console.log('Transactions:', blockWithTxs.prefetchedTransactions); ``` ## Get Transaction Data ```javascript const txHash = '0x...'; // Get transaction const tx = await provider.getTransaction(txHash); console.log('Transaction:', { from: tx.from, to: tx.to, value: ethers.formatEther(tx.value), gasLimit: tx.gasLimit.toString(), gasPrice: ethers.formatUnits(tx.gasPrice, 'gwei') + ' Gwei', nonce: tx.nonce }); // Get transaction receipt const receipt = await provider.getTransactionReceipt(txHash); console.log('Receipt:', { status: receipt.status, // 1 = success, 0 = failed blockNumber: receipt.blockNumber, gasUsed: receipt.gasUsed.toString(), contractAddress: receipt.contractAddress, // if contract deployment logs: receipt.logs.length }); ``` ## Parse Transaction Logs Decode logs from a transaction: ```javascript const receipt = await provider.getTransactionReceipt(txHash); // Parse logs with contract interface const iface = new ethers.Interface(abi); receipt.logs.forEach(log => { try { const parsedLog = iface.parseLog(log); console.log('Event:', parsedLog.name); console.log('Args:', parsedLog.args); } catch (e) { // Log doesn't match ABI } }); ``` ## Estimate Gas Estimate gas for a function call: ```javascript const gasEstimate = await contract.transfer.estimateGas('0x...', ethers.parseEther('1')); console.log('Estimated gas:', gasEstimate.toString()); // With specific transaction parameters const gasWithParams = await contract.transfer.estimateGas( '0x...', ethers.parseEther('1'), { from: wallet.address } ); ``` ## Static Call (Simulate) Simulate a transaction without sending it: ```javascript // Will revert if the transaction would fail const result = await contract.transfer.staticCall('0x...', ethers.parseEther('1')); console.log('Simulation result:', result); // Useful for functions that return values const mintResult = await contract.mint.staticCall(1000); console.log('Would mint:', mintResult.toString(), 'tokens'); ``` ## Call with Overrides Override transaction parameters for a call: ```javascript const balance = await contract.balanceOf('0x...', { blockTag: 1000000 // Query at specific block }); const historicalBalance = await contract.balanceOf('0x...', { blockTag: 'earliest' // Or 'latest', 'pending' }); ``` ## Example: Complete Token Info ```javascript import { ethers } from 'ethers'; const provider = new ethers.JsonRpcProvider('https://testnet.riselabs.xyz'); const tokenAddress = '0x8a93d247134d91e0de6f96547cb0204e5be8e5d8'; // USDC const abi = [ 'function name() view returns (string)', 'function symbol() view returns (string)', 'function decimals() view returns (uint8)', 'function totalSupply() view returns (uint256)', 'function balanceOf(address) view returns (uint256)', 'event Transfer(address indexed from, address indexed to, uint256 value)' ]; const token = new ethers.Contract(tokenAddress, abi, provider); async function getTokenInfo() { // Get basic info const [name, symbol, decimals, totalSupply] = await Promise.all([ token.name(), token.symbol(), token.decimals(), token.totalSupply() ]); console.log('Token Information:'); console.log('Name:', name); console.log('Symbol:', symbol); console.log('Decimals:', decimals); console.log('Total Supply:', ethers.formatUnits(totalSupply, decimals)); // Get recent transfers const transferFilter = token.filters.Transfer(); const recentTransfers = await token.queryFilter(transferFilter, -1000, 'latest'); console.log('\nRecent Transfers:', recentTransfers.length); // Show last 5 transfers recentTransfers.slice(-5).forEach(event => { console.log({ from: event.args.from, to: event.args.to, value: ethers.formatUnits(event.args.value, decimals), block: event.blockNumber }); }); } getTokenInfo().catch(console.error); ``` ## Next Steps * [Writing to Contracts](/docs/builders/ethers/writing) - Send transactions and modify state * [Contract Addresses](/docs/builders/contract-addresses) - Find deployed contract addresses * [Testnet Tokens](/docs/builders/testnet-tokens) - Get testnet tokens for testing # Writing to Contracts (/docs/builders/frontend/ethers/writing) Learn how to send transactions and write to smart contracts on RISE using Ethers.js. ## Setup Signer Create a wallet to sign transactions: ```javascript import { ethers } from 'ethers'; const provider = new ethers.JsonRpcProvider('https://testnet.riselabs.xyz'); const wallet = new ethers.Wallet('YOUR_PRIVATE_KEY', provider); console.log('Signing transactions as:', wallet.address); ``` ## Send ETH Transfer ETH to another address: ```javascript const tx = await wallet.sendTransaction({ to: '0x...', value: ethers.parseEther('0.1') // 0.1 ETH }); console.log('Transaction hash:', tx.hash); // Wait for confirmation const receipt = await tx.wait(); console.log('Transaction confirmed in block:', receipt.blockNumber); console.log('Gas used:', receipt.gasUsed.toString()); ``` ## Write to Contract Call a contract function that modifies state: ```javascript const contractAddress = '0x...'; const abi = [ 'function transfer(address to, uint256 amount) returns (bool)' ]; const contract = new ethers.Contract(contractAddress, abi, wallet); // Send transaction const tx = await contract.transfer('0x...', ethers.parseEther('10')); console.log('Transaction hash:', tx.hash); // Wait for confirmation const receipt = await tx.wait(); console.log('Transaction confirmed!'); console.log('Status:', receipt.status === 1 ? 'Success' : 'Failed'); ``` ## Deploy Contract Deploy a new smart contract: ```javascript const abi = [ /* contract ABI */ ]; const bytecode = '0x...'; // Contract bytecode // Create contract factory const ContractFactory = new ethers.ContractFactory(abi, bytecode, wallet); // Deploy contract const contract = await ContractFactory.deploy( // constructor arguments 'My Token', 'MTK', 18 ); console.log('Deploying contract...'); console.log('Transaction hash:', contract.deploymentTransaction().hash); // Wait for deployment await contract.waitForDeployment(); const address = await contract.getAddress(); console.log('Contract deployed at:', address); ``` ## Wait for Confirmations Wait for multiple confirmations: ```javascript const tx = await contract.transfer('0x...', ethers.parseEther('10')); console.log('Transaction sent:', tx.hash); // Wait for 1 confirmation (default) const receipt1 = await tx.wait(); console.log('1 confirmation'); // Wait for 3 confirmations const receipt3 = await tx.wait(3); console.log('3 confirmations'); ``` ## Set Gas Parameters Control gas settings: ```javascript // Estimate gas first const gasEstimate = await contract.transfer.estimateGas( '0x...', ethers.parseEther('10') ); console.log('Estimated gas:', gasEstimate.toString()); // Send with gas limit const tx = await contract.transfer( '0x...', ethers.parseEther('10'), { gasLimit: gasEstimate * 120n / 100n // Add 20% buffer } ); ``` ### EIP-1559 Transactions ```javascript const feeData = await provider.getFeeData(); const tx = await contract.transfer( '0x...', ethers.parseEther('10'), { maxFeePerGas: feeData.maxFeePerGas, maxPriorityFeePerGas: feeData.maxPriorityFeePerGas } ); ``` ## Sign Messages Sign a message with your private key: ```javascript const message = 'Hello RISE!'; const signature = await wallet.signMessage(message); console.log('Signature:', signature); // Verify signature const recoveredAddress = ethers.verifyMessage(message, signature); console.log('Signer:', recoveredAddress); console.log('Valid:', recoveredAddress === wallet.address); ``` ## Sign Typed Data (EIP-712) Sign structured data: ```javascript const domain = { name: 'My Dapp', version: '1', chainId: 11155931, verifyingContract: '0x...' }; const types = { Mail: [ { name: 'from', type: 'address' }, { name: 'to', type: 'address' }, { name: 'contents', type: 'string' } ] }; const value = { from: wallet.address, to: '0x...', contents: 'Hello!' }; const signature = await wallet.signTypedData(domain, types, value); console.log('Signature:', signature); ``` ## Handle Transaction Errors Properly handle errors: ```javascript try { const tx = await contract.transfer('0x...', ethers.parseEther('10')); const receipt = await tx.wait(); if (receipt.status === 0) { console.log('Transaction failed'); } else { console.log('Transaction successful'); } } catch (error) { if (error.code === 'INSUFFICIENT_FUNDS') { console.error('Not enough funds'); } else if (error.code === 'UNPREDICTABLE_GAS_LIMIT') { console.error('Transaction will likely fail'); } else if (error.code === 'NONCE_EXPIRED') { console.error('Nonce already used'); } else { console.error('Transaction failed:', error.message); } } ``` ## Cancel/Replace Transaction Replace a pending transaction: ```javascript // Send initial transaction const tx = await wallet.sendTransaction({ to: '0x...', value: ethers.parseEther('0.1') }); console.log('Transaction sent:', tx.hash); // Replace with higher gas price (same nonce) const nonce = await provider.getTransactionCount(wallet.address, 'pending'); const feeData = await provider.getFeeData(); const replacementTx = await wallet.sendTransaction({ to: '0x...', value: ethers.parseEther('0.1'), nonce: tx.nonce, maxFeePerGas: feeData.maxFeePerGas * 2n, // Double the fee maxPriorityFeePerGas: feeData.maxPriorityFeePerGas * 2n }); console.log('Replacement transaction:', replacementTx.hash); ``` ## Batch Transactions Send multiple transactions: ```javascript const recipients = ['0x...', '0x...', '0x...']; const amount = ethers.parseEther('0.1'); const transactions = await Promise.all( recipients.map(async (recipient, i) => { const nonce = await provider.getTransactionCount(wallet.address, 'latest') + i; return wallet.sendTransaction({ to: recipient, value: amount, nonce }); }) ); console.log('Transactions sent:', transactions.map(tx => tx.hash)); // Wait for all confirmations const receipts = await Promise.all(transactions.map(tx => tx.wait())); console.log('All transactions confirmed'); ``` ## Example: ERC-20 Token Operations ```javascript import { ethers } from 'ethers'; const provider = new ethers.JsonRpcProvider('https://testnet.riselabs.xyz'); const wallet = new ethers.Wallet(process.env.PRIVATE_KEY, provider); const tokenAddress = '0x8a93d247134d91e0de6f96547cb0204e5be8e5d8'; // USDC const abi = [ 'function transfer(address to, uint256 amount) returns (bool)', 'function approve(address spender, uint256 amount) returns (bool)', 'function transferFrom(address from, address to, uint256 amount) returns (bool)', 'function balanceOf(address) view returns (uint256)', 'function allowance(address owner, address spender) view returns (uint256)' ]; const token = new ethers.Contract(tokenAddress, abi, wallet); async function tokenOperations() { const recipient = '0x...'; const amount = ethers.parseUnits('10', 6); // 10 USDC (6 decimals) // Check balance const balance = await token.balanceOf(wallet.address); console.log('Balance:', ethers.formatUnits(balance, 6), 'USDC'); if (balance < amount) { console.error('Insufficient balance'); return; } // Transfer tokens console.log('Transferring 10 USDC...'); const transferTx = await token.transfer(recipient, amount); console.log('Transaction hash:', transferTx.hash); const transferReceipt = await transferTx.wait(); console.log('Transfer confirmed in block:', transferReceipt.blockNumber); // Approve spending const spender = '0x...'; console.log('Approving spender...'); const approveTx = await token.approve(spender, amount); await approveTx.wait(); console.log('Approval confirmed'); // Check allowance const allowance = await token.allowance(wallet.address, spender); console.log('Allowance:', ethers.formatUnits(allowance, 6), 'USDC'); } tokenOperations().catch(console.error); ``` ## Example: Contract Deployment ```javascript import { ethers } from 'ethers'; const provider = new ethers.JsonRpcProvider('https://testnet.riselabs.xyz'); const wallet = new ethers.Wallet(process.env.PRIVATE_KEY, provider); // Simple ERC20 contract const abi = [ 'constructor(string name, string symbol, uint256 initialSupply)', 'function name() view returns (string)', 'function symbol() view returns (string)', 'function totalSupply() view returns (uint256)', 'function balanceOf(address) view returns (uint256)', 'function transfer(address to, uint256 amount) returns (bool)' ]; const bytecode = '0x...'; // Your compiled bytecode async function deployToken() { console.log('Deploying from:', wallet.address); // Get balance const balance = await provider.getBalance(wallet.address); console.log('Balance:', ethers.formatEther(balance), 'ETH'); // Create factory const factory = new ethers.ContractFactory(abi, bytecode, wallet); // Deploy console.log('Deploying token...'); const token = await factory.deploy( 'My Token', 'MTK', ethers.parseEther('1000000') // 1 million tokens ); console.log('Deployment transaction:', token.deploymentTransaction().hash); // Wait for deployment await token.waitForDeployment(); const address = await token.getAddress(); console.log('Token deployed at:', address); console.log('Explorer:', `https://explorer.testnet.riselabs.xyz/address/${address}`); // Verify deployment const name = await token.name(); const symbol = await token.symbol(); const totalSupply = await token.totalSupply(); console.log('\nToken Info:'); console.log('Name:', name); console.log('Symbol:', symbol); console.log('Total Supply:', ethers.formatEther(totalSupply)); } deployToken().catch(console.error); ``` ## Next Steps * [Contract Addresses](/docs/builders/contract-addresses) - Find deployed contract addresses on RISE * [Testnet Tokens](/docs/builders/testnet-tokens) - Get testnet tokens for testing * [Testnet Details](/docs/builders/testnet-details) - RISE network configuration # Get Started with Viem (/docs/builders/frontend/viem/get-started) Learn how to set up and configure Viem for building on RISE. ## Installation Install Viem using your preferred package manager: ```bash npm install viem ``` ## Project Setup Create a new TypeScript project: ```bash mkdir my-rise-viem-project cd my-rise-viem-project npm init -y npm install --save-dev typescript @types/node npx tsc --init ``` ## Import RISE Testnet RISE Testnet is available in Viem's built-in chains: ```typescript import { riseTestnet } from 'viem/chains' ``` That's it! No need to manually configure the chain. ## Create Clients ### Public Client (Read-only) For reading blockchain data: ```typescript import { createPublicClient, http } from 'viem' import { riseTestnet } from 'viem/chains' const publicClient = createPublicClient({ chain: riseTestnet, transport: http() }) // Get block number const blockNumber = await publicClient.getBlockNumber() console.log('Block number:', blockNumber) // Get account balance const balance = await publicClient.getBalance({ address: '0x...' }) console.log('Balance:', balance) ``` ### Wallet Client (Read & Write) For sending transactions: ```typescript import { createWalletClient, http } from 'viem' import { privateKeyToAccount } from 'viem/accounts' import { riseTestnet } from 'viem/chains' const account = privateKeyToAccount('0xYOUR_PRIVATE_KEY') const walletClient = createWalletClient({ account, chain: riseTestnet, transport: http() }) // Send a transaction const hash = await walletClient.sendTransaction({ to: '0x...', value: 1000000000000000000n // 1 ETH }) console.log('Transaction hash:', hash) ``` ## Environment Variables Create a `.env` file for sensitive data: ```bash PRIVATE_KEY=0x... RPC_URL=https://testnet.riselabs.xyz ``` Load environment variables: ```typescript import { config } from 'dotenv' config() const account = privateKeyToAccount(process.env.PRIVATE_KEY as `0x${string}`) ``` ## Example: Complete Setup ```typescript // index.ts import { createPublicClient, createWalletClient, http } from 'viem' import { privateKeyToAccount } from 'viem/accounts' import { riseTestnet } from 'viem/chains' // Initialize clients const publicClient = createPublicClient({ chain: riseTestnet, transport: http() }) const account = privateKeyToAccount(process.env.PRIVATE_KEY as `0x${string}`) const walletClient = createWalletClient({ account, chain: riseTestnet, transport: http() }) // Get account info const address = account.address const balance = await publicClient.getBalance({ address }) const blockNumber = await publicClient.getBlockNumber() console.log('Address:', address) console.log('Balance:', balance) console.log('Latest block:', blockNumber) ``` ## Next Steps * [Reading from Contracts](/docs/builders/viem/reading) - Query contract data * [Writing to Contracts](/docs/builders/viem/writing) - Send transactions and interact with contracts # Viem (/docs/builders/frontend/viem) Viem is a TypeScript interface for Ethereum that provides low-level stateless primitives for interacting with Ethereum. It's lightweight, modular, and type-safe. ## Why Viem? * **Type-safe**: First-class TypeScript support with inferred types * **Lightweight**: Tree-shakeable with minimal dependencies * **Fast**: Optimized for performance * **Modular**: Only import what you need * **Modern**: Built with latest JavaScript features ## Quick Start ```bash npm install viem ``` ## Basic Setup ```typescript import { createPublicClient, http } from 'viem' import { riseTestnet } from 'viem/chains' // Create a public client const client = createPublicClient({ chain: riseTestnet, transport: http() }) // Get the latest block number const blockNumber = await client.getBlockNumber() console.log('Current block:', blockNumber) ``` ## Next Steps } title="Get Started" href="/docs/builders/frontend/viem/get-started" description="Set up your first Viem project" /> } title="Read Contracts" href="/docs/builders/frontend/viem/reading" description="Query blockchain data and contract state" /> } title="Write Contracts" href="/docs/builders/frontend/viem/writing" description="Send transactions and interact with contracts" /> ## Resources * [Official Viem Documentation](https://viem.sh) * [Viem GitHub](https://github.com/wevm/viem) * [TypeScript Support](https://viem.sh/docs/typescript) # Reading Contract Data (/docs/builders/frontend/viem/reading) Learn how to read data from smart contracts on RISE using Viem. ## Setup First, create a public client: ```typescript import { createPublicClient, http } from 'viem' import { riseTestnet } from './config' const client = createPublicClient({ chain: riseTestnet, transport: http() }) ``` ## Read Contract Use `readContract` to call view/pure functions: ```typescript const result = await client.readContract({ address: '0x...', abi: [ { name: 'balanceOf', type: 'function', stateMutability: 'view', inputs: [{ name: 'owner', type: 'address' }], outputs: [{ type: 'uint256' }], }, ], functionName: 'balanceOf', args: ['0x...'] }) console.log('Balance:', result) ``` ## Multiple Reads (Multicall) Batch multiple contract reads efficiently: ```typescript import { parseAbi } from 'viem' const abi = parseAbi([ 'function name() view returns (string)', 'function symbol() view returns (string)', 'function totalSupply() view returns (uint256)', ]) const results = await client.multicall({ contracts: [ { address: '0x...', abi, functionName: 'name', }, { address: '0x...', abi, functionName: 'symbol', }, { address: '0x...', abi, functionName: 'totalSupply', }, ], }) console.log('Name:', results[0].result) console.log('Symbol:', results[1].result) console.log('Total Supply:', results[2].result) ``` ## Get Contract Events Query past events from a contract: ```typescript import { parseAbiItem } from 'viem' const logs = await client.getLogs({ address: '0x...', event: parseAbiItem('event Transfer(address indexed from, address indexed to, uint256 value)'), fromBlock: 0n, toBlock: 'latest' }) console.log('Transfer events:', logs) ``` ## Watch Contract Events Subscribe to realtime contract events: ```typescript const unwatch = client.watchContractEvent({ address: '0x...', abi: parseAbi(['event Transfer(address indexed from, address indexed to, uint256 value)']), eventName: 'Transfer', onLogs: logs => { logs.forEach(log => { console.log('Transfer:', { from: log.args.from, to: log.args.to, value: log.args.value }) }) } }) // Stop watching // unwatch() ``` ## Get Block Information ```typescript // Get latest block const block = await client.getBlock() console.log('Latest block:', block.number) // Get specific block const specificBlock = await client.getBlock({ blockNumber: 1000000n }) // Get block with transactions const blockWithTxs = await client.getBlock({ blockNumber: 1000000n, includeTransactions: true }) ``` ## Get Transaction Data ```typescript // Get transaction by hash const transaction = await client.getTransaction({ hash: '0x...' }) console.log('Transaction:', transaction) // Get transaction receipt const receipt = await client.getTransactionReceipt({ hash: '0x...' }) console.log('Receipt:', receipt) console.log('Status:', receipt.status) // 'success' or 'reverted' ``` ## Estimate Gas Estimate gas for a contract call: ```typescript const gasEstimate = await client.estimateContractGas({ address: '0x...', abi: parseAbi(['function mint(address to, uint256 amount)']), functionName: 'mint', args: ['0x...', 1000000000000000000n], account: '0x...' }) console.log('Estimated gas:', gasEstimate) ``` ## Example: ERC-20 Token Info ```typescript import { parseAbi, formatUnits } from 'viem' const tokenAddress = '0x...' const userAddress = '0x...' const abi = parseAbi([ 'function name() view returns (string)', 'function symbol() view returns (string)', 'function decimals() view returns (uint8)', 'function totalSupply() view returns (uint256)', 'function balanceOf(address) view returns (uint256)', ]) // Batch read all token info const [name, symbol, decimals, totalSupply, balance] = await Promise.all([ client.readContract({ address: tokenAddress, abi, functionName: 'name', }), client.readContract({ address: tokenAddress, abi, functionName: 'symbol', }), client.readContract({ address: tokenAddress, abi, functionName: 'decimals', }), client.readContract({ address: tokenAddress, abi, functionName: 'totalSupply', }), client.readContract({ address: tokenAddress, abi, functionName: 'balanceOf', args: [userAddress], }), ]) console.log({ name, symbol, decimals, totalSupply: formatUnits(totalSupply, decimals), balance: formatUnits(balance, decimals) }) ``` ## Next Steps * [Writing to Contracts](/docs/builders/viem/writing) - Send transactions and modify state * [Contract Addresses](/docs/builders/contract-addresses) - Find deployed contract addresses # Writing to Contracts (/docs/builders/frontend/viem/writing) Learn how to send transactions and write to smart contracts on RISE using Viem. ## Setup Wallet Client Create a wallet client with your account: ```typescript import { createWalletClient, http } from 'viem' import { privateKeyToAccount } from 'viem/accounts' import { riseTestnet } from './config' const account = privateKeyToAccount('0xYOUR_PRIVATE_KEY') const walletClient = createWalletClient({ account, chain: riseTestnet, transport: http() }) ``` ## Send ETH Transfer ETH to another address: ```typescript const hash = await walletClient.sendTransaction({ to: '0x...', value: 1000000000000000000n, // 1 ETH in wei }) console.log('Transaction hash:', hash) ``` ## Write to Contract Call a contract function that modifies state: ```typescript import { parseAbi } from 'viem' const abi = parseAbi([ 'function transfer(address to, uint256 amount) returns (bool)', ]) const hash = await walletClient.writeContract({ address: '0x...', // Contract address abi, functionName: 'transfer', args: ['0x...', 1000000000000000000n], // recipient, amount }) console.log('Transaction hash:', hash) ``` ## Wait for Transaction Wait for transaction confirmation: ```typescript import { createPublicClient, http } from 'viem' const publicClient = createPublicClient({ chain: riseTestnet, transport: http() }) // Send transaction const hash = await walletClient.writeContract({ address: '0x...', abi, functionName: 'mint', args: [1000n], }) // Wait for confirmation const receipt = await publicClient.waitForTransactionReceipt({ hash }) console.log('Transaction confirmed!') console.log('Block number:', receipt.blockNumber) console.log('Gas used:', receipt.gasUsed) console.log('Status:', receipt.status) // 'success' or 'reverted' ``` ## Deploy Contract Deploy a new smart contract: ```typescript import { parseAbi } from 'viem' const abi = parseAbi([ 'constructor(string name, string symbol)', ]) const bytecode = '0x...' // Contract bytecode const hash = await walletClient.deployContract({ abi, bytecode, args: ['My Token', 'MTK'], }) // Get deployed contract address const receipt = await publicClient.waitForTransactionReceipt({ hash }) console.log('Contract deployed at:', receipt.contractAddress) ``` ## Sign Messages Sign a message with your private key: ```typescript const signature = await walletClient.signMessage({ message: 'Hello RISE!', }) console.log('Signature:', signature) ``` ## Sign Typed Data (EIP-712) Sign structured data: ```typescript const signature = await walletClient.signTypedData({ domain: { name: 'My Dapp', version: '1', chainId: 11155931, verifyingContract: '0x...', }, types: { Mail: [ { name: 'from', type: 'address' }, { name: 'to', type: 'address' }, { name: 'contents', type: 'string' }, ], }, primaryType: 'Mail', message: { from: '0x...', to: '0x...', contents: 'Hello!', }, }) console.log('Signature:', signature) ``` ## Gas Estimation & Control ### Estimate Gas ```typescript const gas = await publicClient.estimateContractGas({ address: '0x...', abi, functionName: 'transfer', args: ['0x...', 1000n], account, }) console.log('Estimated gas:', gas) ``` ### Set Gas Parameters ```typescript const hash = await walletClient.writeContract({ address: '0x...', abi, functionName: 'transfer', args: ['0x...', 1000n], gas: 100000n, // Gas limit }) ``` ## Error Handling Handle transaction errors: ```typescript try { const hash = await walletClient.writeContract({ address: '0x...', abi, functionName: 'transfer', args: ['0x...', 1000n], }) const receipt = await publicClient.waitForTransactionReceipt({ hash }) if (receipt.status === 'success') { console.log('Transaction successful!') } else { console.log('Transaction reverted') } } catch (error) { if (error.name === 'ContractFunctionExecutionError') { console.error('Contract execution failed:', error.message) } else if (error.name === 'InsufficientFundsError') { console.error('Insufficient funds') } else { console.error('Transaction failed:', error) } } ``` ## Simulate Transaction Test a transaction before sending: ```typescript const { result } = await publicClient.simulateContract({ address: '0x...', abi, functionName: 'transfer', args: ['0x...', 1000n], account, }) console.log('Simulation result:', result) // If simulation succeeds, send the transaction const hash = await walletClient.writeContract({ address: '0x...', abi, functionName: 'transfer', args: ['0x...', 1000n], }) ``` ## Example: Complete ERC-20 Transfer ```typescript import { createPublicClient, createWalletClient, http, parseAbi, formatUnits } from 'viem' import { privateKeyToAccount } from 'viem/accounts' import { riseTestnet } from './config' // Setup const account = privateKeyToAccount(process.env.PRIVATE_KEY as `0x${string}`) const publicClient = createPublicClient({ chain: riseTestnet, transport: http(), }) const walletClient = createWalletClient({ account, chain: riseTestnet, transport: http(), }) const tokenAddress = '0x...' const recipientAddress = '0x...' const amount = 1000000000000000000n // 1 token (18 decimals) const abi = parseAbi([ 'function transfer(address to, uint256 amount) returns (bool)', 'function balanceOf(address) view returns (uint256)', ]) // Check balance before const balanceBefore = await publicClient.readContract({ address: tokenAddress, abi, functionName: 'balanceOf', args: [account.address], }) console.log('Balance before:', formatUnits(balanceBefore, 18)) // Send transfer const hash = await walletClient.writeContract({ address: tokenAddress, abi, functionName: 'transfer', args: [recipientAddress, amount], }) console.log('Transaction hash:', hash) // Wait for confirmation const receipt = await publicClient.waitForTransactionReceipt({ hash }) console.log('Transaction confirmed in block:', receipt.blockNumber) // Check balance after const balanceAfter = await publicClient.readContract({ address: tokenAddress, abi, functionName: 'balanceOf', args: [account.address], }) console.log('Balance after:', formatUnits(balanceAfter, 18)) ``` ## Next Steps * [Contract Addresses](/docs/builders/contract-addresses) - Find deployed contract addresses on RISE * [Testnet Tokens](/docs/builders/testnet-tokens) - Get testnet tokens for testing # Compiling Contracts (/docs/builders/smart-contracts/hardhat/compiling) import { Step, Steps } from 'fumadocs-ui/components/steps'; import { Tab, Tabs } from 'fumadocs-ui/components/tabs'; Compile your Solidity contracts to bytecode and ABI for deployment on RISE. ## Configuration Ensure your `hardhat.config.ts` has the Solidity compiler configured: ```typescript title="hardhat.config.ts" import "dotenv/config"; import { defineConfig } from "hardhat/config"; import hardhatToolboxMochaEthers from "@nomicfoundation/hardhat-toolbox-mocha-ethers"; export default defineConfig({ plugins: [hardhatToolboxMochaEthers], solidity: { version: "0.8.30", settings: { optimizer: { enabled: true, runs: 200 } } }, networks: { rise: { type: "http", url: process.env.RISE_RPC_URL || "https://testnet.riselabs.xyz", accounts: process.env.PRIVATE_KEY ? [process.env.PRIVATE_KEY] : [], chainId: 11155931 } } }); ``` ## Compile ### Run Build Compile all contracts in the `contracts/` directory: ```bash npx hardhat build ``` ```bash yarn hardhat build ``` ```bash pnpm exec hardhat build ``` ```bash bun x hardhat build ``` ### Check Artifacts Compilation generates artifacts in the `artifacts/` directory containing: * Contract ABI * Bytecode * Source maps for debugging The compiled JSON files can be found at: ``` artifacts/contracts/YourContract.sol/YourContract.json ``` ## Multiple Compiler Versions If you have contracts requiring different Solidity versions: ```typescript title="hardhat.config.ts" export default defineConfig({ solidity: { compilers: [ { version: "0.8.30" }, { version: "0.7.6" } ] } }); ``` ## Clean and Recompile To force a fresh compilation: ```bash npx hardhat clean npx hardhat build ``` ```bash yarn hardhat clean yarn hardhat build ``` ```bash pnpm exec hardhat clean pnpm exec hardhat build ``` ```bash bun x hardhat clean bun x hardhat build ``` ## Next Steps # Deploying Contracts (/docs/builders/smart-contracts/hardhat/deploying) import { Step, Steps } from 'fumadocs-ui/components/steps'; import { Tab, Tabs } from 'fumadocs-ui/components/tabs'; Deploy your compiled smart contracts to the RISE Testnet using Hardhat Ignition, our official deployment plugin. ## Prerequisites * Hardhat project configured for RISE (see [Get Started](/docs/builders/smart-contracts/hardhat/get-started)) * Testnet ETH from the [RISE Faucet](https://faucet.testnet.riselabs.xyz/) * Private key configured with Configuration Variables ## Deploy with Hardhat Ignition ### Write a Deployment Module Hardhat Ignition uses modules to describe deployments. Create `ignition/modules/Counter.ts`: ```typescript title="ignition/modules/Counter.ts" import { buildModule } from "@nomicfoundation/hardhat-ignition/modules"; export default buildModule("CounterModule", (m) => { const counter = m.contract("Counter"); return { counter }; }); ``` This module deploys an instance of the `Counter` contract. You can also call functions after deployment: ```typescript title="ignition/modules/Counter.ts" import { buildModule } from "@nomicfoundation/hardhat-ignition/modules"; export default buildModule("CounterModule", (m) => { const counter = m.contract("Counter"); // Call a function after deployment m.call(counter, "setNumber", [42n]); return { counter }; }); ``` ### Test Your Module Locally Before deploying to a live network, test the module locally: ```bash npx hardhat ignition deploy ignition/modules/Counter.ts ``` ```bash yarn hardhat ignition deploy ignition/modules/Counter.ts ``` ```bash pnpm exec hardhat ignition deploy ignition/modules/Counter.ts ``` ```bash bun x hardhat ignition deploy ignition/modules/Counter.ts ``` This simulates the deployment in a local network to verify everything works. ### Deploy to RISE Testnet Deploy your contract to RISE: ```bash npx hardhat ignition deploy ignition/modules/Counter.ts --network riseTestnet ``` ```bash yarn hardhat ignition deploy ignition/modules/Counter.ts --network riseTestnet ``` ```bash pnpm exec hardhat ignition deploy ignition/modules/Counter.ts --network riseTestnet ``` ```bash bun x hardhat ignition deploy ignition/modules/Counter.ts --network riseTestnet ``` You'll see output indicating successful deployment with the contract address. Ignition remembers deployment state. If you run the same deployment again, nothing will happen because the module was already executed. ### View on Explorer View your deployed contract on the [RISE Testnet Explorer](https://explorer.testnet.riselabs.xyz) by searching for the contract address from the deployment output. ## Deploy with Constructor Arguments If your contract has constructor parameters: ```typescript title="ignition/modules/Counter.ts" import { buildModule } from "@nomicfoundation/hardhat-ignition/modules"; export default buildModule("CounterModule", (m) => { const initialValue = m.getParameter("initialValue", 42n); const counter = m.contract("Counter", [initialValue]); return { counter }; }); ``` Deploy with parameters: ```bash npx hardhat ignition deploy ignition/modules/Counter.ts --network riseTestnet --parameters '{"CounterModule":{"initialValue":"100"}}' ``` ```bash yarn hardhat ignition deploy ignition/modules/Counter.ts --network riseTestnet --parameters '{"CounterModule":{"initialValue":"100"}}' ``` ```bash pnpm exec hardhat ignition deploy ignition/modules/Counter.ts --network riseTestnet --parameters '{"CounterModule":{"initialValue":"100"}}' ``` ```bash bun x hardhat ignition deploy ignition/modules/Counter.ts --network riseTestnet --parameters '{"CounterModule":{"initialValue":"100"}}' ``` ## Next Steps # Get Started (/docs/builders/smart-contracts/hardhat/get-started) import { Step, Steps } from 'fumadocs-ui/components/steps'; import { Tab, Tabs } from 'fumadocs-ui/components/tabs'; [Hardhat](https://hardhat.org) is a flexible and extensible development environment for Ethereum software. It helps you write, test, debug, and deploy your smart contracts with ease. ## Prerequisites * [Node.js](https://nodejs.org/) v22 or later * A package manager like npm, yarn, pnpm, or bun * A wallet with testnet ETH from the [RISE Faucet](https://faucet.testnet.riselabs.xyz/) ## Create a Project ### Initialize Hardhat Project Create a new directory and initialize a Hardhat project: ```bash mkdir my-rise-project cd my-rise-project ``` Initialize Hardhat with the setup wizard: ```bash npx hardhat --init ``` ```bash yarn dlx hardhat --init ``` ```bash pnpm dlx hardhat --init ``` ```bash bun x hardhat --init ``` When prompted, select: 1. **Version**: "Hardhat 3 Beta" 2. **Path**: current directory (`.`) 3. **Project type**: "A minimal Hardhat project" 4. **Install dependencies**: true This will create a complete project structure with all necessary dependencies. ### Configure for RISE Update your `hardhat.config.ts` to add the RISE Testnet: ```typescript title="hardhat.config.ts" {11-16} import hardhatToolboxViemPlugin from "@nomicfoundation/hardhat-toolbox-viem"; import { defineConfig } from "hardhat/config"; export default defineConfig({ plugins: [hardhatToolboxViemPlugin], solidity: { version: "0.8.30", }, networks: { riseTestnet: { type: "http", url: "https://testnet.riselabs.xyz", accounts: [""], chainId: 11155931 } } }); ``` Never commit private keys directly in config files. In the next step, you'll learn how to use Configuration Variables to keep this secure. ### Secure Your Private Key Use Hardhat's Configuration Variables (keystore) to store your private key securely: ```bash npx hardhat keystore set RISE_PRIVATE_KEY ``` ```bash yarn hardhat keystore set RISE_PRIVATE_KEY ``` ```bash pnpm exec hardhat keystore set RISE_PRIVATE_KEY ``` ```bash bun x hardhat keystore set RISE_PRIVATE_KEY ``` Then update your config to use the variable: ```typescript title="hardhat.config.ts" {2,13} import hardhatToolboxViemPlugin from "@nomicfoundation/hardhat-toolbox-viem"; import { configVariable, defineConfig } from "hardhat/config"; export default defineConfig({ plugins: [hardhatToolboxViemPlugin], solidity: { version: "0.8.30", }, networks: { riseTestnet: { type: "http", url: "https://testnet.riselabs.xyz", accounts: [configVariable("RISE_PRIVATE_KEY")], chainId: 11155931 } } }); ``` If you prefer to use a `.env` file with the `dotenv` package instead of Hardhat's keystore, you can do so, but **this is not recommended** as it's less secure. Make sure to never commit your `.env` file to version control by adding it to `.gitignore`. 1. Create a `.env` file: `PRIVATE_KEY=your_private_key_here` 2. Install dotenv: `npm install dotenv` 3. Add to the top of your config: `require("dotenv").config();` 4. Update accounts: `accounts: process.env.PRIVATE_KEY ? [process.env.PRIVATE_KEY] : []` ### Create a Smart Contract Make sure you're in your Hardhat project's root directory. Then create a `contracts` directory and add a simple Counter contract: ```bash mkdir contracts ``` Create `contracts/Counter.sol`: ```solidity title="contracts/Counter.sol" // SPDX-License-Identifier: UNLICENSED pragma solidity ^0.8.30; contract Counter { uint256 public number; function setNumber(uint256 newNumber) public { number = newNumber; } function increment() public { number++; } } ``` ### Compile the Contract Compile your contract to verify everything is working: ```bash npx hardhat compile ``` ```bash yarn hardhat compile ``` ```bash pnpm exec hardhat compile ``` ```bash bun x hardhat compile ``` This generates artifacts in the `artifacts/` directory. ## Next Steps # Hardhat (/docs/builders/smart-contracts/hardhat) [Hardhat](https://hardhat.org) is a development environment for Ethereum that helps you compile, deploy, test, and debug your smart contracts. RISE is fully EVM compatible, so you can use Hardhat with minimal configuration changes. ## Quick Links # Testing Contracts (/docs/builders/smart-contracts/hardhat/testing) import { Step, Steps } from 'fumadocs-ui/components/steps'; import { Tab, Tabs } from 'fumadocs-ui/components/tabs'; Hardhat includes a built-in testing framework using Mocha and Chai. Write tests to ensure your contracts work correctly before deploying to RISE. ## Write Tests ### Create Test File Make sure you're in your project's root directory and create a new directory called `test`. ```bash mkdir test ``` Create a test file in the `test/` directory using ESM syntax: ```typescript title="test/Counter.ts" import hre from "hardhat"; import { expect } from "chai"; const { ethers } = await hre.network.connect(); describe("Counter", function () { it("should start with 0", async function () { const counter = await ethers.deployContract("Counter"); expect(await counter.number()).to.equal(0n); }); it("should increment", async function () { const counter = await ethers.deployContract("Counter"); await counter.increment(); expect(await counter.number()).to.equal(1n); }); it("should set number", async function () { const counter = await ethers.deployContract("Counter"); await counter.setNumber(42n); expect(await counter.number()).to.equal(42n); }); }); ``` Note: In Hardhat 3, you explicitly create network connections with `hre.network.connect()`. ### Run Tests Execute your tests: ```bash npx hardhat test ``` ```bash yarn hardhat test ``` ```bash pnpm exec hardhat test ``` ```bash bun x hardhat test ``` Output: ``` Counter ✔ should start with 0 ✔ should increment ✔ should set number 3 passing ``` ## Run Specific Tests Run a single test file: ```bash npx hardhat test test/Counter.ts ``` ```bash yarn hardhat test test/Counter.ts ``` ```bash pnpm exec hardhat test test/Counter.ts ``` ```bash bun x hardhat test test/Counter.ts ``` Run tests matching a pattern: ```bash npx hardhat test --grep "increment" ``` ```bash yarn hardhat test --grep "increment" ``` ```bash pnpm exec hardhat test --grep "increment" ``` ```bash bun x hardhat test --grep "increment" ``` ## Next Steps # Verifying Contracts (/docs/builders/smart-contracts/hardhat/verifying) import { Step, Steps } from 'fumadocs-ui/components/steps'; import { Tab, Tabs } from 'fumadocs-ui/components/tabs'; Verify your deployed contracts on the RISE Testnet Explorer so users can view and interact with your contract's source code. ## Prerequisites * Contract deployed to RISE (see [Deploying](/docs/builders/smart-contracts/hardhat/deploying)) * Contract address from deployment ## Verify with Hardhat Ignition ### Configure Verification Add the RISE Explorer configuration to your `hardhat.config.ts`: ```typescript title="hardhat.config.ts" {3,17-24} import hardhatToolboxViemPlugin from "@nomicfoundation/hardhat-toolbox-viem"; import { configVariable, defineConfig } from "hardhat/config"; import "@nomicfoundation/hardhat-verify"; export default defineConfig({ plugins: [hardhatToolboxViemPlugin], solidity: { version: "0.8.30", }, networks: { rise: { type: "http", url: "https://testnet.riselabs.xyz", accounts: [configVariable("RISE_PRIVATE_KEY")], chainId: 11155931 } }, verify: { blockscout: { networks: { rise: "https://explorer.testnet.riselabs.xyz/api" } } } }); ``` ### Verify with Ignition If you deployed with Hardhat Ignition, simply add the `--verify` flag: ```bash npx hardhat ignition deploy ignition/modules/Counter.ts --network riseTestnet --verify ``` ```bash yarn hardhat ignition deploy ignition/modules/Counter.ts --network riseTestnet --verify ``` ```bash pnpm exec hardhat ignition deploy ignition/modules/Counter.ts --network riseTestnet --verify ``` ```bash bun x hardhat ignition deploy ignition/modules/Counter.ts --network riseTestnet --verify ``` Since you already deployed the contract, Ignition won't re-deploy it. It will only submit the source code for verification. ### Check Verification You'll see output indicating successful verification with a link to view the contract on the RISE Explorer. Visit [explorer.testnet.riselabs.xyz](https://explorer.testnet.riselabs.xyz) and search for your contract address to see the verified source code. ## Troubleshooting ### Already Verified If you see "Already Verified", the contract source code has already been submitted. No further action needed. ### Wrong Constructor Arguments If verification fails, double-check your constructor arguments match exactly what was used during deployment. ### Compiler Version Mismatch Make sure the Solidity version in your `hardhat.config` matches the version used in your contract. ## Next Steps Your verified contract is now publicly viewable on the RISE Explorer. Users can: * Read the source code * Interact with contract functions directly through the explorer * View contract events and transactions # Compiling Contracts (/docs/builders/smart-contracts/foundry/compiling) import { Step, Steps } from 'fumadocs-ui/components/steps'; Compile your Solidity contracts using Foundry's `forge build` command. ## Configuration Configure the Solidity compiler in your `foundry.toml`: ```toml title="foundry.toml" [profile.default] src = "src" out = "out" libs = ["lib"] solc = "0.8.30" # Optimizer settings optimizer = true optimizer_runs = 200 [rpc_endpoints] rise = "https://testnet.riselabs.xyz" [etherscan] rise = { key = "", url = "https://explorer.testnet.riselabs.xyz/api" } ``` ## Compile ### Run Build Compile all contracts in the `src/` directory: ```bash forge build ``` ### Check Artifacts Compilation generates artifacts in the `out/` directory containing: * Contract ABI * Bytecode * Metadata The compiled JSON files can be found at: ``` out/YourContract.sol/YourContract.json ``` ## Compiler Options ### Specify Solidity Version ```bash forge build --use 0.8.30 ``` ### Enable Optimizer ```bash forge build --optimize --optimizer-runs 200 ``` ### Watch Mode Automatically recompile on file changes: ```bash forge build --watch ``` ## Clean and Rebuild To force a fresh compilation: ```bash forge clean forge build ``` ## Check Contract Sizes Ensure your contracts are within the 24KB size limit: ```bash forge build --sizes ``` Output shows each contract's size. ## Next Steps # Deploying Contracts (/docs/builders/smart-contracts/foundry/deploying) import { Step, Steps } from 'fumadocs-ui/components/steps'; Deploy your compiled smart contracts to the RISE Testnet using Foundry's `forge create` or deployment scripts. ## Prerequisites * Foundry project configured for RISE (see [Get Started](/docs/builders/smart-contracts/foundry/get-started)) * Testnet ETH from the [RISE Faucet](https://faucet.testnet.riselabs.xyz/) * Private key set in environment variables ## Deploy with forge create The simplest way to deploy a contract: ```bash forge create \ --rpc-url https://testnet.riselabs.xyz \ --private-key $PRIVATE_KEY \ src/Counter.sol:Counter ``` Output: ``` Deployer: 0x1234... Deployed to: 0xabcd... Transaction hash: 0x5678... ``` ### With Constructor Arguments If your contract has constructor arguments: ```bash forge create \ --rpc-url https://testnet.riselabs.xyz \ --private-key $PRIVATE_KEY \ src/Lock.sol:Lock \ --constructor-args 1706745600 ``` ### With ETH Value To send ETH during deployment: ```bash forge create \ --rpc-url https://testnet.riselabs.xyz \ --private-key $PRIVATE_KEY \ src/Lock.sol:Lock \ --constructor-args 1706745600 \ --value 0.001ether ``` ## Deploy with Scripts For more complex deployments, use Forge scripts: ### Create Deploy Script Create a deployment script in `script/Counter.s.sol`: ```solidity title="script/Counter.s.sol" // SPDX-License-Identifier: UNLICENSED pragma solidity ^0.8.13; import {Script, console} from "forge-std/Script.sol"; import {Counter} from "../src/Counter.sol"; contract CounterScript is Script { function run() public { uint256 deployerPrivateKey = vm.envUint("PRIVATE_KEY"); vm.startBroadcast(deployerPrivateKey); Counter counter = new Counter(); console.log("Counter deployed to:", address(counter)); vm.stopBroadcast(); } } ``` ### Run Deployment Script Deploy to RISE Testnet: ```bash forge script script/Counter.s.sol:CounterScript \ --rpc-url https://testnet.riselabs.xyz \ --broadcast ``` Add `-vvvv` for verbose output to see transaction details. ### View on Explorer View your deployed contract on the [RISE Testnet Explorer](https://explorer.testnet.riselabs.xyz) by searching for the contract address. ## Deploy and Verify Deploy and verify in a single command: ```bash forge create \ --rpc-url https://testnet.riselabs.xyz \ --private-key $PRIVATE_KEY \ src/Counter.sol:Counter \ --verify \ --verifier blockscout \ --verifier-url https://explorer.testnet.riselabs.xyz/api/ ``` ## Using RPC Endpoint Aliases If you configured `foundry.toml` with RPC endpoints, use the alias: ```bash forge create \ --rpc-url rise \ --private-key $PRIVATE_KEY \ src/Counter.sol:Counter ``` ## Next Steps # Get Started (/docs/builders/smart-contracts/foundry/get-started) import { Step, Steps } from 'fumadocs-ui/components/steps'; [Foundry](https://book.getfoundry.sh/) is a blazing fast, portable, and modular toolkit for Ethereum application development written in Rust. ## Prerequisites * A wallet with testnet ETH from the [RISE Faucet](https://faucet.testnet.riselabs.xyz/) ## Install Foundry ```bash curl -L https://foundry.paradigm.xyz | bash foundryup ``` This installs `forge`, `cast`, `anvil`, and `chisel`. ## Create a Project ### Initialize Project Create a new Foundry project: ```bash forge init my-rise-project cd my-rise-project ``` This creates a project with: * `src/` - Your smart contracts * `test/` - Your tests * `script/` - Deployment scripts * `foundry.toml` - Configuration file ### Configure for RISE Update your `foundry.toml` to add the RISE network: ```toml title="foundry.toml" [profile.default] src = "src" out = "out" libs = ["lib"] solc = "0.8.30" [rpc_endpoints] rise = "https://testnet.riselabs.xyz" ``` ### Set Environment Variables Create a `.env` file for your private key: ```bash title=".env" PRIVATE_KEY=your_private_key_here ``` Load it in your shell: ```bash source .env ``` **Never commit your `.env` file to version control.** ### Review the Default Contract Foundry creates a default `Counter.sol` contract: ```solidity title="src/Counter.sol" // SPDX-License-Identifier: UNLICENSED pragma solidity ^0.8.13; contract Counter { uint256 public number; function setNumber(uint256 newNumber) public { number = newNumber; } function increment() public { number++; } } ``` ### Build the Project Compile your contracts: ```bash forge build ``` This generates artifacts in the `out/` directory. ## Next Steps # Foundry (/docs/builders/smart-contracts/foundry) [Foundry](https://book.getfoundry.sh/) is a blazing fast, portable, and modular toolkit for Ethereum application development written in Rust. RISE is fully EVM compatible, so you can use Foundry with minimal configuration changes. ## Quick Links # Testing Contracts (/docs/builders/smart-contracts/foundry/testing) import { Step, Steps } from 'fumadocs-ui/components/steps'; Foundry includes a powerful testing framework that lets you write tests in Solidity. Tests run extremely fast compared to JavaScript-based testing frameworks. ## Write Tests ### Create Test File Create a test file in the `test/` directory: ```solidity title="test/Counter.t.sol" // SPDX-License-Identifier: UNLICENSED pragma solidity ^0.8.13; import {Test, console} from "forge-std/Test.sol"; import {Counter} from "../src/Counter.sol"; contract CounterTest is Test { Counter public counter; function setUp() public { counter = new Counter(); } function test_InitialValue() public view { assertEq(counter.number(), 0); } function test_Increment() public { counter.increment(); assertEq(counter.number(), 1); } function test_SetNumber() public { counter.setNumber(42); assertEq(counter.number(), 42); } function testFuzz_SetNumber(uint256 x) public { counter.setNumber(x); assertEq(counter.number(), x); } } ``` ### Run Tests Execute your tests: ```bash forge test ``` Output: ``` Running 4 tests for test/Counter.t.sol:CounterTest [PASS] test_InitialValue() (gas: 5453) [PASS] test_Increment() (gas: 28334) [PASS] test_SetNumber() (gas: 28312) [PASS] testFuzz_SetNumber(uint256) (runs: 256, μ: 27564, ~: 28387) Test result: ok. 4 passed; 0 failed; finished in 10.23ms ``` ## Verbose Output See detailed test output with `-v` flags: ```bash forge test -vv # Show logs forge test -vvv # Show execution traces forge test -vvvv # Show full traces including setup ``` ## Gas Reports Generate gas usage reports: ```bash forge test --gas-report ``` ## Run Specific Tests Run a single test file: ```bash forge test --match-path test/Counter.t.sol ``` Run tests matching a pattern: ```bash forge test --match-test test_Increment ``` Run tests in a specific contract: ```bash forge test --match-contract CounterTest ``` ## Fuzz Testing Foundry automatically runs fuzz tests on functions prefixed with `testFuzz_`: ```solidity function testFuzz_SetNumber(uint256 x) public { counter.setNumber(x); assertEq(counter.number(), x); } ``` Configure fuzz runs in `foundry.toml`: ```toml [fuzz] runs = 1000 ``` ## Cheatcodes Foundry provides cheatcodes for testing advanced scenarios: ```solidity // Set block timestamp vm.warp(1641070800); // Set msg.sender vm.prank(address(0x1234)); // Expect a revert vm.expectRevert("Error message"); // Deal ETH to an address vm.deal(address(0x1234), 1 ether); ``` ## Next Steps # Verifying Contracts (/docs/builders/smart-contracts/foundry/verifying) import { Step, Steps } from 'fumadocs-ui/components/steps'; Verify your deployed contracts on the RISE Testnet Explorer to make the source code publicly viewable. ## Configuration Configure verification in your `foundry.toml`: ```toml title="foundry.toml" [profile.default] src = "src" out = "out" libs = ["lib"] solc = "0.8.30" [rpc_endpoints] rise = "https://testnet.riselabs.xyz" ``` RISE uses Blockscout for contract verification. You don't need an API key - just specify `--verifier blockscout` when verifying. ## Deploy and Verify The easiest way is to deploy and verify in a single command: ```bash forge create \ --rpc-url https://testnet.riselabs.xyz \ --private-key $PRIVATE_KEY \ src/Counter.sol:Counter \ --verify \ --verifier blockscout \ --verifier-url https://explorer.testnet.riselabs.xyz/api/ ``` ## Verify Existing Contract To verify an already deployed contract: ```bash forge verify-contract \ --rpc-url https://testnet.riselabs.xyz \ \ src/Counter.sol:Counter \ --verifier blockscout \ --verifier-url https://explorer.testnet.riselabs.xyz/api/ ``` ### With Constructor Arguments If your contract has constructor arguments: ```bash forge verify-contract \ --rpc-url https://testnet.riselabs.xyz \ \ src/Lock.sol:Lock \ --verifier blockscout \ --verifier-url https://explorer.testnet.riselabs.xyz/api/ \ --constructor-args $(cast abi-encode "constructor(uint256)" 1706745600) ``` ## Using Config Aliases If you configured the RPC endpoint in `foundry.toml`, you can use the alias: ```bash forge verify-contract \ --rpc-url rise \ \ src/Counter.sol:Counter \ --verifier blockscout \ --verifier-url https://explorer.testnet.riselabs.xyz/api/ ``` ## Verify via Script Verify contracts deployed via scripts by adding the `--verify` flag: ```bash forge script script/Counter.s.sol:CounterScript \ --rpc-url https://testnet.riselabs.xyz \ --broadcast \ --verify \ --verifier blockscout \ --verifier-url https://explorer.testnet.riselabs.xyz/api/ ``` ## Important Notes * The RISE explorer uses Blockscout, so always specify `--verifier blockscout` * Constructor arguments are ABI-encoded - use `cast abi-encode` to encode them * Never store private keys in source code ## View Verified Contract After verification, view your contract on the [RISE Testnet Explorer](https://explorer.testnet.riselabs.xyz). The "Contract" tab will show your source code and allow direct interaction with contract functions. # Cancel Order (/docs/risex/api/examples/cancel-order) # Cancel Order Cancel an existing order. **Endpoint:** `POST /v1/orders/cancel` **Prerequisites:** You must have registered a signer first (see [Register Signer](/docs/risex/api/register-signer)). **Example:** ```typescript import axios from "axios"; import { apiClient } from "./risex-core"; import { createPermitParams } from "./create-permit-params"; import { encodeAbiParameters, type Hex } from "viem"; import 'dotenv/config'; const cancelOrder = async ( marketId: number, orderId: string, signingKey: `0x${string}`, // From registerSigner signerAddress: string, // From registerSigner account: string, ) => { try { // Contract addresses const perpContractAddress = '0x68cAcD54a8c93A3186BF50bE6b78B761F728E1b4' as `0x${string}`; const authContractAddress = '0x8d8708f9D87ef522c1f99DD579BF6A051e34C28E' as `0x${string}`; // Encode cancel data (32 bytes) // Binary layout: (marketId << 192) | orderId // This packs marketId in the first 8 bytes and orderId in the remaining 24 bytes const cancelData = (BigInt(marketId) << 192n) | BigInt(orderId); const cancelDataHex = '0x' + cancelData.toString(16).padStart(64, '0') as Hex; const encodedData = encodeAbiParameters( [{ name: 'cancelData', type: 'bytes32' }], [cancelDataHex] ) as Hex; // Create permit params with signature const permitParams = await createPermitParams( encodedData, signingKey, account as `0x${string}`, signerAddress as `0x${string}`, perpContractAddress, authContractAddress, ); const response = await apiClient.post('/v1/orders/cancel', { market_id: marketId.toString(), order_id: orderId, permit_params: { account: permitParams.account, signer: permitParams.signer, deadline: permitParams.deadline, signature: permitParams.signature, nonce: permitParams.nonce, }, }); console.log('Order cancelled successfully!'); console.log('Response:', response.data); return response.data; } catch (error) { if (axios.isAxiosError(error)) { console.error('Cancel order failed:', error.response?.data?.message || error.message); if (error.response?.data) { console.error('Error details:', JSON.stringify(error.response.data, null, 2)); } } else { console.error('Cancel order failed:', (error as Error).message); } throw error; } }; export { cancelOrder }; // Example usage: (async () => { const signingKey = process.env.SIGNING_KEY as `0x${string}`; const signerAddress = '0x...'; // Your signer address from registerSigner const account = '0x...'; // Your main wallet address await cancelOrder( 1, // BTC market '12345678', // Order ID from place-order response signingKey, signerAddress, account ); })(); ``` # Deposit USDC (/docs/risex/api/examples/deposit) # Deposit USDC Deposit USDC into the exchange for trading. **Endpoint:** `POST /v1/account/deposit` **Example:** ```typescript import axios from "axios"; import { apiClient } from "./risex-core"; const depositUSDC = async ( account: string, amount: string, // Amount in plain decimal (e.g., "100" for 100 USDC) ) => { try { const response = await apiClient.post('/v1/account/deposit', { account: account, amount: amount, }); const { data } = response.data; console.log('Deposit successful!'); console.log('Transaction Hash:', data.transaction_hash); console.log('Block Number:', data.block_number); return data; } catch (error) { if (axios.isAxiosError(error)) { console.error('Deposit failed:', error.response?.data?.message || error.message); } else { console.error('Deposit failed:', (error as Error).message); } throw error; } }; // Example usage: // await depositUSDC( // '0xf39Fd6e51aad88F6F4ce6aB8827279cffFb92266', // Your account address // '100' // Deposit 100 USDC // ); ``` ## Important Notes * **Amount Format**: The amount should be in plain decimal format (e.g., "100" for 100 USDC), not with 18 decimals * **Gas Sponsored**: Deposit transactions are gas-sponsored by the API service * **Balance Update**: After deposit, your balance will be updated in the exchange and can be used for trading # Place Order (/docs/risex/api/examples/place-order) # Place Order Place a new trading order. **Endpoint:** `POST /v1/orders/place` **Prerequisites:** You must have registered a signer first (see [Register Signer](/docs/risex/api/register-signer)). **Example:** ```typescript import axios from "axios"; import { apiClient } from "./risex-core"; import { MarketsId, OrderSide, STPMode, OrderType, TimeInForce, encodePlaceOrderData } from "./types"; import { createPermitParams } from "./create-permit-params"; const placeOrder = async ( orderParams: { market_id: MarketsId; size: string; price: string; side: OrderSide; stp_mode: STPMode; order_type: OrderType; post_only: boolean; reduce_only: boolean; tif: TimeInForce; expiry: number; }, signingKey: `0x${string}`, // From registerSigner signerAddress: string, // From registerSigner account: string, ) => { try { // Contract addresses const perpContractAddress = '0x68cAcD54a8c93A3186BF50bE6b78B761F728E1b4' as `0x${string}`; const authContractAddress = '0x8d8708f9D87ef522c1f99DD579BF6A051e34C28E' as `0x${string}`; // Encode order data const encodedData = encodePlaceOrderData({ marketId: orderParams.market_id.toString(), size: BigInt(orderParams.size), price: BigInt(orderParams.price), side: orderParams.side, stpMode: orderParams.stp_mode, orderType: orderParams.order_type, postOnly: orderParams.post_only, reduceOnly: orderParams.reduce_only, timeInForce: orderParams.tif, expiry: orderParams.expiry, }); // Create permit params with signature const permitParams = await createPermitParams( encodedData, signingKey, account as `0x${string}`, signerAddress as `0x${string}`, perpContractAddress, authContractAddress, ); const response = await apiClient.post('/v1/orders/place', { order_params: { market_id: orderParams.market_id, size: orderParams.size, price: orderParams.price, side: orderParams.side, stp_mode: orderParams.stp_mode, order_type: orderParams.order_type, post_only: orderParams.post_only, reduce_only: orderParams.reduce_only, tif: orderParams.tif, expiry: orderParams.expiry, }, permit_params: { account: permitParams.account, signer: permitParams.signer, deadline: permitParams.deadline, signature: permitParams.signature, nonce: permitParams.nonce, }, }); const { data } = response.data; console.log('Order placed successfully!'); console.log('Transaction Hash:', data.transaction_hash); console.log('Order ID:', data.order_id); return data; } catch (error) { if (axios.isAxiosError(error)) { console.error('Order failed:', error.response?.data?.message || error.message); } else { console.error('Order failed:', (error as Error).message); } throw error; } }; // Example usage: // await placeOrder( // { // market_id: MarketsId.BTC, // size: '1000000000000000', // 0.001 BTC // price: '87467000000000000000000', // 87,467 USDC (18 decimals) // side: OrderSide.Long, // stp_mode: STPMode.ExpireMaker, // order_type: OrderType.Market, // post_only: false, // reduce_only: false, // tif: TimeInForce.ImmediateOrCancel, // expiry: 0, // }, // signingKey, // signerAddress, // account // ); ``` # Update Leverage (/docs/risex/api/examples/update-leverage) # Update Leverage Update account leverage for a specific market. **Endpoint:** `POST /v1/account/leverage` **Prerequisites:** You must have registered a signer first (see [Register Signer](/docs/risex/api/register-signer)). **Example:** ```typescript import axios from "axios"; import { apiClient } from "./risex-core"; import { createPermitParams } from "./create-permit-params"; import { encodeAbiParameters, type Hex } from "viem"; import 'dotenv/config'; const updateLeverage = async ( marketId: number, leverageDecimal: string, // e.g., "10" for 10x leverage signingKey: `0x${string}`, // From registerSigner signerAddress: string, // From registerSigner account: string, ) => { try { // Contract addresses const perpContractAddress = '0x68cAcD54a8c93A3186BF50bE6b78B761F728E1b4' as `0x${string}`; const authContractAddress = '0x8d8708f9D87ef522c1f99DD579BF6A051e34C28E' as `0x${string}`; // Convert leverage to 18 decimals for encoding const leverageWith18Decimals = BigInt(leverageDecimal) * BigInt(10 ** 18); // Encode leverage data // keccak256(abi.encode(uint256(marketId), uint128(leverage))) const encodedData = encodeAbiParameters( [ { name: 'marketId', type: 'uint256' }, { name: 'leverage', type: 'uint128' } ], [BigInt(marketId), leverageWith18Decimals] ) as Hex; // Create permit params with signature const permitParams = await createPermitParams( encodedData, signingKey, account as `0x${string}`, signerAddress as `0x${string}`, perpContractAddress, authContractAddress, ); const response = await apiClient.post('/v1/account/leverage', { market_id: marketId.toString(), leverage: String(leverageWith18Decimals), permit_params: { account: permitParams.account, signer: permitParams.signer, deadline: permitParams.deadline, signature: permitParams.signature, nonce: permitParams.nonce, }, }); console.log('Leverage updated successfully!'); console.log('Transaction Hash:', response.data); return response.data; } catch (error) { if (axios.isAxiosError(error)) { console.error('Update leverage failed:', error.response?.data?.message || error.message); if (error.response?.data) { console.error('Error details:', JSON.stringify(error.response.data, null, 2)); } } else { console.error('Update leverage failed:', (error as Error).message); } throw error; } }; export { updateLeverage }; // Example usage: (async () => { const signingKey = process.env.SIGNING_KEY as `0x${string}`; const signerAddress = '0x...'; // Your signer address from registerSigner const account = '0x...'; // Your main wallet address await updateLeverage( 1, // BTC market '10', // 10x leverage signingKey, signerAddress, account ); })(); ``` # Authorization (/docs/risex/contracts/contract-interface/authorization) ## Overview The `RISExAuthorization` contract manages session key lifecycle (register, revoke, permissions) and provides EIP-712 typed data signature verification. It combines three sub-interfaces: * **ISignerManager** — Session key registration, revocation, and permission management * **IPermitWitness** — Witness permits with deadline validation * **IPermitSingle** — ERC-2612 style single-token permits ### Nonce System RISExAuthorization uses a bitmap-based nonce system for replay protection: * `nonceAnchor` (uint48): The epoch anchor for the nonce window * `nonceBitmap` (uint8): The bit index within the 256-bit bitmap for this epoch This allows up to 256 concurrent valid nonces per epoch, rather than requiring sequential nonce usage. ### Permission System Session keys can have granular permissions: ```solidity enum Permission { None, // No permissions All, // Full access Perps, // Perpetual trading only Spot, // Spot trading only MoveFund // Fund movement (deposit/withdraw) only } ``` *** ## Contract Functions ### Register Signer **Description** Registers a signer (session key) to sign on behalf of an account. The account must provide an EIP-712 typed data signature authorizing the signer. The signer is granted `Permission.All` by default. ```solidity function registerSigner( address account, address signer, string memory message, uint48 nonceAnchor, uint8 nonceBitmap, uint32 expiration, bytes memory accountSignature ) external; ``` **Parameters** * `account`: The account address that will authorize the signer * `signer`: The signer address that will sign on behalf of the account * `message`: A human-readable message string included in the account's signature * `nonceAnchor`: The epoch anchor for replay protection * `nonceBitmap`: The bit index within the nonce bitmap * `expiration`: The expiration timestamp (uint32) when the session key expires * `accountSignature`: EIP-712 signature from the account authorizing the signer **Example** ```solidity address account = 0x...; address signer = 0x...; string memory message = "Authorize signer"; uint48 nonceAnchor = ...; // Current nonce anchor uint8 nonceBitmap = 0; // First available bit uint32 expiration = uint32(block.timestamp + 30 days); bytes32 registerHash = _hashTypedDataV4( keccak256( abi.encode( REGISTER_SIGNER_TYPEHASH, // "RegisterSigner(address signer,string message,uint32 expiration,uint48 nonceAnchor,uint8 nonceBitmap)" signer, keccak256(abi.encodePacked(message)), expiration, nonceAnchor, nonceBitmap ) ) ); bytes memory accountSignature = _signTypedDataHash(accountPrivateKey, registerHash); risExAuthorization.registerSigner( account, signer, message, nonceAnchor, nonceBitmap, expiration, accountSignature ); ``` *** ### Register Sender Signer **Description** Registers a signer to sign on behalf of `msg.sender` directly, without requiring a separate account signature. This is a convenience function when the account owner is the transaction sender. The signer is granted `Permission.All` by default. ```solidity function registerSenderSigner( address signer, uint48 nonceAnchor, uint8 nonceBitmap, uint32 expiration ) external; ``` **Parameters** * `signer`: The signer address to authorize * `nonceAnchor`: The epoch anchor for replay protection * `nonceBitmap`: The bit index within the nonce bitmap * `expiration`: The expiration timestamp when the session key expires **Example** ```solidity // Register a signer for the calling account (no separate signature needed) uint48 nonceAnchor = ...; // Current nonce anchor from getNonceState() risExAuthorization.registerSenderSigner( signerAddress, nonceAnchor, 0, // nonceBitmap uint32(block.timestamp + 30 days) ); ``` *** ### Revoke Signer **Description** Revokes a signer's authorization to sign on behalf of an account. The signer must currently be authorized. The account must provide an EIP-712 typed data signature. ```solidity function revokeSigner( address account, address signer, uint48 nonceAnchor, uint8 nonceBitmap, bytes memory accountSignature ) external; ``` **Parameters** * `account`: The account address that authorized the signer * `signer`: The signer address to revoke * `nonceAnchor`: The epoch anchor for replay protection * `nonceBitmap`: The bit index within the nonce bitmap * `accountSignature`: EIP-712 signature from the account authorizing the revocation **Example** ```solidity address account = 0x...; address signer = 0x...; uint48 nonceAnchor = ...; uint8 nonceBitmap = 1; bytes32 revokeHash = _hashTypedDataV4( keccak256( abi.encode( REVOKE_SIGNER_TYPEHASH, // "RevokeSigner(address signer,uint48 nonceAnchor,uint8 nonceBitmap)" signer, nonceAnchor, nonceBitmap ) ) ); bytes memory accountSignature = _signTypedDataHash(accountPrivateKey, revokeHash); risExAuthorization.revokeSigner(account, signer, nonceAnchor, nonceBitmap, accountSignature); ``` *** ### Enable Permission **Description** Enables a specific permission for a signer. Requires an EIP-712 signature from the account. ```solidity function enablePermission( address account, address signer, uint48 nonceAnchor, uint8 nonceBitmap, Permission permission, bytes memory accountSignature ) external; ``` **Parameters** * `account`: The account address * `signer`: The signer address to grant the permission to * `nonceAnchor`: The epoch anchor for replay protection * `nonceBitmap`: The bit index within the nonce bitmap * `permission`: The permission to enable (Perps, Spot, MoveFund, or All) * `accountSignature`: EIP-712 signature from the account *** ### Disable Permission **Description** Disables a specific permission for a signer. Requires an EIP-712 signature from the signer. ```solidity function disablePermission( address account, address signer, uint48 nonceAnchor, uint8 nonceBitmap, Permission permission, bytes memory signerSignature ) external; ``` **Parameters** * `account`: The account address * `signer`: The signer address to revoke the permission from * `nonceAnchor`: The epoch anchor for replay protection * `nonceBitmap`: The bit index within the nonce bitmap * `permission`: The permission to disable * `signerSignature`: EIP-712 signature from the signer *** ## View Functions ### Get Session Key Status **Description** Returns the current status of a session key. ```solidity function getSessionKeyStatus( address account, address signer ) external view returns (SessionKeyStatus); ``` **Returns** * `SessionKeyStatus`: One of `None`, `Authorized`, `Expired`, or `Revoked` *** ### Has Permission **Description** Checks whether a signer has a specific permission for an account. ```solidity function hasPermission( address account, address signer, Permission permission ) external view returns (bool); ``` *** ### Session Keys **Description** Returns the session key details for an account and signer pair. ```solidity function sessionKeys( address account, address signer ) external view returns (uint32 expiration, uint32 permissionBitmap, SessionKeyStatus status); ``` **Returns** * `expiration`: The expiration timestamp * `permissionBitmap`: Bitmap of enabled permissions * `status`: Current session key status *** ### Is Nonce Used **Description** Returns whether a specific nonce has been used for an account. ```solidity function isNonceUsed( address account, uint48 nonceAnchor, uint8 nonceBitmap ) external view returns (bool); ``` *** ### Get Nonce State **Description** Returns the current nonce anchor and full bitmap for an account. ```solidity function getNonceState( address account ) external view returns (uint48 nonceAnchor, uint256 bitmap); ``` *** ### EIP-712 Typehashes The following typehash accessors are available for constructing EIP-712 signatures: ```solidity function REGISTER_SIGNER_TYPEHASH() external pure returns (bytes32); function VERIFY_SIGNER_TYPEHASH() external pure returns (bytes32); function REVOKE_SIGNER_TYPEHASH() external pure returns (bytes32); function ENABLE_PERMISSION_TYPEHASH() external pure returns (bytes32); function DISABLE_PERMISSION_TYPEHASH() external pure returns (bytes32); function VERIFY_WITNESS_TYPEHASH() external pure returns (bytes32); function PERMIT_SINGLE_TYPEHASH() external pure returns (bytes32); ``` # Perp (/docs/risex/contracts/contract-interface/perp) ## PerpsManager The `PerpsManager` contract is the main entry point for perpetual futures trading. It handles order placement, cancellation, margin mode, leverage, and position management. ### Place Order **Description** Places a trading order (market or limit) in the specified market. ```solidity function placeOrder( IOrdersManager.PlaceOrderParams calldata params ) external returns (WideOrderId orderId); ``` **Parameters** * `params`: PlaceOrderParams struct: * `marketId` (uint16): The market ID * `sizeSteps` (uint32): Order size in steps (multiply by market's `stepSize` to get actual size) * `priceTicks` (uint24): Price in ticks (multiply by market's `stepPrice` to get actual price) * `ttlUnits` (uint16): TTL in 5-minute units (for GoodTillTime orders) * `side` (OrderSide): Buy or Sell * `stpMode` (STPMode): Self-trade prevention mode (ExpireMaker, ExpireTaker, ExpireBoth) * `orderType` (OrderType): Market or Limit * `postOnly` (bool): If true, order will only rest on the book (reverts if it would match) * `reduceOnly` (bool): If true, order can only reduce an existing position * `timeInForce` (TimeInForce): GoodTillCancelled, GoodTillTime, FillOrKill, or ImmediateOrCancel * `headerVersion` (uint8): Header version for encoding compatibility * `builderId` (uint16): Builder code ID (0 if none) **Returns** * `WideOrderId`: 56-bit order ID encoding rest/ephemeral flag, side, userId, and slot/nonce **Example** ```solidity IOrdersManager.PlaceOrderParams memory params = IOrdersManager.PlaceOrderParams({ marketId: 1, // BTC sizeSteps: 100, // 100 steps priceTicks: 500000, // price in ticks ttlUnits: 0, // no TTL side: IOrdersManager.OrderSide.Buy, stpMode: IOrdersManager.STPMode.ExpireMaker, orderType: IOrdersManager.OrderType.Limit, postOnly: false, reduceOnly: false, timeInForce: IOrdersManager.TimeInForce.GoodTillCancelled, headerVersion: 0, builderId: 0 }); WideOrderId orderId = perpsManager.placeOrder(params); ``` *** ### Cancel Order **Description** Cancels a single resting limit order in the specified market. ```solidity function cancelOrder( IOrdersManager.CancelOrderParams calldata params ) external; ``` **Parameters** * `params`: CancelOrderParams struct: * `marketId` (uint16): The market ID * `orderId` (RestingOrderId): The 40-bit resting order ID to cancel **Example** ```solidity // placeOrder returns a WideOrderId (56-bit). To cancel, extract the RestingOrderId (40-bit) // using WideOrderId.toRestingOrderId() — only resting (limit) orders can be cancelled. RestingOrderId restingId = wideOrderId.toRestingOrderId(); IOrdersManager.CancelOrderParams memory params = IOrdersManager.CancelOrderParams({ marketId: 1, orderId: restingId }); perpsManager.cancelOrder(params); ``` *** ### Cancel Orders (Batch) **Description** Cancels multiple resting orders in a single market in one transaction. ```solidity function cancelOrders( uint16 marketId, RestingOrderId[] calldata orderIds ) external; ``` **Parameters** * `marketId`: The market ID * `orderIds`: Array of resting order IDs to cancel **Example** ```solidity RestingOrderId[] memory orderIds = new RestingOrderId[](2); orderIds[0] = orderId1; orderIds[1] = orderId2; perpsManager.cancelOrders(1, orderIds); ``` *** ### Update Margin Mode **Description** Updates the margin mode (Cross or Isolated) for an account in a specific market. Cannot change margin mode while the account has open positions or orders in that market. ```solidity function updateMarginMode( IPerpsAccount.UpdateMarginModeParams calldata params ) external; ``` **Parameters** * `params`: UpdateMarginModeParams struct: * `marketId` (uint16): The market ID * `marginMode` (MarginMode): Cross or Isolated **Example** ```solidity IPerpsAccount.UpdateMarginModeParams memory params = IPerpsAccount.UpdateMarginModeParams({ marketId: 1, marginMode: IPerpsAccount.MarginMode.Isolated }); perpsManager.updateMarginMode(params); ``` *** ### Update Leverage **Description** Updates the leverage for an account in a specific market. Leverage determines the maximum position size relative to margin. ```solidity function updateLeverage( IPerpsAccount.UpdateLeverageParams calldata params ) external; ``` **Parameters** * `params`: UpdateLeverageParams struct: * `marketId` (uint16): The market ID * `leverage` (uint8): The new leverage multiplier (e.g., 10 for 10x, max determined by market config) **Example** ```solidity IPerpsAccount.UpdateLeverageParams memory params = IPerpsAccount.UpdateLeverageParams({ marketId: 1, leverage: 20 // 20x leverage }); perpsManager.updateLeverage(params); ``` *** ### Update Isolated Position Margin Balance **Description** Adds or removes margin from an isolated position. Positive amount adds margin (transfers from cross balance), negative amount removes margin (transfers back to cross balance). ```solidity function updateIsolatedPositionMarginBalance( IPerpsIsolatedMargin.UpdateIsolatedPositionMarginBalanceParams calldata params ) external; ``` **Parameters** * `params`: UpdateIsolatedPositionMarginBalanceParams struct: * `marketId` (uint16): The market ID * `amount` (int256): The delta amount to add (positive) or remove (negative), in USDC with 18 decimals **Example** ```solidity // Add 100 USDC to isolated position IPerpsIsolatedMargin.UpdateIsolatedPositionMarginBalanceParams memory params = IPerpsIsolatedMargin.UpdateIsolatedPositionMarginBalanceParams({ marketId: 1, amount: 100e18 }); perpsManager.updateIsolatedPositionMarginBalance(params); // Remove 50 USDC from isolated position params.amount = -50e18; perpsManager.updateIsolatedPositionMarginBalance(params); ``` *** ### Migrate Account **Description** Migrates all positions, collateral, and open orders from the caller's account to a new account address. The source account must be healthy (not liquidatable) and the target must have no existing state. ```solidity function migrateAccount(address newAccount) external; ``` **Parameters** * `newAccount`: The target account address to migrate to **Example** ```solidity perpsManager.migrateAccount(newAccountAddress); ``` *** ## CollateralManager The `CollateralManager` contract handles collateral deposits and withdrawals for perpetual trading. It includes rate limiting and emergency withdrawal guards for security. ### Deposit **Description** Deposits collateral tokens into the specified account. The caller must have approved the CollateralManager contract to spend the tokens. ```solidity function deposit(address receiver, Currency token, uint256 amount) external; ``` **Parameters** * `receiver`: The account to credit with the deposited collateral * `token`: The token address (wrapped as `Currency` type) * `amount`: The amount of tokens to deposit (in token's native decimals) **Example** ```solidity // Approve tokens first IERC20(usdc).approve(address(collateralManager), amount); // Deposit USDC collateralManager.deposit(account, Currency.wrap(usdc), amount); ``` *** ### Withdraw **Description** Withdraws collateral tokens from the caller's account to the specified address. The withdrawable amount is limited by the account's free margin balance. Withdrawals may be rate-limited or queued during emergency conditions. ```solidity function withdraw(address to, Currency token, uint256 amount) external; ``` **Parameters** * `to`: The address to withdraw tokens to * `token`: The token address (wrapped as `Currency` type) * `amount`: The amount of tokens to withdraw (in token's native decimals) **Example** ```solidity // Get the withdrawable amount uint256 withdrawable = collateralManager.getWithdrawableUSDC(account); // Withdraw USDC to the recipient collateralManager.withdraw(recipient, Currency.wrap(usdc), withdrawable); ``` *** ### Permit Transfer From **Description** Withdraws collateral on behalf of an owner using a Permit2-style signed permit. The signature includes `msg.sender` as the authorized spender. Uses sequential nonces for replay protection. ```solidity function permitTransferFrom( ISignatureTransfer.PermitTransferFrom calldata permit, ISignatureTransfer.SignatureTransferDetails calldata transferDetails, address owner, bytes calldata signature ) external; ``` **Parameters** * `permit`: Permit data containing token, amount, nonce, and deadline * `transferDetails`: The withdrawal destination and requested amount * `owner`: The account authorizing the withdrawal * `signature`: EIP-712 signature from the owner *** ## View Functions ### Get Token Balance **Description** Returns the projected collateral balance for a specific token for an account. For USDC, this includes projected realized PnL from deferred settlements and subtracts projected cross funding fees. It does not include unrealized PnL from open positions. *Available on: CollateralManager* ```solidity function getTokenBalance(address account, Currency token) external view returns (int256); ``` **Example** ```solidity int256 balance = collateralManager.getTokenBalance(account, Currency.wrap(usdc)); ``` *** ### Get Total Token Balance In USDC **Description** Returns the projected total token balance denominated in USDC for an account, summing all token balances using oracle prices. *Available on: CollateralManager* ```solidity function getTotalTokenBalanceInUSDC(address account) external view returns (int256); ``` *** ### Get Position **Description** Returns the position for an account in a market. *Available on: PerpsManager* ```solidity function getPosition(uint16 marketId, address account) external view returns (Position memory); ``` **Returns** * `Position` struct: * `size` (int128): Position size (positive for long, negative for short) * `quoteAmount` (int128): Quote amount * `lastFundingPayment` (int128): Last funding payment snapshot * `leverage` (uint8): Current leverage multiplier * `marginMode` (MarginMode): Cross or Isolated * `isolatedUsdcBalance` (uint112): Isolated margin balance (if in isolated mode) **Example** ```solidity IPerpsAccount.Position memory position = perpsManager.getPosition(1, account); ``` *** ### Get Leverage **Description** Returns the leverage for an account in a market. *Available on: PerpsManager* ```solidity function getLeverage(uint16 marketId, address account) external view returns (uint128); ``` **Returns** * `uint128`: The effective leverage multiplier (e.g., 10 for 10x). Note: stored as `uint8` internally in the Position struct, but returned as `uint128` by this view function. When setting leverage via `updateLeverage`, pass a `uint8` value. **Example** ```solidity uint128 leverage = perpsManager.getLeverage(1, account); ``` *** ### Get Market Config **Description** Returns the configuration for a market. *Available on: PerpsManager* ```solidity function getMarketConfig(uint16 marketId) external view returns (PerpsMarketConfig memory); ``` **Returns** * `PerpsMarketConfig` struct: * `name` (string): Market name * `quote` (address): Quote token address * `unlocked` (bool): Whether the market is active for trading * `maxLeverage` (uint8): Maximum allowed leverage * `maintenanceMarginFactor` (uint80): Maintenance margin factor * `minOrderStep` (uint32): Minimum order size in steps * `maxOrderStep` (uint32): Maximum order size in steps * `oiLimitSteps` (uint32): Open interest limit in steps * `stepSize` (uint64): Size per step (multiply sizeSteps by this) * `stepPrice` (uint64): Price per tick (multiply priceTicks by this) * `matchPriceBandBps` (uint24): Match price band in basis points (0 = disabled) **Example** ```solidity IPerpsMarketConfig.PerpsMarketConfig memory config = perpsManager.getMarketConfig(1); ``` *** ### Get Open Orders **Description** Returns a paginated list of open resting order IDs for an account in a market, excluding fully-consumed deferred orders. *Available on: PerpsManager* ```solidity function getOpenOrders( uint16 marketId, address account, uint256 startIndex, uint256 limit ) external view returns (RestingOrderId[] memory); ``` **Example** ```solidity RestingOrderId[] memory orderIds = perpsManager.getOpenOrders(1, account, 0, 10); ``` *** ### Get Total Open Orders **Description** Returns the total number of open orders for an account in a market. *Available on: PerpsManager* ```solidity function getTotalOpenOrders(uint16 marketId, address account) external view returns (uint256); ``` *** ### Get Active Markets **Description** Returns the active markets bitmap for an account (markets where the account has positions or orders). *Available on: PerpsManager* ```solidity function getActiveMarkets(address account) external view returns (uint256[] memory); ``` *** ### Get Withdrawable USDC **Description** Returns the maximum withdrawable USDC amount for an account, considering margin requirements. *Available on: CollateralManager* ```solidity function getWithdrawableUSDC(address account) external view returns (uint256); ``` **Example** ```solidity uint256 withdrawable = collateralManager.getWithdrawableUSDC(account); ``` *** ### Get Account Equity **Description** Returns the total account equity in USDC, including all positions and collateral. *Available on: CollateralManager* ```solidity function getAccountEquity(address account) external view returns (int256); ``` **Example** ```solidity int256 equity = collateralManager.getAccountEquity(account); ``` *** ### Get Cross Margin Balance **Description** Returns the projected cross margin balance for an account. Requires the pre-computed total token balance in USDC (from `CollateralManager.getTotalTokenBalanceInUSDC`). *Available on: PerpsManager* ```solidity function getCrossMarginBalance( int256 totalTokenBalanceInUSDC, address account ) external view returns (int256); ``` **Example** ```solidity int256 tokenBalance = collateralManager.getTotalTokenBalanceInUSDC(account); int256 crossMargin = perpsManager.getCrossMarginBalance(tokenBalance, account); ``` *** ### Get Free Cross Margin Balance **Description** Returns the projected free (available for withdrawal or new orders) cross margin balance for an account. *Available on: PerpsManager* ```solidity function getFreeCrossMarginBalance( int256 totalTokenBalanceInUSDC, address account ) external view returns (uint256); ``` **Example** ```solidity int256 tokenBalance = collateralManager.getTotalTokenBalanceInUSDC(account); uint256 freeMargin = perpsManager.getFreeCrossMarginBalance(tokenBalance, account); ``` *** ### Get Supported Collateral Tokens **Description** Returns the full list of supported collateral token addresses. *Available on: CollateralManager* ```solidity function getSupportedCollateralTokens() external view returns (address[] memory); ``` *** ### Get Total Markets **Description** Returns the total number of perpetual markets. *Available on: PerpsManager* ```solidity function getTotalMarkets() external view returns (uint256); ``` *** ### Get Open Interest **Description** Returns the current open interest for a market. *Available on: PerpsManager* ```solidity function getOpenInterest(uint16 marketId) external view returns (uint256); ``` # AccountRegistry (/docs/risex/contracts/contract-abi/account-registry) # AccountRegistry Use this ABI when you interact with the contract that registers accounts and resolves `userId` values for protocol users. ## ABI The canonical ABI for this contract is published as JSON: **[AccountRegistry.json](/risex/abis/AccountRegistry.json)** You can open the link in a browser, save the file into your repository, or fetch it from your deployment pipeline. The same file is included when you use **Download all ABIs (ZIP)** on the [Contract ABIs overview](/docs/risex/contracts/contract-abi). ## Integration notes * **viem / wagmi:** Import the JSON (or load it at runtime) and pass it as `abi` to `getContract`, `readContract`, `writeContract`, or equivalent helpers. * **ethers:** Pass the parsed ABI array to `new Contract(address, abi, runner)`. * **Addresses:** Use [Deployments](/docs/risex/contracts/deployments) to resolve the live address for each environment. ## See also * [Contract ABIs overview](/docs/risex/contracts/contract-abi) * [Deployments](/docs/risex/contracts/deployments) # CollateralManager (/docs/risex/contracts/contract-abi/collateral-manager) # CollateralManager Use this ABI when you interact with the contract that tracks user collateral and margin for the exchange. ## ABI The canonical ABI for this contract is published as JSON: **[CollateralManager.json](/risex/abis/CollateralManager.json)** You can open the link in a browser, save the file into your repository, or fetch it from your deployment pipeline. The same file is included when you use **Download all ABIs (ZIP)** on the [Contract ABIs overview](/docs/risex/contracts/contract-abi). ## Integration notes * **viem / wagmi:** Import the JSON (or load it at runtime) and pass it as `abi` to `getContract`, `readContract`, `writeContract`, or equivalent helpers. * **ethers:** Pass the parsed ABI array to `new Contract(address, abi, runner)`. * **Addresses:** Use [Deployments](/docs/risex/contracts/deployments) to resolve the live address for each environment. ## See also * [Contract ABIs overview](/docs/risex/contracts/contract-abi) * [Deployments](/docs/risex/contracts/deployments) # ERC20 (/docs/risex/contracts/contract-abi/erc20) # ERC20 Use this ABI for generic token operations (for example `transfer`, `approve`, `balanceOf`) against ERC-20 contracts deployed on RISE. ## ABI The canonical ABI for this contract is published as JSON: **[ERC20.json](/risex/abis/ERC20.json)** You can open the link in a browser, save the file into your repository, or fetch it from your deployment pipeline. The same file is included when you use **Download all ABIs (ZIP)** on the [Contract ABIs overview](/docs/risex/contracts/contract-abi). ## Integration notes * **viem / wagmi:** Import the JSON (or load it at runtime) and pass it as `abi` to `getContract`, `readContract`, `writeContract`, or equivalent helpers. * **ethers:** Pass the parsed ABI array to `new Contract(address, abi, runner)`. * **Addresses:** Use [Deployments](/docs/risex/contracts/deployments) to resolve the live address for each environment. ## See also * [Contract ABIs overview](/docs/risex/contracts/contract-abi) * [Deployments](/docs/risex/contracts/deployments) # FeeManager (/docs/risex/contracts/contract-abi/fee-manager) # FeeManager Use this ABI to read or update fee-related parameters, depending on your integration and on-chain permissions. ## ABI The canonical ABI for this contract is published as JSON: **[FeeManager.json](/risex/abis/FeeManager.json)** You can open the link in a browser, save the file into your repository, or fetch it from your deployment pipeline. The same file is included when you use **Download all ABIs (ZIP)** on the [Contract ABIs overview](/docs/risex/contracts/contract-abi). ## Integration notes * **viem / wagmi:** Import the JSON (or load it at runtime) and pass it as `abi` to `getContract`, `readContract`, `writeContract`, or equivalent helpers. * **ethers:** Pass the parsed ABI array to `new Contract(address, abi, runner)`. * **Addresses:** Use [Deployments](/docs/risex/contracts/deployments) to resolve the live address for each environment. ## See also * [Contract ABIs overview](/docs/risex/contracts/contract-abi) * [Deployments](/docs/risex/contracts/deployments) # FundingRate (/docs/risex/contracts/contract-abi/funding-rate) # FundingRate Use this ABI when you interact with the contract that records funding payments, premium index history, and per-market funding clamps. ## ABI The canonical ABI for this contract is published as JSON: **[FundingRate.json](/risex/abis/FundingRate.json)** You can open the link in a browser, save the file into your repository, or fetch it from your deployment pipeline. The same file is included when you use **Download all ABIs (ZIP)** on the [Contract ABIs overview](/docs/risex/contracts/contract-abi). ## Integration notes * **viem / wagmi:** Import the JSON (or load it at runtime) and pass it as `abi` to `getContract`, `readContract`, `writeContract`, or equivalent helpers. * **ethers:** Pass the parsed ABI array to `new Contract(address, abi, runner)`. * **Addresses:** Use [Deployments](/docs/risex/contracts/deployments) to resolve the live address for each environment. ## See also * [Contract ABIs overview](/docs/risex/contracts/contract-abi) * [Deployments](/docs/risex/contracts/deployments) # Overview (/docs/risex/contracts/contract-abi) import { Callout } from 'fumadocs-ui/components/callout'; # Contract ABIs These artifacts are the Solidity **JSON ABIs** for the main RISEx protocol contracts. Use them with [viem](https://viem.sh/), [ethers](https://docs.ethers.org/), or any library that accepts a standard Ethereum ABI array. Contract **addresses** for RISE Testnet are listed on the [Deployments](/docs/risex/contracts/deployments) page. Pair each address with the ABI for the matching contract before you encode calls or deploy integrations. Full ABIs are served as static JSON under `/risex/abis/` instead of being pasted into MDX. That keeps documentation pages fast to load and avoids build-time memory issues while remaining easy to copy into your own repo or pipeline. ## Download all ABIs Use the button below to fetch every ABI file in one step. Your browser downloads a single ZIP archive (`risex-contract-abis.zip`) containing the same JSON files as in this documentation tree. ## Contracts | Contract | Role | ABI (JSON) | | ---------------------------------------------------------------------------------------------------- | ----------------------------------------------------------------- | ------------------------------------------------------------------------------------ | | [AccountRegistry](/docs/risex/contracts/contract-abi/account-registry) | Address-to-user registration and `userId` resolution | [AccountRegistry.json](/risex/abis/AccountRegistry.json) | | [CollateralManager](/docs/risex/contracts/contract-abi/collateral-manager) | Collateral balances, margin, and related accounting | [CollateralManager.json](/risex/abis/CollateralManager.json) | | [ERC20](/docs/risex/contracts/contract-abi/erc20) | Fungible token interface (collateral and quoted assets) | [ERC20.json](/risex/abis/ERC20.json) | | [FeeManager](/docs/risex/contracts/contract-abi/fee-manager) | Fee parameters and fee-related flows | [FeeManager.json](/risex/abis/FeeManager.json) | | [FundingRate](/docs/risex/contracts/contract-abi/funding-rate) | Funding settlement, premium index, and per-market funding clamps | [FundingRate.json](/risex/abis/FundingRate.json) | | [OrdersManager](/docs/risex/contracts/contract-abi/orders-manager) | Order placement, updates, and coordination with matching | [OrdersManager.json](/risex/abis/OrdersManager.json) | | [PerpsManager](/docs/risex/contracts/contract-abi/perps-manager) | Perpetual positions, markets, and funding-related logic | [PerpsManager.json](/risex/abis/PerpsManager.json) | | [RISExAccessManagerUpgradeable](/docs/risex/contracts/contract-abi/risex-access-manager-upgradeable) | Role-based access control (upgradeable deployment) | [RISExAccessManagerUpgradeable.json](/risex/abis/RISExAccessManagerUpgradeable.json) | | [RISExAuthorization](/docs/risex/contracts/contract-abi/risex-authorization) | Permits, session keys, operator allowances, and permission checks | [RISExAuthorization.json](/risex/abis/RISExAuthorization.json) | | [RISExOracle](/docs/risex/contracts/contract-abi/risex-oracle) | Price and oracle surface for the protocol | [RISExOracle.json](/risex/abis/RISExOracle.json) | | [RISExUniversalRouter](/docs/risex/contracts/contract-abi/risex-universal-router) | Composed execution and router entrypoints | [RISExUniversalRouter.json](/risex/abis/RISExUniversalRouter.json) | ## Suggested workflow 1. Confirm **chain** and **contract addresses** from [Deployments](/docs/risex/contracts/deployments). 2. Add the matching **ABI JSON** to your project (copy from this site, use the ZIP above, or vendor the files from `public/risex/abis/` in the docs repository). 3. Instantiate clients (for example `getContract` in viem or `Contract` in ethers) and encode calls with your library’s helpers. For higher-level signing and session flows, see [Contract interface](/docs/risex/contracts/contract-interface/authorization) and the rest of the RISEx documentation. # OrdersManager (/docs/risex/contracts/contract-abi/orders-manager) # OrdersManager Use this ABI when submitting, canceling, or querying orders through the on-chain orders contract. ## ABI The canonical ABI for this contract is published as JSON: **[OrdersManager.json](/risex/abis/OrdersManager.json)** You can open the link in a browser, save the file into your repository, or fetch it from your deployment pipeline. The same file is included when you use **Download all ABIs (ZIP)** on the [Contract ABIs overview](/docs/risex/contracts/contract-abi). ## Integration notes * **viem / wagmi:** Import the JSON (or load it at runtime) and pass it as `abi` to `getContract`, `readContract`, `writeContract`, or equivalent helpers. * **ethers:** Pass the parsed ABI array to `new Contract(address, abi, runner)`. * **Addresses:** Use [Deployments](/docs/risex/contracts/deployments) to resolve the live address for each environment. ## See also * [Contract ABIs overview](/docs/risex/contracts/contract-abi) * [Deployments](/docs/risex/contracts/deployments) # PerpsManager (/docs/risex/contracts/contract-abi/perps-manager) # PerpsManager Use this ABI for perpetual-specific actions and state, alongside addresses listed under Perps in [Deployments](/docs/risex/contracts/deployments). ## ABI The canonical ABI for this contract is published as JSON: **[PerpsManager.json](/risex/abis/PerpsManager.json)** You can open the link in a browser, save the file into your repository, or fetch it from your deployment pipeline. The same file is included when you use **Download all ABIs (ZIP)** on the [Contract ABIs overview](/docs/risex/contracts/contract-abi). ## Integration notes * **viem / wagmi:** Import the JSON (or load it at runtime) and pass it as `abi` to `getContract`, `readContract`, `writeContract`, or equivalent helpers. * **ethers:** Pass the parsed ABI array to `new Contract(address, abi, runner)`. * **Addresses:** Use [Deployments](/docs/risex/contracts/deployments) to resolve the live address for each environment. ## See also * [Contract ABIs overview](/docs/risex/contracts/contract-abi) * [Deployments](/docs/risex/contracts/deployments) # RISExAccessManagerUpgradeable (/docs/risex/contracts/contract-abi/risex-access-manager-upgradeable) # RISExAccessManagerUpgradeable Use this ABI if your integration must check roles, listen for access events, or perform admin operations allowed by the access manager. ## ABI The canonical ABI for this contract is published as JSON: **[RISExAccessManagerUpgradeable.json](/risex/abis/RISExAccessManagerUpgradeable.json)** You can open the link in a browser, save the file into your repository, or fetch it from your deployment pipeline. The same file is included when you use **Download all ABIs (ZIP)** on the [Contract ABIs overview](/docs/risex/contracts/contract-abi). ## Integration notes * **viem / wagmi:** Import the JSON (or load it at runtime) and pass it as `abi` to `getContract`, `readContract`, `writeContract`, or equivalent helpers. * **ethers:** Pass the parsed ABI array to `new Contract(address, abi, runner)`. * **Addresses:** Use [Deployments](/docs/risex/contracts/deployments) to resolve the live address for each environment. ## See also * [Contract ABIs overview](/docs/risex/contracts/contract-abi) * [Deployments](/docs/risex/contracts/deployments) # RISExAuthorization (/docs/risex/contracts/contract-abi/risex-authorization) # RISExAuthorization Use this ABI when you interact with the contract that handles permits, signer registration, allowances, and witness signature verification for the exchange. ## ABI The canonical ABI for this contract is published as JSON: **[RISExAuthorization.json](/risex/abis/RISExAuthorization.json)** You can open the link in a browser, save the file into your repository, or fetch it from your deployment pipeline. The same file is included when you use **Download all ABIs (ZIP)** on the [Contract ABIs overview](/docs/risex/contracts/contract-abi). ## Integration notes * **viem / wagmi:** Import the JSON (or load it at runtime) and pass it as `abi` to `getContract`, `readContract`, `writeContract`, or equivalent helpers. * **ethers:** Pass the parsed ABI array to `new Contract(address, abi, runner)`. * **Addresses:** Use [Deployments](/docs/risex/contracts/deployments) to resolve the live address for each environment. ## See also * [Contract ABIs overview](/docs/risex/contracts/contract-abi) * [Contract interface — authorization](/docs/risex/contracts/contract-interface/authorization) * [Deployments](/docs/risex/contracts/deployments) # RISExOracle (/docs/risex/contracts/contract-abi/risex-oracle) # RISExOracle Use this ABI to read oracle-backed values or to integrate tooling that depends on the same oracle contract the protocol uses. ## ABI The canonical ABI for this contract is published as JSON: **[RISExOracle.json](/risex/abis/RISExOracle.json)** You can open the link in a browser, save the file into your repository, or fetch it from your deployment pipeline. The same file is included when you use **Download all ABIs (ZIP)** on the [Contract ABIs overview](/docs/risex/contracts/contract-abi). ## Integration notes * **viem / wagmi:** Import the JSON (or load it at runtime) and pass it as `abi` to `getContract`, `readContract`, `writeContract`, or equivalent helpers. * **ethers:** Pass the parsed ABI array to `new Contract(address, abi, runner)`. * **Addresses:** Use [Deployments](/docs/risex/contracts/deployments) to resolve the live address for each environment. ## See also * [Contract ABIs overview](/docs/risex/contracts/contract-abi) * [Deployments](/docs/risex/contracts/deployments) # RISExUniversalRouter (/docs/risex/contracts/contract-abi/risex-universal-router) # RISExUniversalRouter Use this ABI when routing through the universal router for swaps or other supported composed calls. ## ABI The canonical ABI for this contract is published as JSON: **[RISExUniversalRouter.json](/risex/abis/RISExUniversalRouter.json)** You can open the link in a browser, save the file into your repository, or fetch it from your deployment pipeline. The same file is included when you use **Download all ABIs (ZIP)** on the [Contract ABIs overview](/docs/risex/contracts/contract-abi). ## Integration notes * **viem / wagmi:** Import the JSON (or load it at runtime) and pass it as `abi` to `getContract`, `readContract`, `writeContract`, or equivalent helpers. * **ethers:** Pass the parsed ABI array to `new Contract(address, abi, runner)`. * **Addresses:** Use [Deployments](/docs/risex/contracts/deployments) to resolve the live address for each environment. ## See also * [Contract ABIs overview](/docs/risex/contracts/contract-abi) * [Deployments](/docs/risex/contracts/deployments)